
Metal Text Effect In Photoshop
In this Photoshop text effects tutorial, we'll learn how to easily create metal text, a popular effect widely used in video games and movie posters! It may seem like there's a lot of steps involved, but once you've done it a few times, creating the effect won't take you more than a few minutes from start to finish. To create the metal texture itself and apply it to the text, we'll be using a couple of layer styles, some filters, layer blend modes, and a clipping mask! I'll be using Photoshop CS5 for this tutorial but any recent version of Photoshop will work.
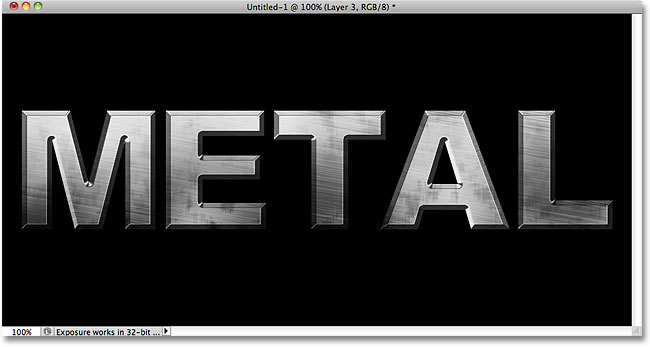
Here's the final result we'll be creating:
Let's get started!
Step 1: Create A New Document
Create a new Photoshop document by going up to the File menu in the Menu Bar at the top of the screen and choosing New, or press Ctrl+N (Win) / Command+N (Mac) on your keyboard for a faster shortcut:

You'll want to create a document that's a little bigger than you need, for reasons we'll see in a moment. I'll make my document 1200 pixels wide by 600 pixels high, and I'll leave the resolution at its default 72 pixels/inch. You can use these same settings to follow along or enter your own values. Set the Background Contents option to White for now, even though we'll be changing it in the next step. Click OK when you're done. Your new document will appear on the screen:

Step 2: Fill The Background With Black
Press the letter D on your keyboard to quickly reset Photoshop's Foreground and Background colors to their defaults if needed, which will set your Foreground color to black. Then press Alt+Backspace (Win) / Option+Delete (Mac) to quickly fill the document with the current Foreground color (black):

Step 3: Add A New Blank Layer
Click on the New Layer icon at the bottom of the Layers panel:
Photoshop adds a new blank layer named "Layer 1" above the Background layer:

Step 4: Fill The New Layer With Light Gray
Go up to the Edit menu at the top of the screen and choose Fill:

When the Fill dialog box appears, click on the drop-down box to the right of the word Use and select Color from the list of options:

As soon as you select Color, Photoshop will pop open the Color Picker so you can choose the color you want to fill the layer with. Choose a light gray. If you want to use the exact shade of gray I'm using, enter 195 for the R, G and B options:

Click OK when you're done to exit out of the Color Picker, then click OK to exit out of the Fill dialog box. Photoshop fills the layer with gray, temporarily hiding the black-filled Background layer from view:

Step 5: Add Noise
Go up to the Filter menu at the top of the screen, choose Noise, and then choose Add Noise:

When the Add Noise dialog box appears, add lots of noise to the image by setting the Amount to around 150%. Make sure the Gaussian and Monochromatic options are selected at the bottom of the dialog box:

Click OK when you're done to exit out of the dialog box. The document should now be filled with noise:

Step 6: Apply The Motion Blur Filter
We're going to use all this noise to create the first part of our metal texture. Go back up to the Filter menu, choose Blur, and then choose Motion Blur:

When the Motion Blur dialog box appears, set the Angle of the blur to around -10°, then increase the Distance to around 200 pixels:

Click OK when you're done to close out of the dialog box. Blurring the noise has created a brushed metal effect:

Step 7: Crop Away The Edges
Back in Step 1, I mentioned you should make your document a bit larger than you need. The reason is because the Motion Blur filter has trouble blurring pixels around the edges of a document, which we can see clearly now in our own document. Let's crop away those unwanted areas. Select Photoshop's Crop Tool from the Tools panel, or press the letter C to select it with the keyboard shortcut:

With the Crop Tool selected, click in the top left corner of the good texture area, then keep your mouse button held down and drag to the bottom right corner of the good texture area. Release your mouse button to view a preview of the area you'll be keeping (the dark area around the edges will be cropped away):

Press Enter (Win) / Return (Mac) to have Photoshop crop away the unwanted edges. Only the good texture now remains:

Step 8: Add Your Text
Select the Type Tool from the Tools panel, or press the letter T to select it with the keyboard shortcut:

With the Type Tool selected, choose your font from the Options Bar along the top of the screen. For best results with this effect, use a font with thick letters. I'm going to use Arial Black:
Once you've chosen a font, click inside the document and add your text. I'll type the word "METAL":

When you're done, click on the checkmark in the Options Bar to accept the text:

Step 9: Resize The Text With Free Transform
Your text will most likely be too small at this point (as mine is), so go up to the Edit menu and choose Free Transform, or press Ctrl+T (Win) / Command+T (Mac) to select Free Transform with the keyboard shortcut:

This places the Free Transform box and handles around the text. To resize the text, hold down your Shift key and drag out any of the four corner handles (the little squares). Keeping the Shift key held down as you drag constrains the aspect ratio of the text so you don't distort the overall shape of it. To move the text, click anywhere inside the bounding box and simply drag it around with your mouse. When you're done, press Enter (Win) / Return (Mac) to accept the changes and exit out of Free Transform:

Step 10: Move The Text Layer Below The Texture Layer
Click on the text layer in the Layers panel and with your mouse button still held down, drag the layer between the gray texture layer (Layer 1) and the Background layer. When you see a highlight bar appear between those two layers, release your mouse button and Photoshop will snap the text layer into place:

Step 11: Create A Clipping Mask
Click on Layer 1 in the Layers panel to select it. Then go up to the Layer menu and choose Create Clipping Mask:

Layer 1 will become indented to the right in the Layers panel, indicating that it's now "clipped" to the text layer below it:

If we look in the document window, we see that the gray texture now appears only inside the text:

Step 12: Add A Bevel And Emboss Layer Style
Click on the text layer in the Layers panel to select it. Then click on the Layer Styles icon at the bottom of the Layers panel:
Choose Bevel and Emboss from the list of layer styles that appears:

This opens Photoshop's Layer Style dialog box set to the Bevel and Emboss options in the middle column. First, change the Technique to Chisel Hard, then increase the Size to around 7 px. Drag the Depth slider towards the right to increase it to around 500%:

In the Shading section of the options, click on the Gloss Contour thumbnail:

This opens the Contour Editor. Click on the Preset drop-down box at the top of the dialog box and choose Ring from the list:

Click OK to exit out of the Contour Editor. Then, back in the main Layer Style dialog box, select the Anti-aliased option to the right of the Gloss Contour thumbnail:

Don't close out of the Layer Style dialog box yet. We still have one more to add, but your text should now look similar to this:
Step 13: Add A Gradient Overlay Layer Style
Click directly on the words Gradient Overlay in the left column of the Layer Style dialog box. You need to click directly on the words themselves, not just in the checkbox, for the Gradient Overlay options to appear:

The middle column of the Layer Style dialog box will change to show options for the Gradient Overlay. By default, Photoshop chooses a gradient based on the current Foreground and Background colors (black and white), but if some other gradient is selected, click on the gradient preview bar:

Then click on the Foreground-to-Background gradient's thumbnail (top left) in the Gradient Editor to select it:

Click OK to close out of the Gradient Editor. Back in the main Layer Style dialog box, change the Blend Mode to Overlay, then lower the Opacity to around 70%. This will add an initial lighting effect to the metal:

Click OK to exit out of the Layer Style dialog box. Here's the effect with the layer styles added:

Step 14: Add A New Layer Set To The Overlay Blend Mode
Click on Layer 1 in the Layers panel to select it. Hold down your Alt (Win) / Option (Mac) key and click on the New Layer icon at the bottom of the Layers panel:
This tells Photoshop to pop open the New Layer dialog box where we can set some options before the new layer is added. Click inside the checkbox to the left of where it says Use Previous Layer to Create Clipping Mask to select the option, then change the Mode (short for Blend Mode) to Overlay. Click OK when you're done to close out of the dialog box. A new blank layer named "Layer 2", set to the Overlay blend mode, will appear above Layer 1 in the Layers panel. Like Layer 1, it will be clipped to the text layer below it:

Step 15: Apply The Clouds Filter
Let's add some random highlights and shadows to the metal effect. For that, we'll use Photoshop's Clouds filter, along with the Overlay blend mode we've already set the layer to. Go up to the Filter menu at the top of the screen, choose Render, and then choose Clouds:

The "clouds" create lots of light and dark areas:

Step 16: Apply The Gaussian Blur Filter
The clouds need to be smoothed out a little so they look more like highlights and shadows. We'll do that by blurring them. Go up to the Filter menu, choose Blur, and then choose Gaussian Blur:

When the Gaussian Blur dialog box appears, drag the slider along the bottom towards the right to increase the Radius value to around 10 pixels:

Here's the image after blurring the clouds:

Step 17: Add A New Layer Set To The Multiply Blend Mode
Once again hold down Alt (Win) / Option (Mac) and click on the New Layer icon at the bottom of the Layers panel to bring up the New Layer dialog box. Select the Use Previous Layer to Create Clipping Mask option by clicking inside its checkbox, then change the Mode to Multiply. Finally, select the Fill with Multiply-neutral color (white) option at the bottom of the dialog box. Click OK when you're done to close out of it and add the new layer:

Step 18: Add Noise
Let's grunge up our metal effect by adding some dirt and scratches to it. Go up to the Filter menu, choose Noise, then choose Add Noise. The Add Noise dialog box will appear with the same settings we used previously. No need to change them, so just click OK to exit out of the dialog box. The text is now filled with noise, and since the layer's blend mode is set to Multiply, only the dark specks of noise are visible:

Step 19: Apply The Median Filter
To turn the noise into something that looks like dirt or scratches, go back up to the Filter menu, choose Noise once again, and then choose Median:

The Median filter is designed to remove noise from an image. Click inside the Radius input box and use the Up arrow on your keyboard to slowly increase its value while keeping an eye on your image in the document window. As you increase the Radius value, the noise will begin to disappear, leaving "clumps" of it behind to create our dirt and scratches effect. A value of around 9 pixels should work. Click OK when you're done to exit out of the dialog box:

Step 20: Lower The Layer Opacity
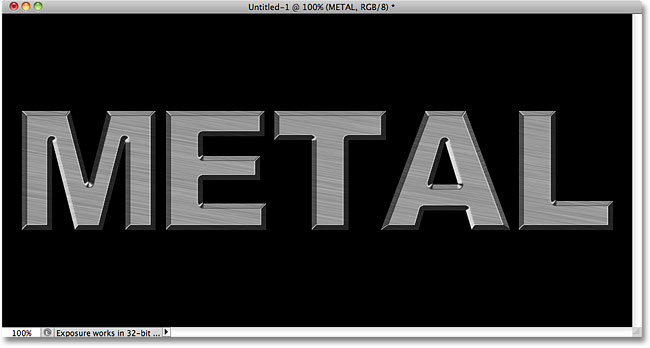
If the dirt and scratches effect looks too dark, lower the opacity of the layer. You'll find the Opacity option in the top right corner of the Layers panel. I'm going to lower mine to around 70%:

And with that, we're done! Here is the final "metal text" effect:
The Text Remains Editable
One of the nice things about creating this metal effect the way we have is that the text remains completely editable, and we can even change the font we're using if we don't like the one we started with! To change the font, simply select the Type Tool from the Tools panel, click on the text layer in the Layers panel to select it, then choose a different font from the Options Bar (you may need to resize the text again using Free Transform - see Step 9). For example, here I've done nothing more than change the font to Trajan Pro Bold:

Here, I've edited the text, changing the word from "METAL" to "STEEL". If you save your document as a Photoshop .PSD file, you can open it again any time you want and edit your text without ever having to recreate the metal texture:

[ads-boottom-float-left]
Where to go next...
And there we have it! Visit our Text Effects or Photo Effects sections for more Photoshop effects tutorials!