
Gold Plated Text Effect In Photoshop
Before we begin: Please note that this tutorial was originally written for Photoshop CS5 and earlier. If you're using Photoshop CC or CS6, you'll want to check out our fully updated Turning Text Into Gold With Photoshop tutorial.
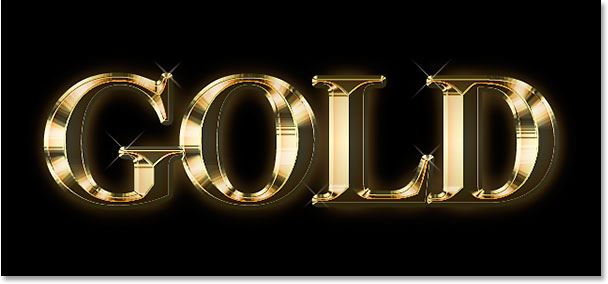
In this Photoshop text effects tutorial, we're going to learn how to turn text into gold using Photoshop's Layer Styles. We'll even throw in some sparkles at the end to make our gold letters really shine.
Here's the effect we're going for:
Let's get started!
Step 1: Open A New Photoshop Document
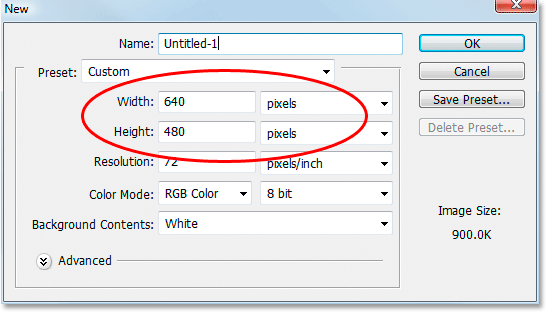
Open a new document in Photoshop by going up to the File menu and choosing New..., or by using the keyboard shortcut, Ctrl+N (Win) / Command+N (Mac). I'm just going to use the 640x480 preset size. You can use whichever size you like for your width and height, and then click OK to create your new Photoshop document:
Watch the video or continue with the written guide below:
Step 2: Fill The Background Layer With Black
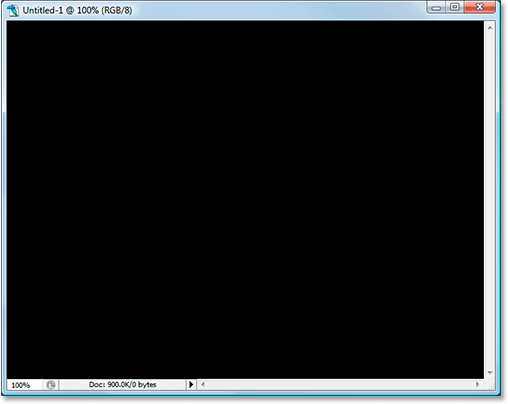
Press D on your keyboard to quickly reset Photoshop's foreground and background colors, which sets black as your foreground color. Then use the keyboard shortcut Alt+Backspace (Win) / Option+Delete (Mac) to fill the Background layer with black:
Step 3: Set Your Foreground Color To White And Add Your Text
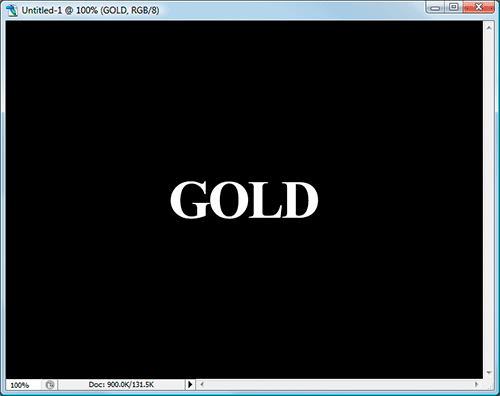
Press X on your keyboard to swap your foreground and background colors so white becomes your foreground color. Select your Type tool from the Tools palette or by pressing T on your keyboard. Choose a font from the Options Bar at the top of the screen, then click inside the Document Window and enter your text. I'm using "Times New Roman Bold" here to keep things simple if you want to follow along. I'll enter the word "GOLD":
Step 4: Resize Your Text With The Free Transform Command
The text is too small at this point, so with the text layer selected in the Layers palette, use the keyboard shortcut Ctrl+T (Win) / Command+T (Mac) to bring up Photoshop's Free Transform box and handles around the text. Hold down Shift+Alt (Win) / Shift+Option (Mac) to have Photoshop constrain the text proportions and resize the text from the center as you drag out any of the corner handles to enlarge the text:

Press Enter (Win) / Return (Mac) when you're done to accept the transformation.
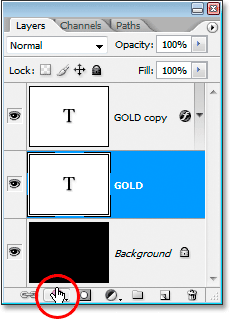
Step 5: Duplicate The Text Layer
Use the keyboard shortcut Ctrl+J (Win) / Command+J (Mac) to quickly duplicate the text layer. You should now have three layers in your Layers palette:
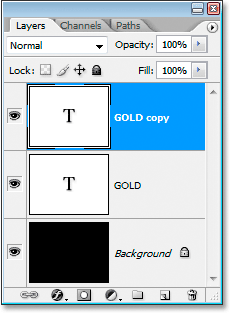
We're going to be working on the text copy layer throughout the next few steps.
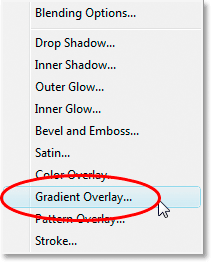
Step 6: Add A Gradient Overlay To The Text
With the text copy layer selected, click on the Layer Styles icon at the bottom of the Layers palette:
Select Gradient Overlay from the list:
This brings up the Layer Style dialog box set to the Gradient Overlay options:
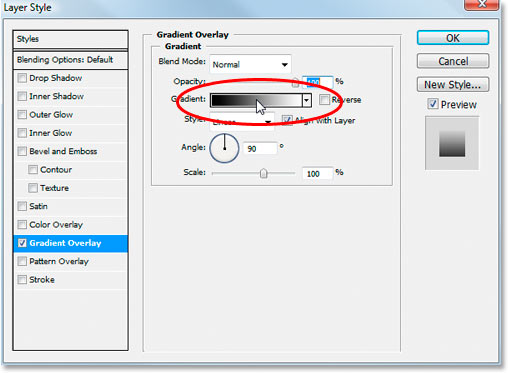
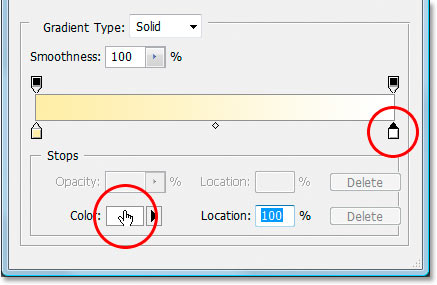
We're going to set the colors for our gradient, so click directly on the gradient preview area (circled in red above) to bring up the Gradient Editor.
Step 7: Select A Lighter And Darker Gold Color For The Gradient
When the Gradient Editor appears, click on the left color marker to select it, and then click on the Color swatch to choose a color for the left side of the gradient:
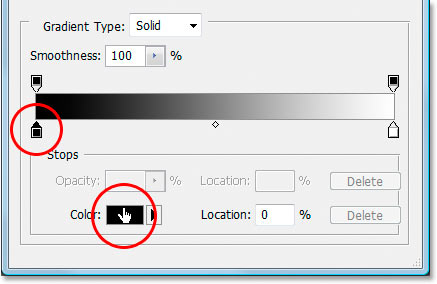
This brings up Photoshop's Color Picker. You can use whichever gold colors you prefer, but if you want to follow along, I've entered a color of R:247, G:238, B:173 which gives us a light gold color (I cheated and sampled the color from a photo of a gold coin):
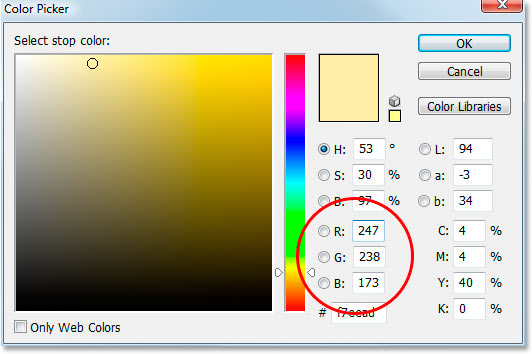
Click OK to accept the color and exit out of the Color Picker. Then, back in the Gradient Editor, click on the right color marker to select it, and then click back on the Color swatch:
When the Color Picker comes back up, enter R:193, G:172, B:81 to give us a darker gold color (also sampled from the gold coin):
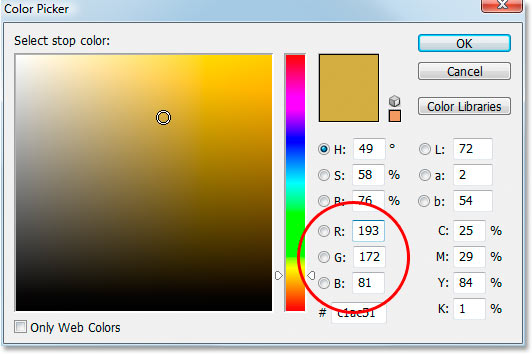
Click OK to exit out of the Color Picker once again, and click OK to exit out of the Gradient Editor as well.
Your text should now look like this:

Don't exit out of the Layer Style dialog box yet. We have more to do.
Step 8: Change The Gradient "Style" To "Reflected"
Back in the Gradient Overlay options in the Layer Style dialog box, click on the down-pointing arrow to the right of the word "Linear" and change the Style of the gradient to Reflected:
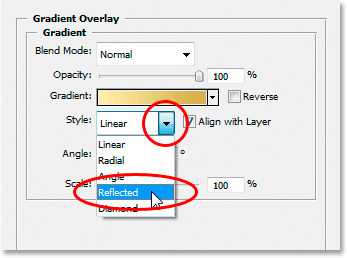
This will add the darker gold color to both the top and bottom of the text, leaving the lighter color in the middle:

Step 9: Select The "Bevel and Emboss" Options
Click directly on the words "Bevel and Emboss" in the layer styles menu along the left of the Layer Style dialog box to switch to the Bevel and Emboss options. Make sure you click directly on the words themselves, not just in the little box beside them, otherwise the options won't appear:
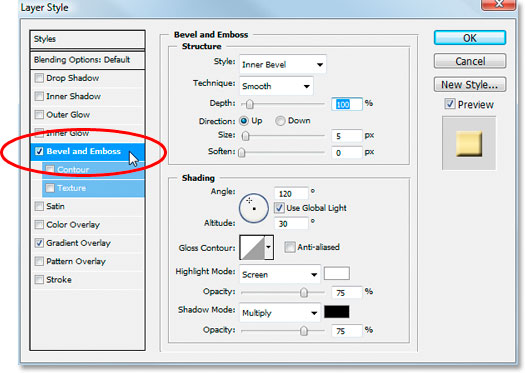
Step 10: Change The "Technique" To "Chisel Hard"
In the Bevel and Emboss Structure options in the middle of the Layer Style dialog box, click on the down-pointing arrow to the right of the word "Smooth" and change the Technique to Chisel Hard:

Step 11: Change The "Gloss Contour" To "Ring Double"
In the Shading options below the Structure options, click on the down-pointing arrow to the right of the word "Gloss Contour" and select Ring - Double, which is on the bottom row, third from the left:

Select the Anti-Aliased option as well to prevent our text from getting the "jaggies".
Here's the text at this point:

Step 12: Increase The Structure "Size" To Close Up The Open Space Inside The Letters
Go back up to the Structure options at the top of the Layers styles dialog box and drag the Size slider bar to the right until you've closed up the open spaces inside the letters. Here I've dragged mine to a value of 16 pixels:
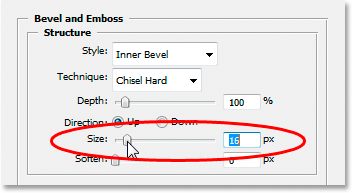
The open spaces are now gone:

Step 13: Increase The Structure "Depth" To Enhance The Lighting Effect
Next, drag the Depth slider to the right to enhance the lighting effect on the letters. I've dragged mine to a value of 171%:
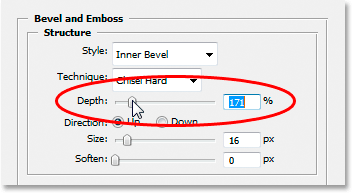
Now things are starting to look good:

Step 14: Turn On The "Contour" In The Layer Style Menu
Next, click inside the checkbox to the left of the word Contour on the left of the Layer Style dialog box, directly below the "Bevel and Emboss" option. This will enhance our gold effect even further. There's no need to change any options for it, so just click inside the checkbox to enable it:
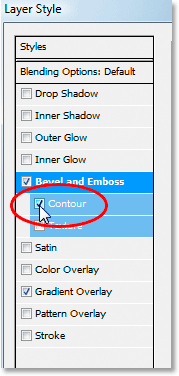
Here's the text with "Contour" enabled:

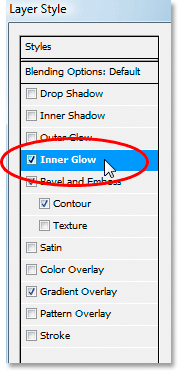
Step 15: Add An Inner Glow
One last thing to do here before we exit out of the Layer Style dialog box and switch to the original text layer. We're going to add an Inner Glow effect to enhance our gold colors. To do that, click directly on the words Inner Glow on the left of the Layer Style dialog box to enable it and bring up its options:
Change the options that I've circled here:
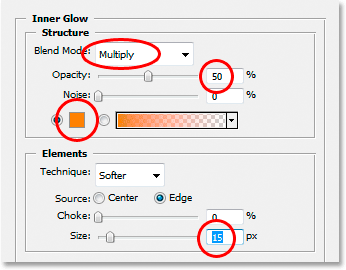
First, change the Blend Mode to Multiply. Then lower the Opacity to 50%. Click on the color swatch directly below the word "Noise", which brings up the Color Picker. Enter R:232, G:128, B:31 to give us an orange color (this one was sampled from a photo of a gold brick) and click OK to exit out of the Color Picker. Finally, increase the glow Size to 15 pixels.
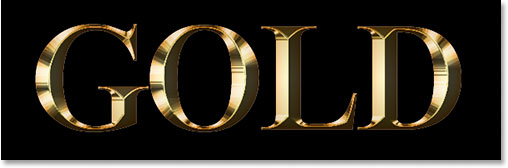
When you're done, you can click OK to exit out of the Layer Style dialog box. Your text should now look something like this:
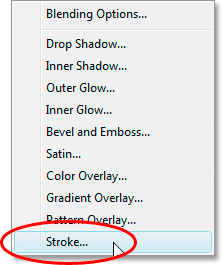
Step 16: Add A Stroke To The Original Text Layer
We're done with the text copy layer at this point. Now we're going to work on the original text layer, so click on it in the Layers palette to select it. We're going to head back to the Layer Style dialog box once again, so click on the Layer Styles icon at the bottom of the Layers palette:
This time, select Stroke at the bottom of the list:
This will bring the Layer Style dialog box back up, set to the Stroke options. Change the options that I've circled below:
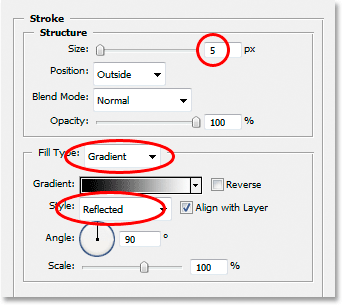
First, increase the stroke Size to 5 pixels. Then change the Fill Type from "Color" to Gradient. We're going to be using the same gradient colors for the stroke that we used on the text. Before we go setting gradient colors though, change the gradient Style to Reflected.
Step 17: Set The Stroke Gradient To The Same Colors As The Text
Click directly on the gradient preview area in the Stroke options:
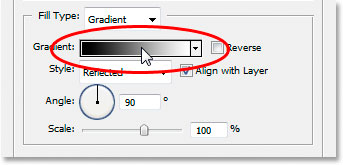
This will once again bring up the Gradient Editor. Set the colors for the gradient to the same colors we used on the text. For the left color, use R:247, G:238, B:173, and for the color on the right, use R:193, G:172, B:81. Click OK to exit out of the Gradient Editor once you've set the colors, and your text should look like this:

Step 18: Apply The "Bevel and Emboss" Style To The Stroke
Click directly on the words Bevel and Emboss in the menu on the left of the Layer Style dialog box to once again enable it and bring up its options. This time, rather than adding a bevel and emboss style to the text, we're going to add it to the stroke. Change the options that I've circled below:
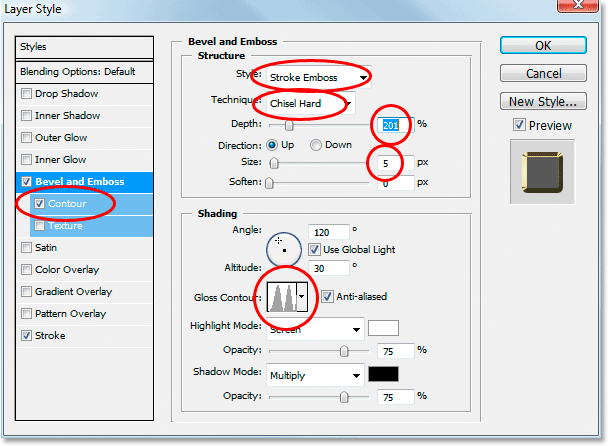
First, in order to apply these settings to the stroke, we need to change the top option, Style to Stroke Emboss. Now all of these settings will be applied to our stroke. Change the Technique to Chisel Hard once again. Set the Size to 5 pixels. In the "Shading" section, click on the down-pointing arrow to the right of the words Gloss Contour and once again select that Ring - Double option, which is the third one from the left on the bottom row. Finally, over on the left in the menu area, once again click inside the Contour checkbox to enable it.
After applying the Bevel and Emboss style to the stroke, your text should now look like this:

Step 19: Apply The "Outer Glow" Style
One last thing to do here in the Layer Styles dialog box. We're going to add a bit of a glow to the text, as if some light was reflecting off the gold. Click directly on the words Outer Glow in the menu on the left to turn on the Outer Glow style and bring up its options, then change the options I've circled below:
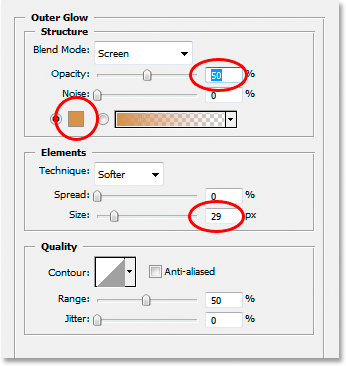
First, lower the Opacity value to 50%. Then click on the color swatch directly below the word "Noise", which brings up Photoshop's Color Picker. Enter in R:183, G:145, G:79 for the color (another gold brick photo sample) and click OK to exit out of the Color Picker. Finally, set the Size to around 29 pixels, and then click OK to exit out of the Layer Styles dialog box.
The text now has a faint glow around it:

One thing left to do...
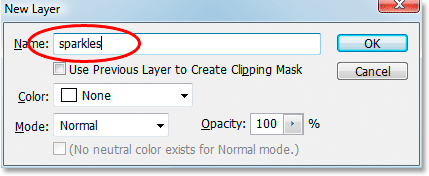
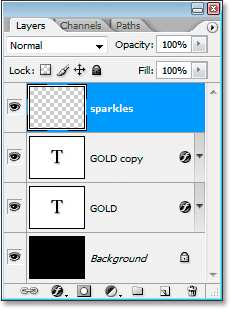
Step 20: Add A New Blank Layer Above The Text Copy Layer
Click on the text copy layer in the Layers palette to select it, then press the keyboard shortcut Ctrl+Shift+N (Win) / Command+Shift+N (Mac) to bring up the New Layer dialog box. Name the new layer "sparkles", and click OK:
We now have our new blank layer in the Layers palette:
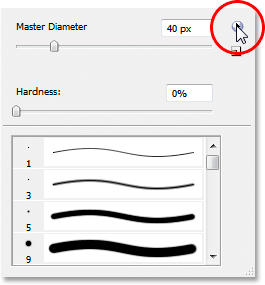
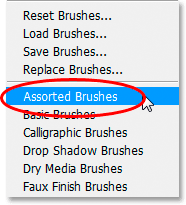
Step 21: Load The "Assorted Brushes"
We're going to add some sparkles to our gold text to really make it shine, and we're going to use a brush for that. But first, we need to load in some new brushes. Grab the Brush tool from the Tools palette or press B on your keyboard to quickly select it. Then right-click (Win) / Control-click (Mac) anywhere inside the Document Window to bring up the Brush options menu, and click on the small right-pointing arrow in the top right corner:
Click on the Assorted Brushes in the long list that appears to select them:
Photoshop will ask you if you want to replace the current brushes with these new brushes or simply append them to the existing ones. Click Append:

Step 22 Sample A Light Gold Color From The Text With The Eyedropper Tool
Grab the Eyedropper tool from the Tools palette or press I to quickly select it, and then click on one of the lightest areas in the text to sample that color. We're going to use that color for our sparkles:

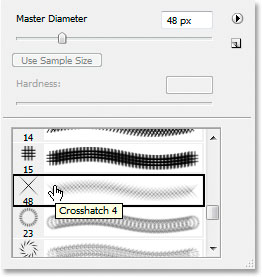
Step 23: Select One Of The "Crosshatch" Brushes To Use As A Sparkle
With your light gold color sampled, switch back to your Brush tool again, and then once again right-click (Win) / Control-click (Mac) anywhere inside the Document Window to bring up the Brush options menu. Scroll down the list of available brushes until you come across one that looks like a fancy "X". If you have Tool Tips turned on in your Photoshop Preferences, you'll see that the brush is named "Crosshatch", as we can see here:
Step 24: Paint A Few Randomly Placed Sparkles Around The Text
With your brush selected and your sampled color ready to go, click in a few random locations around the text to add some sparkles. Change the brush size after each click to add even more randomness by using the right and left bracket keys to increase or decrease the brush size on the fly. Adding sparkles is fun, but too many is too many, so only add a few. A couple of larger ones and a couple of smaller ones should do it.
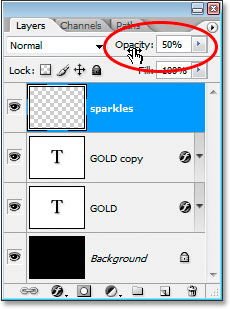
If you find your sparkles look too intense, lower the opacity of the "sparkles" layer. Here I've lowered mine down to 50%:
Once you've added your sparkles and lowered the opacity to your liking, you've completed the gold lettering effect! Here's my final "Gold-Plated Text" effect result:
And there we have it! Now that you've created the gold text, check out Part 2 where I show you how to easily move the effect onto a different background! Or visit our Text Effects or Photo Effects sections for more tutorials!