
Ghostly Blur Text Effect In Photoshop
In this Photoshop tutorial, we'll learn how to give text a ghostly, supernatural look to it using a couple of simple blur filters. I'll be using Photoshop CS5 throughout the tutorial but any recent version of Photoshop will work.
Here's what the final result will look like:
Let's get started!
Step 1: Rasterize The Type
Here's the document I'm starting with, which is just the word "BLUR" typed in white in front of a solid black background. I used Arial Bold for the font:

If we look in the Layers panel, we see the Type layer sitting above the black Background layer:

Make sure the Type layer is selected in the Layers panel (selected layers are highlighted in blue), then go up to the Layer menu in the Menu Bar along the top of the screen, choose Rasterize, then choose Type:

"Rasterizing" type just means we're converting it from editable text into pixels, which we need to do before Photoshop will let us apply any filters to it. Nothing will appear to have changed in the document window, but we can see in the Layers panel that the Type layer has become a normal pixel-based layer:

Step 2: Make Three Copies Of The Layer
We need to make three copies of our rasterized text, so go up to the Layer menu, choose New, then choose Layer via Copy, or press Ctrl+J (Win) / Command+J (Mac) to access the same command with the faster keyboard shortcut:

Either way tells Photoshop to make a copy of the layer and place it above the original:

Do the same thing two more times, either by choosing Layer > New > Layer via Copy twice or by pressing Ctrl+J (Win) / Command+J (Mac) twice, although the keyboard shortcut is much faster. When you're done, you should have 4 text layers, plus the Background layer on the bottom:

Step 3: Select The Original Text Layer
Click on the original text layer in the Layers panel (the one directly above the Background layer) to select it:

Step 4: Apply The Motion Blur Filter
Go up to the Filter menu at the top of the screen, choose Blur, then choose Motion Blur:

This opens Photoshop's Motion Blur dialog box. Let's start by adding a vertical motion blur to the text. Change the Angle of the blur to 90°, then begin dragging the Distance slider at the bottom of the dialog box towards the right to increase the amount of blurring. Keep an eye on the document window as you drag the slider to judge the results. I'm going to set my Distance value to around 150 pixels which I think looks good with my image, but the value you use may be different depending on the size and resolution of your document:

When you're done, click OK to close out of the dialog box. Your vertical motion blur effect should look similar to this:

Step 5: Select The Layer Above It
Click on the layer above the original text layer in the Layers panel (the layer that says "copy" after its name) to select it:

Step 6: Apply The Motion Blur Filter Again
Press Ctrl+Alt+F (Win) / Command+Option+F (Mac) on your keyboard. This is a quick way to access the last filter we used, which in our case was the Motion Blur filter. Photoshop will re-open the filter's dialog box for us so we can make any changes we need before the filter is applied. This time, we'll add a horizontal motion blur, so change the Angle to 0°. You can leave the Distance option set to the same value you used last time:

Click OK to close out of the dialog box. Photoshop applies a horizontal motion blur to the layer:

Step 7: Merge The Two Layers Together
Go up to the Layer menu and choose Merge Down, or press Ctrl+E (Win) / Command+E (Mac) on your keyboard:

Photoshop will merge the two motion blur layers together in the Layers panel, leaving us with three text layers:

Step 8: Apply The Gaussian Blur Filter
The edges of the motion blur effect look too sharp, so let's apply a different type of blurring to soften them. Go up to the Filter menu once again, choose Blur, then choose Gaussian Blur:

This opens the Gaussian Blur dialog box. Drag the Radius slider at the bottom a little towards the right to add a small amount of blurring, just enough to soften the edges of the motion blur effect. A Radius value of around 2 pixels should be enough, although you may need to use a higher value for a larger document. As always, keep an eye on the document window as you drag the slider to judge the results:

Click OK to close out of the dialog box. The edges of the motion blur now appear softer:

Step 9: Select The Layer Above It
Click on the layer directly above the merged layer (the one with "copy 2" in the name) to select it:

Step 10: Apply The Gaussian Blur Filter
Press Ctrl+Alt+F (Win) / Command+Option+F (Mac) on your keyboard. This again re-opens the dialog box for last filter we used, which this time was the Gaussian Blur filter. We'll use the Gaussian Blur filter here to add a glow effect around the letters in the text. Drag the Radius slider towards the right and as you drag, you'll see a glow begin to appear around the text. I'm going to increase my Radius value to 8 pixels, which gives my letters a subtle, soft glow:

Click OK to once again close out of the dialog box. We can now see the soft glow around the text:

Step 11: Select The Top Layer
Select the top layer in the Layers panel, which is the only text layer we haven't applied any filters to:

Step 12: Merge The Layer With The Layer Below It
Just as we did in Step 7, go up to the Layer menu and choose Merge Down, or press Ctrl+E (Win) / Command+E (Mac) for the keyboard shortcut. This will merge the top layer with the blurred "glow" layer below it, leaving us with just two text layers:

Step 13: Add A Layer Mask
Click on the Layer Mask icon at the bottom of the Layers panel:

A layer mask thumbnail appears on the top layer, letting us know that a mask has been added:

Step 14: Select The Gradient Tool
Select Photoshop's Gradient Tool from the Tools panel:

Step 15: Choose A White To Black Gradient
With the layer mask selected (the mask thumbnail in the Layers panel will have a white highlight border around it letting you know it's selected), press the letter D on your keyboard to quickly reset Photoshop's Foreground and Background colors if needed, which sets the Foreground color to white and the Background color to black. Then right-click (Win) / Control-click (Mac) anywhere inside the document window to quickly open the Gradient Picker and choose the white to black gradient (top left corner - it's actually the Foreground to Background gradient) by clicking on its thumbnail. Press Enter (Win) / Return (Mac) when you're done to close out of the Gradient Picker:

Step 16: Select The "Reflected Gradient" Option
In the Options Bar along the top of the screen, click on the Reflected Gradient icon to change the style of gradient we're about to draw:

Step 17: Draw A Gradient On The Layer Mask
With the Reflected Gradient option selected, click anywhere along the horizontal center of the text to set the starting point for the gradient. Then hold down your Shift key and, with your mouse button still held down, drag straight up to the top of the text. Holding the Shift key as you drag makes it easier to drag straight upward:

Release your mouse button at the top of the text, at which point Photoshop draws the reflected gradient on the layer mask, leaving only the middle of the text completely visible, then gradually fading away towards the top and bottom of the letters, allowing the motion blur effect behind them to show through:

Step 18: Duplicate The Layer
Press Ctrl+J (Win) / Command+J (Mac) on your keyboard to quickly duplicate the layer:

This makes the glow effect more intense, giving the text more of a "ghostly" appearance:

You can increase the glow even more simply by duplicating the layer again. I'll press Ctrl+J (Win) / Command+J (Mac) to make another copy of the layer:

Things are definitely starting to look spooky at this point:

Step 19: Add A Hue/Saturation Adjustment Layer
As a final step, let's colorize the effect. Click on the New Adjustment Layer icon at the bottom of the Layers panel:

Choose Hue/Saturation from the list of adjustment layers that appears:

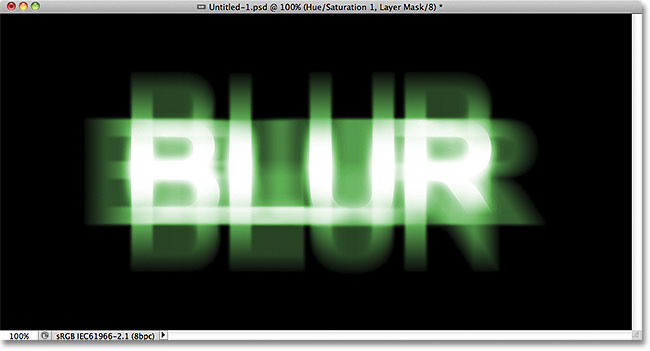
If you're using Photoshop CS4 or CS5, the controls and options for the Hue/Saturation adjustment layer will appear in the Adjustments Panel. For CS3 and earlier, a separate dialog box will open. First, select the Colorize option by clicking inside its checkbox. Then drag the Hue slider to select a color to use, and drag the Saturation slider to adjust the intensity of the color. I'm going to choose a ghostly green by setting my Hue value to 123, then I'll increase the Saturation value to 40:

For Photoshop CS3 and earlier users, click OK to close out of the dialog box when you're done. CS4 and CS5 users can leave the Adjustments Panel open. And with that, we're done! Here, after colorizing the text, is my final "ghostly blur" effect:
And there we have it! Visit our Text Effects or Photo Effects sections for more Photoshop effects tutorials!