
Classic Vignette Photo Effect With Photoshop
In this Photoshop tutorial, we'll learn how to add a timeless, classic vignette effect to a photo, perfect for wedding and engagement photos, anniversaries and other family portraits!
Creating the effect is easy and once you're familiar with the steps, it takes no more than a couple of minutes from start to finish. I'm using Photoshop CS5 here but any recent version of Photoshop will work.
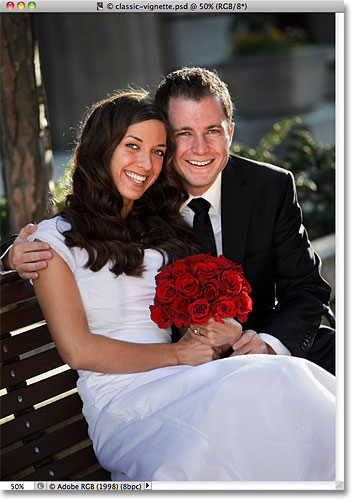
Here's the photo I'll be starting with:
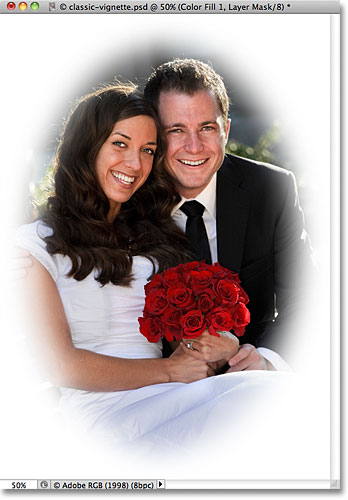
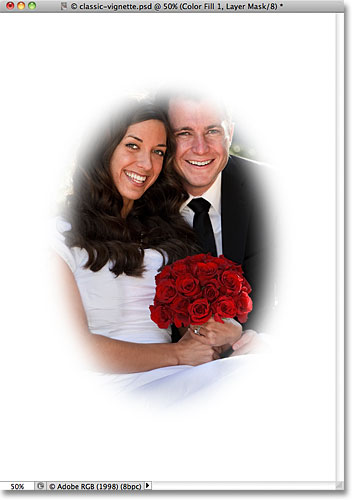
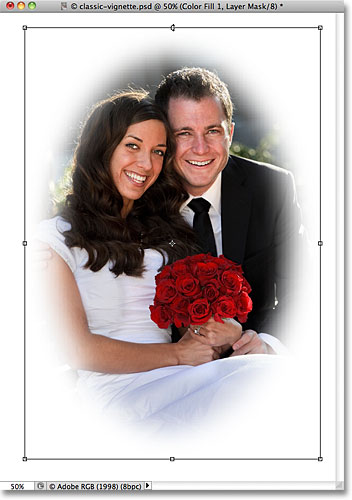
Here's what the final result will look like:
How To Create A Classic Vignette Effect
Step 1: Add A White Solid Color Fill Layer
With the photo newly opened in Photoshop, we'll start by filling our document with white, which will become the color of the vignette border. Normally, we would simply add a new blank layer to the document and then use Photoshop's Fill command to fill the new layer with white, but let's do something different. Click on the New Fill or Adjustment Layer icon at the bottom of the Layers panel (it's the circle split diagonally between black and white):
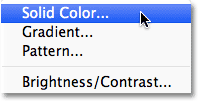
This opens a list of all the fill and adjustment layers we can choose from. Select a Solid Color fill layer from the top of the list:
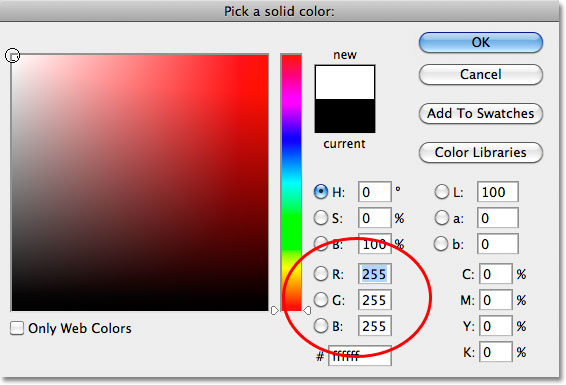
As its name implies, a Solid Color fill layer lets us quickly fill the document with a solid color. As soon as you choose Solid Color from the list, Photoshop pops open the Color Picker so we can select the color we want to use. Choose white, either by clicking in the top left corner of the large color selection box on the left or by entering 255 for the R, G and B values near the bottom center of the dialog box:
Click OK to close out of the Color Picker, and the document is now filled with solid white:
Step 2: Select The Layer Mask
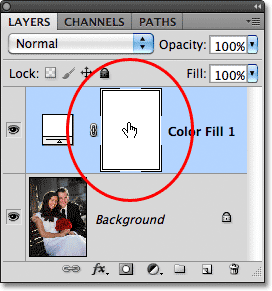
So why did we use a Solid Color fill layer here instead of just adding a normal layer and filling it with white? The reason is because the next thing we need to do is add a layer mask to the white-filled layer, but Photoshop's fill layers, like the Solid Color one we just added, already come with a built-in layer mask so there's no need for us to add one ourselves! If we look in the Layers panel, we see the fill layer, which Photoshop named "Color Fill 1", sitting above the original image on the Background layer, and we see the layer mask thumbnail directly to the left of the layer's name. Click on the mask thumbnail to select it. A highlight border will appear around the thumbnail letting you know the layer mask itself is now selected:
Step 3: Select The Elliptical Marquee Tool
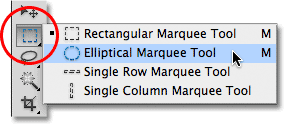
Select the Elliptical Marquee Tool from the Tools panel. By default, it's hiding behind the Rectangular Marquee Tool, so click on the Rectangular Marquee Tool and hold your mouse button down for a second or two until a fly-out menu appears showing the other tools available in that spot, then choose the Elliptical Marquee Tool from the list:
Step 4: Drag Out An Elliptical Selection Outline
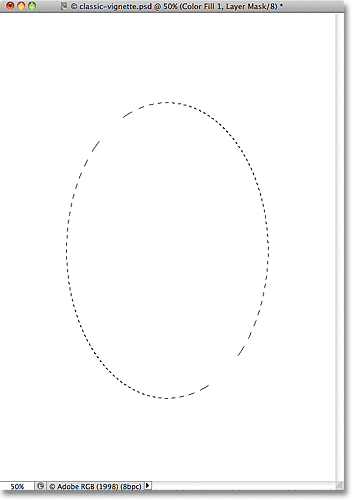
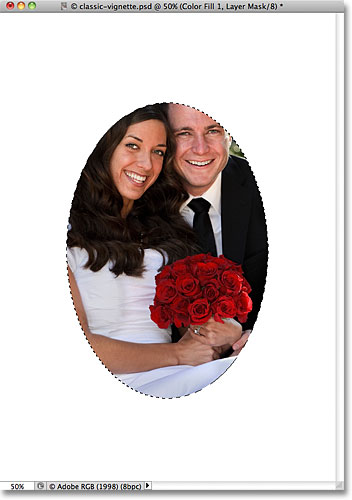
With the Elliptical Marquee Tool selected, click inside the document and drag out an elliptical selection outline in the center of the document. You can move the selection outline around to reposition it as you're drawing it by holding down your spacebar and dragging it to a new location. Release your spacebar to continue dragging out the selection. Don't worry about its exact size, shape or position for now because we can easily fix things up later. All we need at the moment is an initial elliptical selection outline:
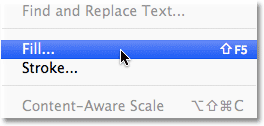
Step 5: Fill The Selection With Black
Go up to the Edit menu in the Menu Bar along the top of the screen and choose Fill:
This opens the Fill dialog box. Change the Use option at the top of the dialog box to Black:
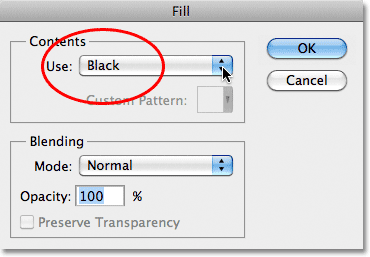
Click OK to close out of the Fill dialog box. Photoshop fills the selection with black, and because we had the layer mask selected on the Solid Color fill layer, the black effectively punches a hole through the fill layer, revealing the original photo on the Background layer behind it:
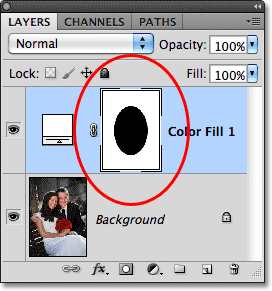
The layer mask thumbnail in the Layers panel shows us the area we filled with black:
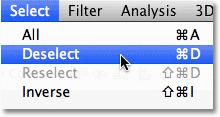
Step 6: Deselect The Selection
We don't need our selection outline anymore, so to remove it from the document, go up to the Select menu at the top of the screen and choose Deselect. You can also press Ctrl+D (Win) / Command+D (Mac) to quickly deselect it using the keyboard shortcut if you prefer:
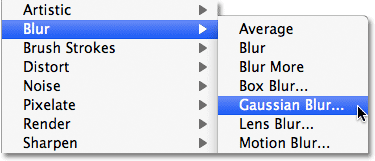
Step 7: Apply The Gaussian Blur Filter
To soften the edges of the vignette border, we'll use Photoshop's Gaussian Blur filter. Go up to the Filter menu at the top of the screen, choose Blur, then choose Gaussian Blur:
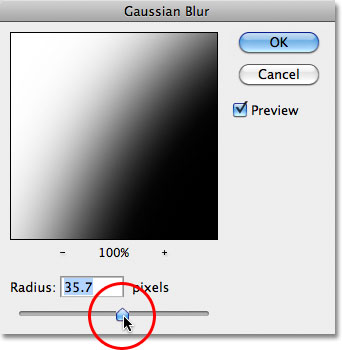
This opens the Gaussian Blur dialog box. Keep an eye on your image as you begin dragging the Radius slider at the bottom of the dialog box towards the right. The further to the right you drag the slider, the more blurring you'll apply to the vignette edges and the softer they'll become. The exact Radius value you end up using will depend on the size of the image you're working with. For me, a value of around 35 pixels works well, but your value may be different:
Click OK when you're done to close out of the dialog box. Your vignette edges should now appear softer:
Step 8: Reshape And Move The Border With Free Transform
With the photo border edges now softened, the only thing left to do is fine-tune it by resizing, reshaping and moving it as needed, and we can do all of that easily with Photoshop's Free Transform command. Go up to the Edit menu at the top of the screen and choose Free Transform. You can also press Ctrl+T (Win) / Command+T (Mac) to quickly access Free Transform with the keyboard shortcut:
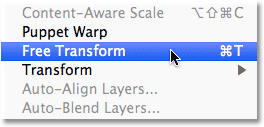
This places Photoshop's Free Transform box and handles around the photo border. To resize and reshape it, simply click on any of the handles (the little squares) and drag them. If you hold down your Alt (Win) / Option (Mac) key as you're dragging a handle, you'll resize the border from its center rather than from the side or corner. To move the border, simply click anywhere inside the bounding box and drag it around with your mouse. Continue dragging the handles and moving the border until you're happy with the way it looks. When you're done, press Enter (Win) / Return (Mac) to accept the changes and exit out of the Free Transform command:
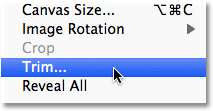
Step 9: Trim Away Any Extra White Space
Finally, if you want to trim away any extra white space around the image, go up to the Image menu at the top of the screen and choose Trim:
This opens the Trim dialog box. Select the Top Left Pixel Color option in the top half of the dialog box if it's not already selected, and leave the Top, Bottom, Left and Right options selected in the bottom half of the dialog box:
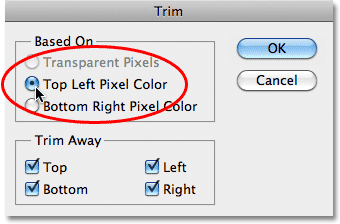
Click OK to close out of the dialog box, and Photoshop trims away any extra white space around the image, leaving us with our final vignette result: