
Adding Sunlight Through Trees With Photoshop
Before we begin... This version of our Adding Sunlight Through Trees tutorial was originally published for Photoshop CS5 and earlier. If you're using Photoshop CC or CS6, please see our updated and expanded Sunlight Through Trees Effect tutorial.
In this Photoshop Effects tutorial, we're going to learn how to add beams of sunlight through trees, which is not only a great way to make an image look more interesting, it's also a lot easier to do than you might think, as we'll see.
We'll even finish things off by making the sunbeams appear to be shining on the ground after they pass through the trees, which adds more realism to the final effect.
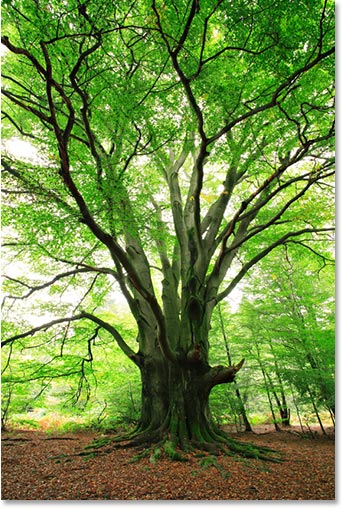
Here's the image I'll be starting with in this Photoshop tutorial:
And here's what it will look like after we add our sunbeams:

This tutorial is from our Photo Effects series. Let's get started!
Step 1: Find The Color Channel With The Highest Contrast
With our image open in Photoshop, the first thing we need to do is find out which of our three color channels (Red, Green and Blue) contains the highest amount of contrast. To do that, switch over to your Channels palette, which by default is grouped in beside your Layers palette. You'll see the "Red", "Green" and "Blue" channels listed, which combine to create all the colors we see in our image. You'll also see what appears to be a fourth channel, the "RGB" channel at the top, but it's really just the composite of the Red, Green and Blue channels ("RGB" stands for "Red, Green and Blue") and isn't a channel itself:

We're interested in the three color channels, and what you want to do is click on each channel while keeping an eye on your image to see which one of them gives us the highest amount of contrast in the image.
Click on the Red channel first and you'll see your image turn black and white. Remember what it looks like, then click on the Green channel. You'll see a different looking black and white version of the image. Again, remember what it looks like, then click on the Blue channel for a third black and white version of the image. You want to choose the version that offers the highest amount of contrast, and chances are, if the image you're working on looks similar to mine, it will be the Blue channel with the highest contrast. Here's what my Blue channel looks like. The sky in the background is nice and bright while the trees and ground are very dark, exactly what I was looking for:

Step 2: Make A Copy Of The Channel
Now that I know my Blue channel is the one that offers the highest amount of contrast, I need to make a duplicate of it. To copy a channel, simply click on it and drag it down onto the New Channel icon at the bottom of the Channels palette (it's the second icon from the right):

Release your mouse button and you'll see the copy of the channel below all the other channels in the Channels palette. Since I copied my Blue channel, Photoshop named the duplicate "Blue copy":

Step 3: Darken The Dark Areas Further With The Levels Command
We need to increase the contrast even further in our copied channel by making the dark areas completely black, and we can do that easily with Photoshop's Levels command. To access Levels, either go up to the Image menu at the top of the screen, choose Adjustments, and then choose Levels, or for a faster way, use the keyboard shortcut Ctrl+L (Win) / Command+L (Mac). Either way brings up the Levels dialog box. Directly below the Histogram (the black graph that looks like a mountain range) in the center, you'll see three little sliders - a black one on the left, a white one on the right, and a gray one in the middle. Click on the black one on the left and begin dragging it towards the right. As you drag the slider, you'll see the dark areas in your image becoming even darker. Continue dragging the slider towards the right until all the dark areas in the image appear to be filled with black:

Click OK when you're done to exit out of the dialog box. Here's my image after dragging the slider. The dark areas now appear filled in with black while the sky in the background remains nice and bright:

Step 4: Load The Channel As A Selection
Hold down your Ctrl (Win) / Command (Mac) key and click directly on the channel in the Channels palette:

This loads the channel as a selection in the image:

Step 5: Add A New Blank Layer
Switch over to your Layers palette at this point and click on the New Layer icon at the bottom to add a new blank layer:
![]()
You'll see your image turn back into a full color image as soon as you click on the icon, and Photoshop adds a new blank layer named "Layer 1" above the Background layer in the Layers palette:

Step 6: Fill The Selection With White
Press the letter D on your keyboard to reset your Foreground and Background colors if needed, which sets black as your Foreground color and white as your Background color. Then use the keyboard shortcut Ctrl+Backspace (Win) / Command+Delete (Mac) to fill the selection with white on the new layer. It may not be easy to tell that anything has happened if your sky was already fairly white to begin with as mine is, which is why I haven't included a screenshot here, but we've now filled the sky area with solid white and we're going to use it to create our sunbeams.
Step 7: Duplicate The New Layer
With "Layer 1" selected in the Layers palette (the currently selected layer is highlighted in blue), use the keyboard shortcut Ctrl+J (Win) / Command+J (Mac) to duplicate the layer. A copy of the layer, which Photoshop names "Layer 2", appears at the top of the Layers palette:

Step 8: Apply The "Radial Blur" Filter To "Layer 2"
We're now going to create our sunbeams. With "Layer 2" selected in the Layers palette, go up to the Filter menu at the top of the screen, choose Blur, and then choose Radial Blur. This brings up the Radial Blur filter's dialog box. Increase the Amount option at the top to somewhere around 80, although this value will depend on the size of your image and how long you need your sunbeams to be. The higher you set this value, the longer they'll be, so you'll probably need to experiment a little here. Select Zoom for the Blur Method, which is what's going to give us our sunbeam shapes, and set the Quality option to Best. If you're running Photoshop on a slower computer and you're simply experimenting at this point with the Amount value, you may want to set the Quality option to either "Good" or "Draft", which will give you lower quality sunbeams while you're experimenting but won't take as long for Photoshop to render them. You'll want to set it to "Best" though when you're ready to create the actual effect.
In the bottom right corner of the dialog box, you'll see the Blur Center option. This is where we tell Photoshop where want the sunbeams to start from (the spot where they'll "zoom" out from). The square area represents your image (even though your image probably isn't square). Click in the general spot where you want the sunbeams to be coming from. I want my sunbeams to start from approximately a quarter of the way down from the top center of the image, so that's where I've clicked inside the square:

Click OK when you're done to exit out of the dialog box and have Photoshop create our first batch of sunbeams:

The sunbeams don't really stand out very well just yet, but we'll fix that next.
Step 9: Add An "Outer Glow" Layer Style
To make our sunbeams stand out a bit more, let's add a glow to them. Click on the Layer Styles icon at the bottom of the Layers palette (the icon that looks like the letter "f"):

Then choose Outer Glow from the list of layer styles that appears:
This brings up Photoshop's Layer Style dialog box set to the Outer Glow options in the middle column. No need to change any of the settings here. The defaults work fine for our sunbeams, so simply click OK to exit out of the dialog box and apply the Outer Glow effect:

The sunbeams now stand out much better with the Outer Glow applied to them:

Step 10: Change The Layer Blend Mode To "Soft Light"
The sunbeams are a little too intense now though, so let's make them look a bit more realistic, and we can do that simply by changing the blend mode of the layer they're on. With "Layer 2" still selected, go up to the blend mode options in the top left corner of the Layers palette. By default, the blend mode is set to "Normal". Click on the down-pointing arrow to the right of the word "Normal" and select the Soft Light blend mode from the list:

Here's my image after changing the blend mode to "Soft Light":

Step 11: Duplicate "Layer 2"
With "Layer 2" still selected, press Ctrl+J (Win) / Command+J (Mac) to duplicate it. Photoshop copies the layer, adds it above "Layer 2" in the Layers palette, and names it "Layer 2 copy":

Step 12: Lengthen The Sunbeams With The "Free Transform" Command
We now have two copies of our sunbeams, one on "Layer 2" and the other on "Layer 2 copy". Let's make the sunbeams on "Layer 2 copy" longer to add some variety to them, and we can do that easily using Photoshop's Free Transform command. Before we do that though, if you're currently working with your image inside a document window, press the letter F on your keyboard to switch your screen mode to Full Screen Mode With Menu Bar, which will make it a lot easier to see what you're doing. Then press Ctrl+T (Win) / Command+T (Mac) to bring up the Free Transform box and handles around the image.
If you look closely in the center of the image, you'll see a little target icon. Click on it and drag it up into the same location your sunbeams are zooming out from:
![]()
Once you've moved the target icon into its new location, hold down Shift+Alt (Win) / Shift+Option (Mac) and drag any of the corner handles outward to stretch out the sunbeams. By holding down the "Shift" key as we drag, we tell Photoshop to constrain the proportions of the image, and holding down "Alt/Option" tells Photoshop to use the location of that little target icon we moved a moment ago as the center of the transformation, so the beams of light stretch out from that point. Here, I'm dragging out the bottom left handle to make the sunbeams longer:

Press Enter (Win) / Return (Mac) when you're done to accept the transformation.
Step 13: Resize And Reposition "Layer 1" To Create The Ground Reflections
At this point, our beams of light through the trees are complete, but let's finish things off and add a bit more realism by making them appear to be shining on the ground after they pass through the trees. If you remember from earlier in the tutorial, we created a selection from the channel we copied, then added a new layer ("Layer 1") and filled it with white. Up until now, we haven't done anything with that layer, but we're going to use it right now to create the light shining on the ground.
To do that, first click on "Layer 1" in the Layers palette to select it. Then once again press Ctrl+T (Win) / Command+T to bring up the Free Transform box and handles. Click anywhere inside the image (except for on the target icon in the center) and drag the image down until the white-filled areas are appearing over the ground. These white-filled areas are going to become the light shining on the ground. You'll most likely also need to resize them by dragging the top and bottom center handles inward to "squish" them a bit into position:

Press Enter (Win) / Return (Mac) when you're done to accept the transformation.
Step 14: Change The Blend Mode Of "Layer 1" To "Overlay"
Finally, to make the white-filled areas look more like light shining on the ground and less like, well, white-filled areas, simply go up to the blend mode options once again in the top left corner of the Layers palette and change the blend mode for "Layer 1" from "Normal" to Overlay:

And with that, we're done! Here's my original image once again for comparison:
And here, after changing the blend mode of "Layer 1" to "Overlay" to create the light shining on the ground, is my final result:
And there we have it! That's how to add rays of sunlight through trees with Photoshop! Visit our Photo Effects section for more Photoshop effects tutorials!