
Adding Reflections To Sunglasses With Photoshop
In this Photoshop Effects tutorial, we're going learn how to add reflections, or at least, different reflections, to sunglasses. This is a popular Photoshop effect and opens up a world of creative and artistic possibilities depending on who is wearing the sunglasses and who or what you have them looking at.
Here's the image I'll be using for this tutorial:

If we look closely, we can see that there already is a faint reflection in her sunglasses, and it looks like she's standing on the side of a road if I'm not mistaken. To me, she could just as easily be standing on a tropical beach, so we're going to give her more mirror-like reflective lenses and have her looking towards the water instead by using this photo:

as the reflection in her sunglasses:

This tutorial is from our Photo Effects series. Let's get started!
Step 1: Select One Of The Lenses
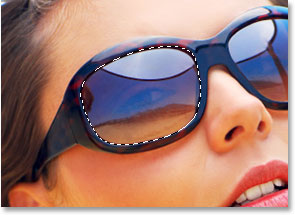
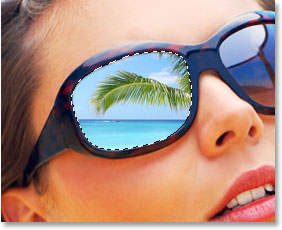
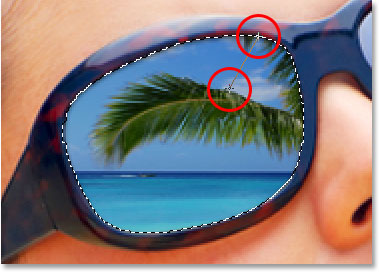
We need to work on one lens at a time, so let's begin with the lens on the left (our left, her right). To complete the work on the other lens, all we'll need to do is repeat the same steps we're about to do. First, we need to select the lens, so select around the outside of it using the selection tool of your choice (Lasso Tool, Pen Tool, etc.):
Step 2: Create A New Blank Layer
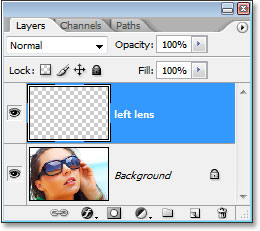
With the lens selected, click on the New Layer icon at the bottom of the Layers palette to add a new blank layer above the original Background layer, which is the layer that contains our original image:
Photoshop adds a new layer above the Background layer and automatically names it "Layer 1". Double-click directly on the layer's name in the Layers palette and rename it to "left lens" to make it easier for us to keep track of what we're doing (it's always a good idea to name your layers):
Step 3: Fill The Selection With Black On The New Layer
With the "left lens" layer selected (the currently selected layer is highlighted in blue in the Layers palette), press the letter D on your keyboard to reset your Foreground and Background colors if necessary so black becomes your Foreground color (white becomes your Background color), then use the keyboard shortcut Alt+Backspace (Win) / Option+Delete (Mac) to fill the selection we made with black:

Press Ctrl+D (Win) / Command+D (Mac) when you're done to deselect the selection.
It looks like we've filled the left lens with black, but since we're using layers and we've filled the selection on a layer above the Background layer, our original image isn't affected at all. The black filled selection area and the original photo are completely separate from each other.
Step 4: Drag The Second Image Into The Document
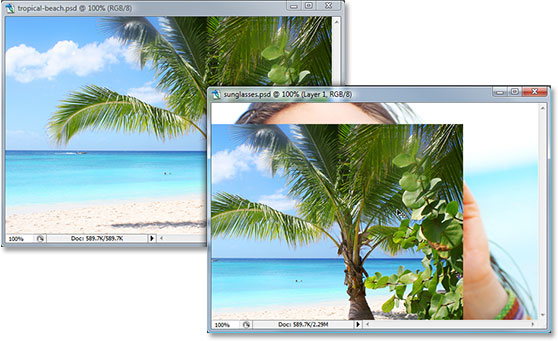
At this point, we need to bring in the image we're going to be using as the reflection in the sunglasses, so open your second image in Photoshop if it's not open already and have both images displaying in their own separate document windows on the screen (you can cycle through the various screen modes for each document by pressing the letter F on your keyboard). Press V to quickly select Photoshop's Move Tool, then simply click anywhere inside the second image and drag it into the sunglasses document:
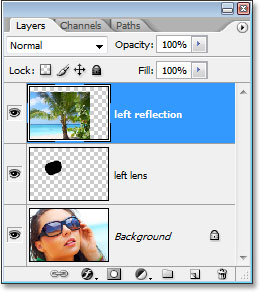
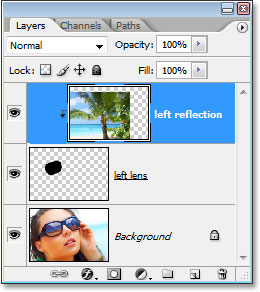
If we look in our Layers palette, we can see that the second image has been added on a new layer above the "left lens" layer. Double-click on the layer's name and rename it to "left reflection":
Step 5: Create A Clipping Mask
Currently, the image on the "left reflection" layer is blocking much of the sunglasses image from view. What we want is for it to appear only inside the left lens, and we can do that easily by using the "left lens" layer as a clipping mask for the "left reflection" layer above it. What this means is, the only area of the tropical beach photo that will remain visible is the area sitting above the black-filled area on the layer below it. Any areas of the tropical beach photo that are sitting above any transparent areas on the "left lens" layer below it will be hidden from view.
To create the clipping mask, with the "left reflection" layer selected in the Layers palette, go up to the Layer menu at the top of the screen and choose Create Clipping Mask, or use the keyboard shortcut Alt+Ctrl+G (Win) / Option+Command+G (Mac). Either way turns the "left lens" layer into a clipping mask for the "left reflection" layer above it, and the tropical beach photo (or whatever photo you happen to be using) is now sitting nicely inside the left lens:

If we look in our Layers palette, we can see that the "left reflection" layer now appears indented to the right, with a small arrow pointed down towards the "left lens" layer below it, which indicates that the "left reflection" layer is now being clipped by the "left lens" layer:
Step 6: Resize And Reposition The Image With Free Transform
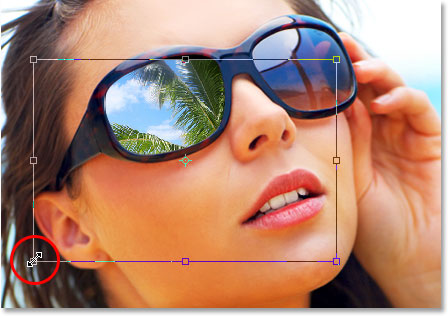
Now that our reflection image is inside the left lens, let's resize it and reposition it. We can do both of those things at once using Photoshop's Free Transform command, so press Ctrl+T (Win) / Command+T (Mac) to bring up the Free Transform box and handles around the second image. Even though we can only see the part of the image that's inside the lens, Photoshop places the Free Transform box and handles around the actual dimensions of the image. If you can't see some of the handles because they're outside of the viewable area inside the document window, press F on your keyboard to switch your view mode to Full Screen Mode With Menu Bar, which will allow you to see all of the Free Transform handles (press F a couple more times when you're done with Free Transform if you want to switch back to the document window view mode). Then simply drag any of the corner handles inward to resize the image. Hold down Shift as you're dragging to constrain the proportions of the image, and hold down Alt as you drag if you want Photoshop to resize the image from its center:
If you need to rotate the image, move your mouse outside any of the corner handles. You'll see your mouse cursor change to a curved line with a small arrow on each end. Simply click and drag with your mouse to rotate the image.
To move the image, click anywhere inside the Free Transform box and move the image around with your mouse. Just don't click on the small target icon in the center, otherwise you'll move the target icon, not the image. Press Enter (Win) / Return (Mac) when you're done to accept the transformation. Here's my image after moving and resizing my tropical beach photo inside the lens:

Step 7: Add An "Inner Shadow" Layer Style
Let's add a bit of a shadow to the reflected image so it looks like it's part of the lens and not just sitting on top of it. Click back on the "left lens" layer in the Layers palette to select it, then click on the Layer Styles icon at the bottom of the Layers palette:
Select Inner Shadow from the list of Layer Styles that appears:
This brings up Photoshop's Layer Style" dialog box set to the Inner Shadow options in the middle column. I want my shadow to appear mainly in the top right corner of the lens so I'm going to set my Angle to 65°. You may want to set yours to a different angle. Set the Distance option to 1 px and lower the Size option down to about 3 px:
Here's my lens after applying the Inner Shadow:

Step 8: Apply The "Spherize" Filter
Right now, the image we're using for our reflection is completely flat, but most lenses have a slight curve to them, so let's add that slight curve to our reflection image. Click on the "left reflection" layer in the Layers palette to select it. Then hold down Ctrl (Win) / Command (Mac) and click directly on the thumbnail for the "left lens" layer in the Layers palette:

This will load a selection around the lens back into the document:
We're going to be applying the Spherize filter to the "left reflection" layer, and by loading this selection first, this allows us to apply the filter only to the area inside the selection, rather than applying it to the entire layer.
Now that we've loaded the selection, go up to the Filter option at the top of the screen, choose Distort, and then choose Spherize. When the Spherize filter dialog box appears, select Horizontal Only for the Mode option at the bottom, then use the slider to raise the Amount to around 25-30%. I'm going to raise mine to 30% since her lenses seem to have quite a bit of curve to them:
Click OK when you're done to apply the filter and exit out of the dialog box. Press Ctrl+D (Win) / Command+D (Mac) when you're done to deselect the selection. Here's my image after applying the Spherize filter to the image inside the left lens. The difference is subtle, but it's usually the small things that make the difference between something that looks realistic and something that doesn't:

Step 9: Duplicate The "Left Reflection" Layer
With the "left reflection" layer still selected, use the keyboard shortcut Ctrl+J (Win) / Command+J (Mac) to duplicate the layer. A copy of the layer, which Photoshop names "left reflection copy", appears above it in the Layers palette. Click on the new layer's name and rename it to "multiply" (you'll see why in a moment):
Step 10: Set The New "Multiply" Layer To Be Clipped By The "Left Lens" Layer
When we duplicated the "left reflection" layer, Photoshop created a copy of it for us but left us with a small problem. The original "left reflection" layer is being clipped by the "left lens" layer below it, but the copy we just created is not being clipped, which means it's not being confined to the inside of the lens and is currently just sitting there on top of the original image. All we need to do to fix that is do the same thing we did with the original "left reflection" layer. Either go up to the Layer menu and choose Create Clipping Mask or use the keyboard shortcut Alt+Ctrl+G (Win) / Option+Command+G (Mac) to clip the "multiply" layer to the "left lens" layer so the only part remaining visible is the area inside the lens. We can now see in the Layers palette that both the original "lens reflection" layer and the "multiply" layer are being clipped by the "left lens" layer below them:

Step 11: Change The Layer Blend Mode To "Multiply"
The reason we renamed the new layer to "multiply" is because we're going to change it's layer blend mode to Multiply, which is going to enable us to darken the image inside the lens so it's not so bright. To do that, simply go up to the blend mode option in the top left corner of the Layers palette, click on the down-pointing arrow to the right of the word "Normal" and select "Multiply" from the list:

As soon as you change the blend mode, the image inside the lens appears much darker:

If you find the image inside the lens now appears too dark, simply go up to the Opacity option in the top right corner of the Layers palette and lower the opacity of the "multiply" layer until you've brightened the image back up to the point where you're happy with the results. Or, if you want to make the image even darker, click on the "left reflection" layer to select it and lower it's opacity value. By lowering the opacity of the "left reflection" layer, you begin to mix in some of the solid black from the "left lens" layer below it (which is why we filled our lens selection with black earlier in the tutorial). Here I've lowered the opacity of the "left reflection" layer to 80% to mix in just a hint of the black from the "left lens" layer:
My reflected image now appears even darker, giving the lens a tinted look to it:

It's entirely a judgment call on your part how dark to make the reflection, if you even want to darken it at all.
Step 12: Select The Gradient Tool With A White-To-Transparent Gradient
To finish off our work on the left lens and give it a bit more of a three dimensional, curved appearance, let's add a highlight to it, as if the sun is reflecting off of it. I'm going to add it in the top right corner of the lens. To do that, we need the Gradient Tool, so select it from the Tools palette or press G to select it with the keyboard shortcut:
We want to add a white-to-transparent gradient, so press the letter X on your keyboard to swap your Foreground and Background colors, making white your Foreground color. Then with the Gradient Tool selected, right-click (Win) / Control-click (Mac) anywhere inside the document to bring up the Gradient Picker and select the gradient second from the left, top row:
Step 13: Load A Selection Once Again Around The Lens
Hold down your Ctrl (Win) / Command (Mac) key and click directly on the thumbnail for the "left lens" layer in the Layers palette to once again load a selection around the lens:
Step 14: Add A New Layer At The Top Of The Layers Palette
Make sure the top layer (the "multiply" layer) is currently selected in the Layers palette, then click on the New Layer icon at the bottom of the Layers palette to add a new blank layer above all the others. Rename the new layer "highlight":
Step 15: Drag Out A White-To-Transparent Gradient On The "Highlight" Layer
To add the highlight, I'm simply going to drag out a white-to-transparent gradient on the "highlight" layer, starting from the top right corner of the lens and extending downward diagonally towards the center:
Release the mouse button and Photoshop draws the white-to-transparent gradient, adding the highlight to the lens. Since we had a selection around the lens, the gradient is confined to the area inside the lens. Press Ctrl+D (Win) / Command+D (Mac) to deselect the selection. Here's my image after adding my highlight in the top right corner of the lens:

Step 16: Repeat The Same Steps For The Other Lens
We've completed work on the left lens. Now we just need to add the reflection to the right lens, and to do that, we simply repeat all the steps we've just done for the other lens:
- Select the right lens
- Add a new layer and name it "right lens"
- Fill the selection with black
- Drag the second image into the sunglasses document and rename its layer "right reflection"
- Create a clipping mask to clip the "right reflection" layer to the "right lens" layer below it
- Use Free Transform to resize and reposition the image inside the lens
- Add an "Inner Shadow" layer style to the "right lens" layer
- Apply the "Spherize" filter to the "right reflection" layer
- Duplicate the "right reflection" layer and rename it "multiply"
- Change the blend mode of the duplicate layer to "Multiply"
- Lower the opacity of the new "multiply" layer to brighten the image back up or lower the opacity of the "right reflection" layer to make it even darker.
- Add a highlight in the top right corner of the right lens with the Gradient Tool and a white-to-transparent gradient
Keep in mind as you're repositioning the image in the right lens with the Free Transform command that the reflection in the right lens should be coming from a slightly different angle than the reflection in the left lens, so to make things look more realistic, adjust the position of the right reflection so it appears a bit off center from the left one. Once you've repeated all the steps for the right lens, you're done!
Here, after repeating all the steps for the right lens, is my final result. When repeating the steps for the right lens, I only lowered the opacity of the "right reflection" layer to 90% rather than the 80% I lowered the "left reflection" layer to, and the reason for it is that her face seems to be tilted away slightly from the direction of the sun so I made the reflection in the lens closest to the sun appear slightly brighter, again just to add a touch more realism:
And there we have it! That's how to add reflections to sunglasses with Photoshop! Visit our Photo Effects section for more Photoshop effects tutorials!