
Create A Portrait Studio Background With Photoshop
In this Photoshop Effects tutorial, we'll learn how to quickly and easily create a simple photo studio background in Photoshop which can then be used to make any portrait-style photo look as if it was taken in an actual photo studio, even if it was really taken in your office, your kitchen, your neighbor's backyard, or basically any place other than a photo studio. As with most Photoshop effects, this background works best when used with the right type of photo, so since we're trying to make it appear as if the photo was taken in a portrait studio, it helps if the person in the photo is dressed nicely, hair in place, and sitting in one of those completely unnatural portrait studio poses.
One other thing to keep in mind before we begin... If you're planning on taking a photo to use with this background, try to have the person (or people) sit in front of a plain white background if possible when you take the shot, since that will make it much easier to select them in the original photo when you go to move them in front of this new background we're about to create.
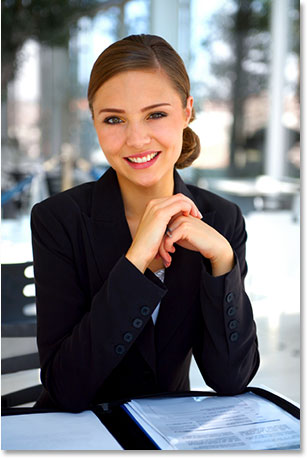
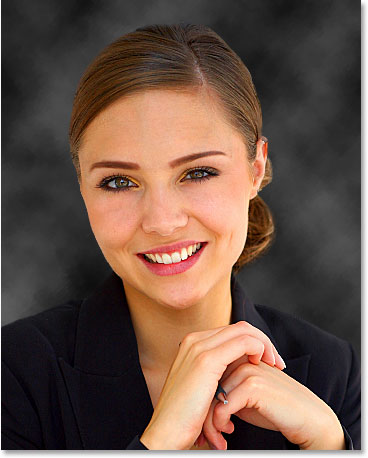
Here's the image I'll be using for this tutorial:
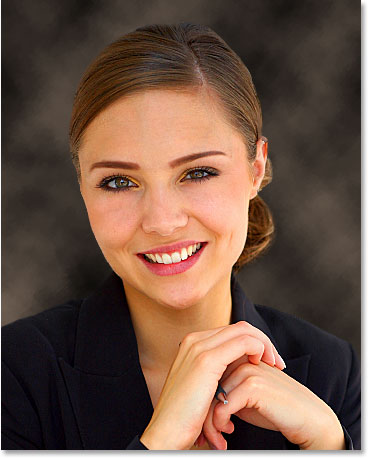
Obviously, this photo wasn't taken inside a studio, but here's how it will look when we're done:
This tutorial is from our Photo Effects series. Let's get started!
Step 1: Create A New Photoshop Document Set To 72 Pixels/Inch
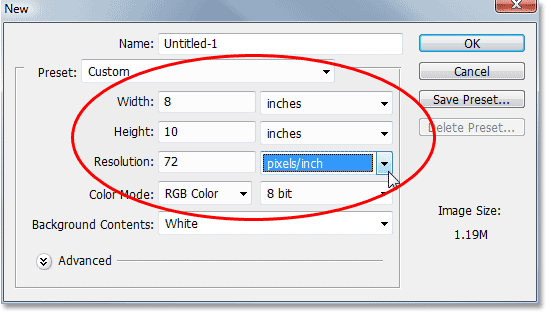
To begin, we need to create a new Photoshop document, so go up to the File menu at the top of the screen and choose New, or use the keyboard shortcut Ctrl+N (Win) / Command+N (Mac). Either way brings up Photoshop's New Document dialog box. Let's use a standard size of 8x10 inches for our new document, so I'll select that from the list of Preset sizes. I also want to make sure that I enter 72 pixels/inch for my Resolution value:
Now, if you know anything about image resolution and print quality, you're probably wondering why I've set my resolution to only 72 pixels/inch, which is far lower than the professional print quality resolution of 300 pixels/inch, and you're most likely thinking that if we go to print this image at only 72 pixels/inch, it's going to look rather horrible, and you'd be right. There's no way we can print our image at such a low resolution and expect it to look good. Don't worry though, we won't be leaving it like this.
The reason we're starting off at only 72 pixels/inch is because we're going to be using Photoshop's Clouds filter to help us create our background, and the Clouds filter is resolution-dependent and only works well at low resolutions. If we tried to use the Clouds filter at 300 pixels/inch, we'd get a whole bunch of really small clouds instead of a few large ones, and we want the larger ones for this effect. I'll show you what I mean in just a moment. For now though, go ahead and create your new document by clicking OK in the top right corner of the dialog box.
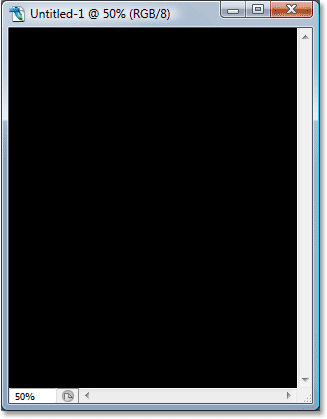
Step 2: Fill The New Document With Black
We need our background to be black, so press the letter D on your keyboard to reset your Foreground and Background colors if needed, which sets black as your Foreground color (white becomes your Background color), and then use the keyboard shortcut Alt+Backspace (Win) / Option+Delete (Mac) to fill the document with black:
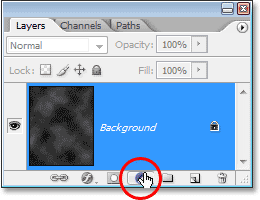
Step 3: Create A New Blank Layer
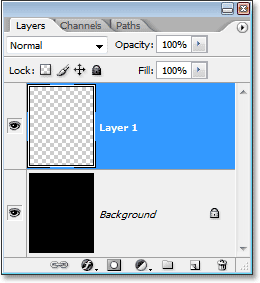
If we look in our Layers palette, we can see that we currently have only one layer, the Background layer. We need to add a new blank layer to the document, so click on the New Layer icon at the bottom of the Layers palette (it's the icon directly to the left of the trash bin):
Photoshop adds a new blank layer to the document, places it above the original Background layer, and names it "Layer 1":
Step 4: Apply The "Clouds" Filter To The New Layer
With the new layer selected in the Layers palette (the currently selected layer is highlighted in blue), go up to the Filter menu at the top of the screen, choose Render, and then choose Clouds. I don't think you'll find too many people who'll claim that Photoshop's Clouds filter gives you anything remotely close to realistic-looking clouds, but still, your document should now look something like this:
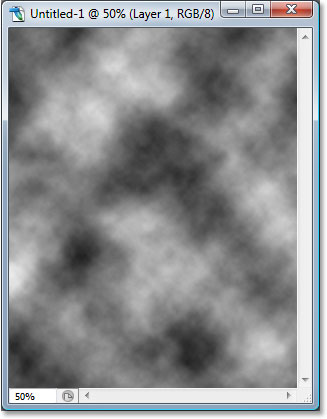
The Clouds filter gives you something different each time you apply it, so if you want to experiment with it a little to see different variations of the effect, simply press Ctrl+F (Win) / Command+F several times to re-apply the filter and you'll see a different cloud pattern each time.
Before we continue, just to show you what I meant earlier about how the Clouds filter would give us a different result if we tried running in at 300 pixels/inch instead of 72 pixels/inch, here's what we'd get with it at 300 pixels/inch:
That's a few too many clouds for what we need here, which is why we're running it at a low resolution value.
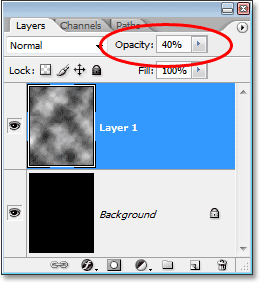
Step 5: Lower The Opacity Of The Clouds Layer To 40%
We've added our clouds but they're too intense at the moment. We need them to be much more subtle, so go to the Opacity option in the top right corner of the Layers palette and lower the layer's opacity down to 40%:
Step 6: Merge The Layers
We need to merge our two layers together at this point, and we can do that with the keyboard shortcut Ctrl+E (Win) / Command+E (Mac). If we look again in our Layers palette, we can see that two layers have been merged into one:

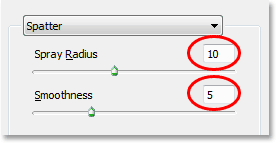
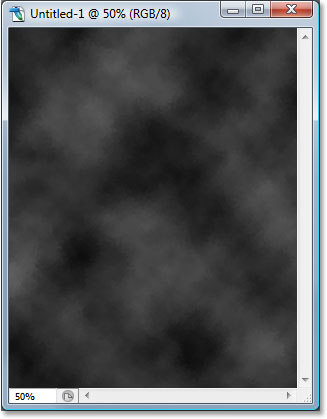
Step 7: Apply The "Spatter" Brush Filter
Let's make the background look a bit more interesting by adding a little texture to it. Going up to the Filter menu once again, this time choose Brush Strokes, and then choose Spatter. When the dialog box appears, enter 10 for the Spray Radius and 5 for the Smoothness, then click OK to apply the filter to the image:
This gives the background a bit of a "painted" look to it:
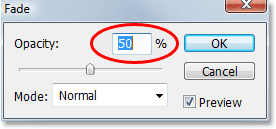
Step 8: Fade The Filter Effect's Opacity To 50%
Before you click anywhere else in Photoshop, go up to the Edit menu at the top of the screen and choose Fade Spatter. The "Fade" option is only available as the very next thing you do after applying a filter, so if you click somewhere else first and then try and select the Fade option, it will be grayed out and unavailable. When the Fade dialog box appears, lower the opacity value of the filter effect to 50% to reduce the intensity of the effect:
Step 9: Apply The "Sprayed Stokes" Filter
Let's add just a bit more texture to the background by once again going back up to the Filter menu, again choosing Brush Strokes, and this time choosing Sprayed Strokes. When the dialog box appears, enter 12 for the Stroke Length, 7 for the Spray Radius and Right Diagonal for the Stroke Direction option, then click OK to apply the filter:

This adds even more to the "painted" look of the background, although it's a little hard to see in the screenshot below but it should be easier to see in your own document:

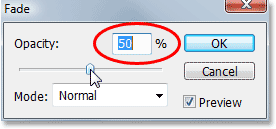
Step 10: Fade The Filter Effect's Opacity To 50%
Once again, let's fade the opacity of our filter effect by going up to the Edit menu and choosing Fade Sprayed Strokes. When the dialog box appears, lower the opacity value to 50% just as we did with the Spatter brush filter a moment ago, then click OK:
Step 11: Increase The Image Resolution To 300 Pixels/Inch
Now that we've finished with the Clouds filter, we can increase the resolution to what it should be if we want professional print quality. Of course, increasing the resolution of an image in Photoshop is usually something we want to avoid as much as possible since all you're doing is making the image larger without adding any more detail to it (as powerful as Photoshop is, it still has no way of knowing what the image would have looked like in higher resolution), and you end up with an image that went from crisp and sharp to soft and dull. However, since all we're doing here is creating a background, and backgrounds are often blurred out anyway to bring more attention to the main subject in the foreground, we can get away with it.
To increase the resolution, go up to the Image menu at the top of the screen and choose Image Size. When the Image Size dialog box appears, enter a value of 300 pixels per inch (which is the standard for professional quality printing) for the Resolution option. Also, make sure the Resample Image option is checked at the bottom of the dialog box, and if you're using Photoshop CS2 or higher, set the Interpolation Method (it's the drop-down list to the right of where it says "Resample Image") to Bicubic Smoother, which is generally what we use when making images larger. If you're using an older version of Photoshop, set it to Bicubic:

The only difference you'll notice after increasing the resolution is that the image will now appear much larger on your screen if you zoom in to 100%.
Step 12: Add A "Hue/Saturation" Adjustment Layer
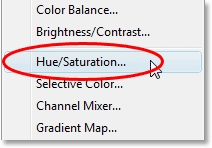
At this point, our background is pretty much complete, but let's give ourselves a bit more control over it by adding a "Hue/Saturation" adjustment layer, which is going to give us the ability to not only lighten the background if we think it's looking a little too dark but also change its color. To do that, simply click on the New Adjustment Layer icon at the bottom of the Layers palette (it's the icon that looks like a circle split diagonally between black and white):
Then choose Hue/Saturation from the list of adjustment layers that appears:
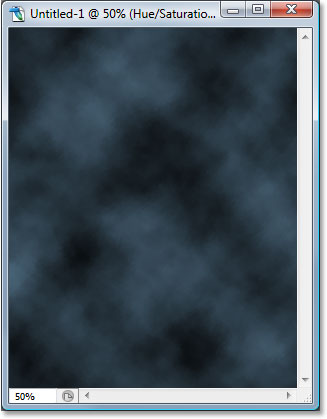
When the Hue/Saturation dialog box appears, if you think your background looks a little too dark, simply drag the Lightness slider to the right to lighten the background. If you want to add some color to your background, first select the Colorize option in the bottom right corner of the dialog box, then drag the Hue slider left or right to select a color. You can adjust the intensity of the color by dragging the Saturation slider in the middle of the dialog box. Here I've used the Hue/Saturation adjustment layer to add blue to the background, just as an example:
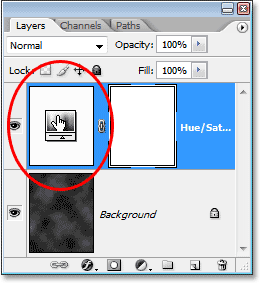
If you don't need or want to lighten or add any color to your background at this point, simply click OK to exit out of the dialog box, and if you look in your Layers palette, you'll see the Hue/Saturation adjustment layer sitting there above the Background layer. At any point down the road, if you decide to lighten the background or change its color, all you need to do is double-click directly on the adjustment layer's thumbnail in the Layers palette, which will bring up the Hue/Saturation dialog box and you can make your changes:
Step 13: Save The Photoshop Document
We've completed our work on the background, so let's save our Photoshop document so we can use it whenever we need it instead of recreating it each time. To do that, use the keyboard shortcut Ctrl+S (Win) / Command+S (Mac). Normally this is the keyboard shortcut for the "Save" option, but if this is the first time you're saving the document, Photoshop will bring up the Save As dialog box instead, since it needs to know where to save it, what to call it and what format to save it in. Make sure you save the document as a Photoshop .PSD file. Name the document something that makes sense to you ("Studio-Background.PSD" works nicely) and then save it to your computer's hard drive in a location where you can easily access it again.
Step 14: Drag The Person From Their Original Photo Into The Background Document
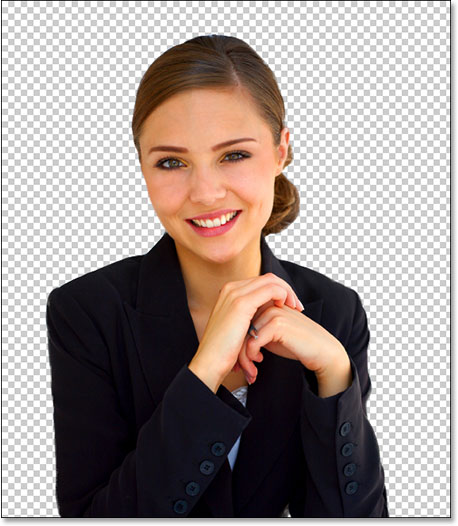
At this point, all we need is someone to place in front of our newly created background, so open the photo that contains the person and use the selection tool of your choice (Lasso Tool, Pen Tool, Extract filter, etc.) to select them. Here I've used the Extract filter (which we'll cover in another tutorial) to remove the woman from her background in the original photo. I've also cropped away part of the bottom of the image since I won't be needing it:
Then, with her selected, all I need to do is press the letter V on my keyboard to quickly select the Move Tool and drag her into the Background document. Make sure you have the Hue/Saturation adjustment layer selected first in the Background document so that the person appears on a new layer above it, otherwise the adjustment layer will lighten and/or colorize not only the background but the person as well:

Still with the Move Tool selected, drag the person into position in front of the background:
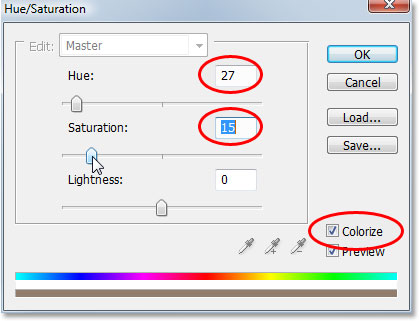
If I want to add a little color to the background at this point, all I need to is double-click on the Hue/Saturation layer's thumbnail in the Layers palette and when the dialog box appears, I'll select the Colorize option in the bottom right corner, then drag the Hue slider to about 27, which gives me a nice warm color that works well with her skin tone. I'll also lower the Saturation to about 15 so the color is more subtle:
And here we have the final result:
And there we have it! We've now created a simple portrait studio-style background in Photoshop that we've saved and can re-use, as well as lighten and/or colorize, whenever we need it! Visit our Photo Effects section for more Photoshop effects tutorials!