
Telling Stories With Shadows In Photoshop
In this Photoshop Effects tutorial, we'll learn how to truly make a picture worth a thousand words by adding a different shadow behind someone in a photo, as if to imply that the person in the photo is one day going to become the image in the shadow. Or maybe they really are the image in the shadow but they manage to keep it hidden from everyone, sort of a "Dr. Jekyll and Mr. Hyde" scenario. Or, as in the case with the image I'll be using in this tutorial, perhaps the person is imagining themselves as the image in the shadow.
This is a really fun and popular effect to create in Photoshop, and you may remember seeing it used heavily a few years back in the promotional posters for "Star Wars, Episode I - The Phantom Menace", where a very young and innocent looking Anakin Skywalkwer was casting the shadow of Darth Vader behind him. Fortunately, you don't need to be a special effects wizard to create the same effect with your own images. All you need is a copy of Photoshop and a little imagination.
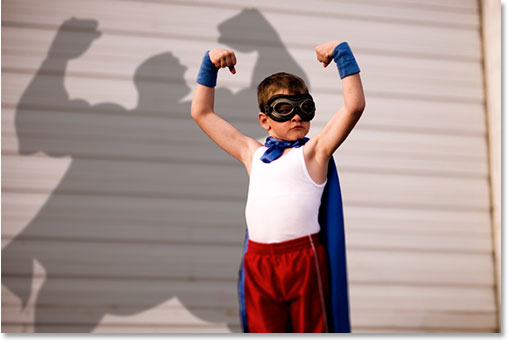
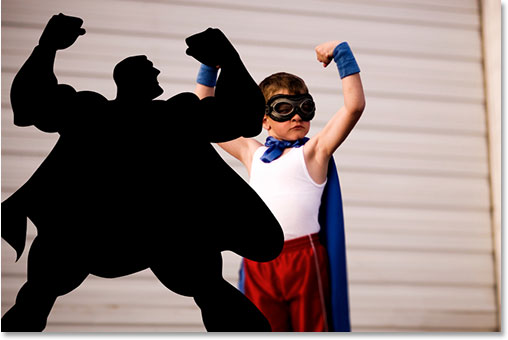
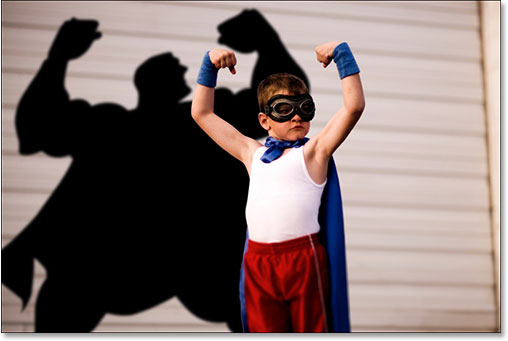
Here's the image I'll be using for this Photoshop tutorial:

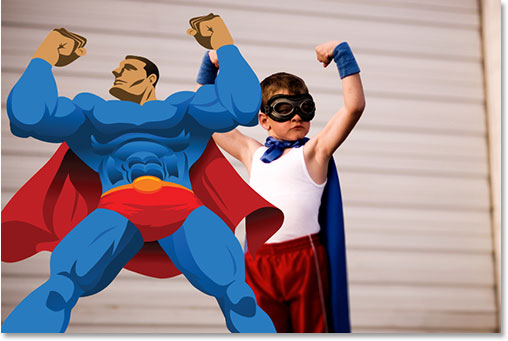
Obviously, this little guy sees himself as a mighty super hero, so let's help him out by projecting a super hero shadow on the wall behind him:
This tutorial is from our Photo Effects series. Let's get started!
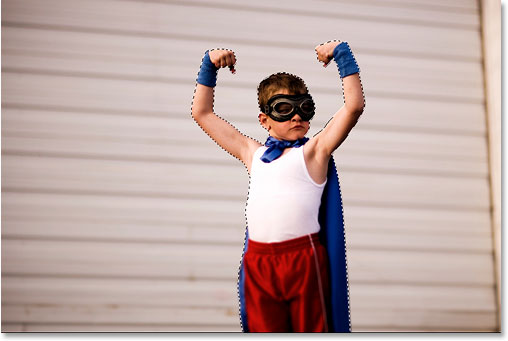
Step 1: Make A Selection Around The Person
With your image open in Photoshop, use the selection tool of your choice (Lasso Tool, Magnetic Lasso Tool, Pen Tool, etc.) to draw a selection around the person:
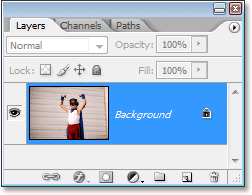
Step 2: Copy The Selection To A New Layer
If we look in our Layers palette, we can see that we currently have just one layer, the Background layer, which contains our image:
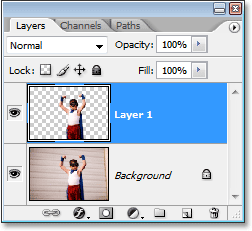
We need to copy the person in the photo onto their own layer above the Background layer so that we can slide a shadow in behind them, which we'll do in a moment. Since we've already drawn a selection around them, all we need to do is use the keyboard shortcut, Ctrl+J (Win) / Command+J (Mac), and Photoshop will copy the selection onto a new layer. Nothing will seem to have happened to the image itself, but if we look again in the Layers palette, we can see that a copy of the boy (in my case) is now on a new layer, which Photoshop has named "Layer 1":
Step 3: Open The Photo Containing The Person Or Object You Want To Use For The Shadow
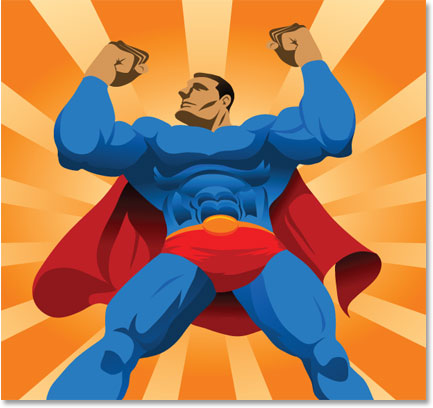
To create the shadow effect, you'll need a second image containing whatever it is you want to use as a shadow, whether it's a person or an object of some kind. I want to give the boy a super hero shadow, so I'm going to use this image here which should work nicely:
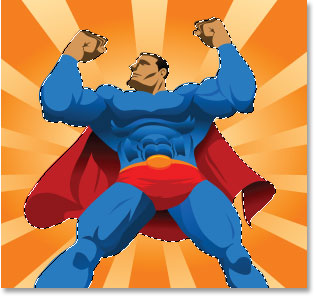
Step 4: Make A Selection Around The Person Or Object
Just as we did with the original image when we drew a selection around the person in the photo, we need to draw another selection, this time around the person or object in the second image that we want to use for our shadow. So once again, use the selection tool of your choice to draw a selection around them (or it):
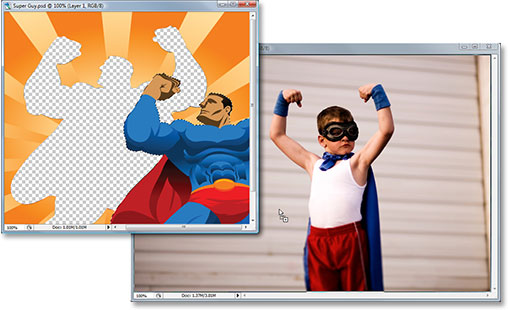
Step 5: Drag The Selection Into The Original Image
Once you have your selection around the person or object, select the Move Tool from the Tools palette:
You can also press V on your keyboard to select it with the shortcut. Then, with both images open in their own separate document windows, simply click anywhere inside the selection and drag the image from the second photo into the original image's document window:
When you release your mouse button, you'll see the selection from the second image appearing in the original image:
You can close out of the second document window at this point, since we no longer need to have it open.
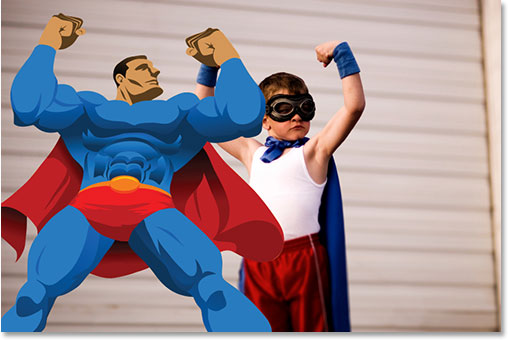
There's one thing I want to fix here before we continue. The boy in the photo is looking towards the right, but my super hero is looking towards the left. I need to flip the super hero around so that he's looking in the same general direction as the boy. To do that, I'll simply go up to the Edit menu at the top of the screen, choose Transform, and then choose Flip Horizontal:
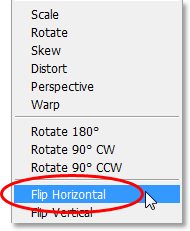
When I do that, Photoshop flips the super hero around for me so that both he and the boy are looking towards the right:
Step 6: Fill The Shadow Image With Black
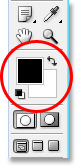
Since we want to use the selected image we just dragged into the document as a shadow, we need to fill it with black. To do that, make sure you have black as your Foreground color by pressing the letter D on your keyboard, which resets your Foreground color to black and your Background color to white, as we can see in the two color swatches near the bottom of the Tools palette (the top left swatch is the Foreground color and the bottom right one is the Background color):
Then use the keyboard shortcut Shift+Alt+Backspace (Win) / Shift+Option+Delete to fill the person or object with black:
If we had simply pressed "Alt+Backspace" (Win) / "Option+Delete" (Mac), we would have filled the entire layer with black, but by adding the "Shift" key in there as well, we were able to fill only the person or object on the layer (the "contents" of the layer) with black. The rest of the layer remained untouched.
Step 7: Drag The Shadow Image Between The Background Layer and "Layer 1"
We have the image we want to use as our shadow inside the original photo and we've filled it with black. So far, so good, except of course for one small problem. The shadow is currently in front of the boy. I need it to appear behind him. This is where layers come in.
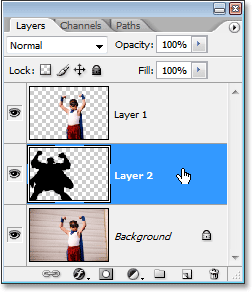
To move the shadow behind the boy, all I need to do is drag the shadow's layer below the boy's layer in the Layers palette. If I look in my Layers palette, I can see that I now have three layers - the original Background layer on the bottom, the copy of the boy from the original photo on "Layer 1", and the shadow image at the very top on "Layer 2":

The reason the shadow appears in front of the boy in the document is because its layer is above the boy's layer, blocking the boy from view wherever the two layers overlap. To fix that, all I need to do is click on "Layer 2" in the Layers palette and drag it down below the boy on "Layer 1", which will place it directly between "Layer 1" and the Background layer (Photoshop won't allow you to drag any layers below the Background layer, since it wouldn't make much sense to have something behind the background). Click on "Layer 2" and drag it down until you see a black horizontal line appear between "Layer 1" and the Background layer. Release your mouse button when that line appears and Photoshop will move "Layer 2" below "Layer 1":
Now that the shadow's layer is below the boy's layer in the Layers palette, if we look back in the image, we can see that the shadow now appears behind the boy:
Step 8: Move And Resize The Shadow With Free Transform
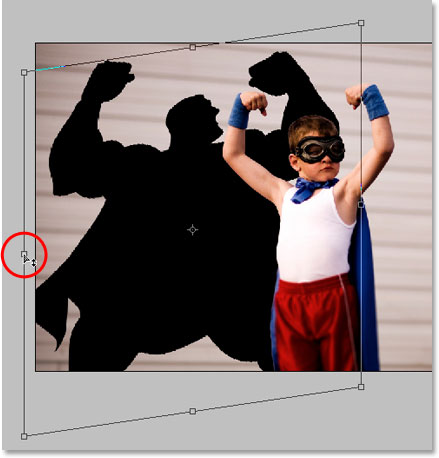
With "Layer 2" still selected in the Layers palette (the currently selected layer is highlighted in blue), press Ctrl+T (Win) / Command+T (Mac) to bring up Photoshop's Free Transform box and handles around the shadow and move it into position by clicking anywhere inside the Free Transform box (anywhere except the small target icon in the center) and dragging the shadow into place with your mouse. You can resize the shadow by dragging any of the handles. To constrain the proportions of the shadow as you drag it larger or smaller, hold down Shift and drag any of the corner handles.
If you're having trouble seeing all the Free Transform handles because some of them extend out beyond the sides of the document window, press F on your keyboard to switch your screen mode to Full Screen Mode With Menu Bar.
If I look closely at my image, I can see that the boy's left arm (his left, our right) is up a little higher than the other one, but the super hero has the opposite arm higher. To fix that, I'm going to hold down my Ctrl (Win) / Command key, then click on the left middle handle of the Free Transform box and drag downward with my mouse, which will skew the image, bringing the left side of the super hero down below the right until his arms are more in line with the boy's arms:
Press Enter (Win) / Return (Mac) when you're done to accept the transformations.
Step 9: Apply The Gaussian Blur Filter To The Shadow
Now that our shadow is in place, there's only a couple of problems remaining. One is that the edges of the shadow are much too sharp, and the other is that the shadow is too dark and intense. Both of these issues are easily fixed, so let's work on the edges first. With "Layer 2" still selected in the Layers palette, go up to the Filter menu at the top of the screen, choose Blur, and then choose Gaussian Blur.
This brings up the Gaussian Blur dialog box. We're going to soften the shadow edges by blurring them, but we don't want to blur the edges too much, otherwise we'll lose too much detail in the shadow and it will be tough to make out the shape. All we want is a subtle amount of blurring, so set the Radius value to somewhere between 2 and 6 pixels, depending on the resolution of your image. I'm using a low resolution image for this tutorial, and for me, a Radius of about 2.5 pixels works well:
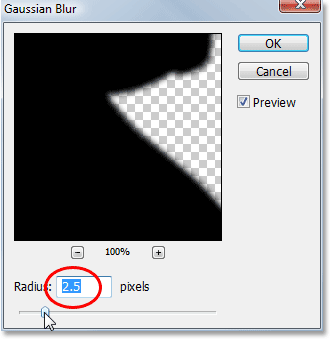
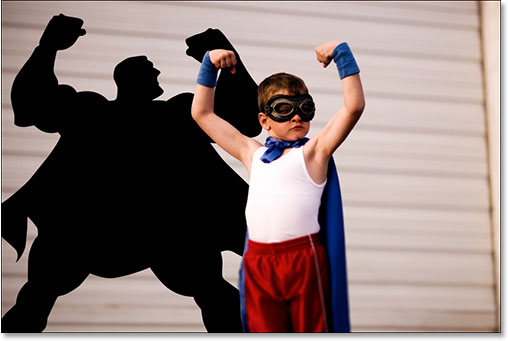
Click OK when you're done to exit out of the dialog box. Here's my image after softening the edges of the shadow with Gaussian Blur:
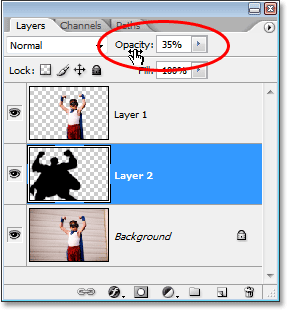
Step 10: Lower The Opacity Of The Shadow
Finally, to reduce the intensity of the shadow, simply go up to the Opacity option in the top right corner of the Layers palette and lower the opacity of "Layer 2". I'm going to lower mine down to about 35%:
And with that, you're done! Here, after lowering the opacity of my shadow, is my final "Telling Stories With Shadows" result:
And there we have it! That's how to tell stories with shadows in Photoshop! Visit our Photo Effects section for more Photoshop effects tutorials!