
Turn A Photo Into A Collage Of Squares With Photoshop
In this Photoshop Effects tutorial, we're going to learn how to turn a photo into a collage of squares. It's a fun effect, and it's really easy to do, especially since most of the work is simple repetition, as we shall see.
Here's the original photo I'll be starting with:

And here's the image with the completed "Collage of Squares" effect:
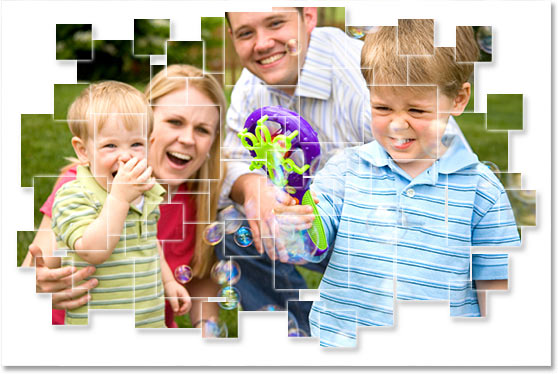
As I said, most of the work is just repetition, so once you get "into the groove" with what you're doing, you won't even need to think about it. You can just have fun creating the effect.
This tutorial is from our Photo Effects series. Let's get started!
Step 1: Duplicate The Background Layer
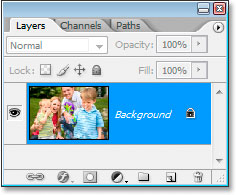
With my image open in Photoshop, I currently have just one layer, the Background layer, which contains my original image:
I need to duplicate the Background layer, so I'm going to use the keyboard shortcut Ctrl+J (Win) / Command+J (Mac), which adds a copy of the Background layer in the Layers palette. Photoshop automatically names the copy "Layer 1":

Step 2: Add A New Layer Between The Two Layers And Fill It With White
We need to add a new blank layer between the two layers we currently have in the Layers palette. To do that, with "Layer 1" selected, hold down the Ctrl (Win) / Command (Mac) key on your keyboard and click on the New Layer icon at the bottom of the Layers palette. Normally Photoshop adds the new layer above the currently selected layer, but by holding down Ctrl/Command, this tells Photoshop to add the new layer below it instead:
I now have my new blank layer, "Layer 2", between the two other layers:

Just a quick note before we continue.... We're going to end up with lots of layers by the time this effect is finished, and normally that would mean we'd definitely want to make sure we're naming our layers as we go. In this case though, you'd probably drive yourself mad trying to come up with descriptive names for each layer, so unless that sort of thing appeals to you, I wouldn't worry about naming your layers when creating this effect. Generally speaking though, naming layers is a habit you should get into.
Having said that, let's continue. We need to fill this new layer with white, since we're going to use white as our background color for the effect, so press the letter D on your keyboard to reset your Foreground and Background colors, which makes white your Background color, and then with the new blank layer selected in the Layers palette, use the keyboard shortcut Ctrl+Backspace (Win) / Command+Delete (Mac) to fill the layer with white.
You won't see anything happen in your Document Window, since the copy of the Background layer is blocking "Layer 2" from view, but if you look in the Layers palette, you'll see that the thumbnail preview for the layer is now filled with white:

Step 3: Drag Out A Square Selection Around Part Of The Image
I'm going to click back on the copy of my Background layer, "Layer 1", in the Layers palette to select it. Then I'm going to grab my Rectangular Marquee tool from the Tools palette:

I could also press M on my keyboard to quickly select it. Then, with the Rectangular Marquee tool in hand and "Layer 1" selected in the Layers palette, I'm going to drag out a square-shaped selection inside the image. I'll drag out a square around the boy's face on the right:

In order to constrain the selection to a perfect square, hold down Shift as you drag.
Step 4: Add A Layer Mask
Once you have your square-shaped selection, and again making sure that "Layer 1" is selected in the Layers palette, click on the Add A Layer Mask icon at the bottom of the Layers palette:
This will add a layer mask to "Layer 1", and because I had an area of the image selected when I clicked the "Add A Layer Mask" icon, Photoshop will use that selection to create the mask, meaning that only the area of the image that was inside the selection - the boy's face - will remain visible in the Document Window. The rest of the image will be hidden from view, revealing the white-filled layer below it:

Step 5: Unlink The Layer Mask From The Layer Contents
If we look at our Layers palette once again, we can see the layer mask that's been added to "Layer 1". The mask is filled with black, except for the small square area that's white, which is the area around the boy's face that's showing in the Document Window. If you look closely, you'll also see a small link icon between the layer thumbnail and the mask thumbnail:

When that link icon is visible, it means that the contents of the layer (the image) and the layer mask are, well, linked. If you move one, you move them both. That's not what we want. We want to be able to move the mask without moving the image. In order to do that, all we have to do is click on that link icon, which will cause it to disappear, at which point the layer mask can be moved independently of the layer contents. I'm going to click on the link icon to remove it:

Step 6: Add A White "Outer Glow" Layer Style To The Mask
In order to be able to see the edges of the squares as we're creating the effect, I'm going to add an "Outer Glow" layer style to the mask. First, I'm going to click directly on the layer mask's thumbnail to select it. I can tell it's selected when it has a highlight box around it. Then, with the mask selected, I'm going to click on the New Adjustment Layer icon at the bottom of the Layers palette:

Then I'll select Outer Glow from the list that appears:

This brings up Photoshop's Layer Style dialog box with the Outer Glow options in the middle column. By default, the Outer Glow layer style uses a yellowish color. I want to change it to white, so to do that, I'm going to click directly on the Outer Glow's color swatch:

When I click on the color swatch, Photoshop's Color Picker appears. I'm going to choose white in the top left corner:

Then I'll click OK to exit out of the Color Picker. My Outer Glow color is now white.
I'm going to leave all the other options for the Outer Glow alone and just click OK at this point to exit out of the Layer Style dialog box. The white Outer Glow will be added to the layer mask. We won't be able to see it in the image just yet because it's a white glow against a white background, but we'll see it once we start adding more square sections to the image, as we're about to do.
Step 7: Duplicate The Layer
Remember at the beginning of this tutorial when I said that most of the work is simple repetition? Well, this is where it starts. These next couple of steps will be repeated over and over again, but don't worry, they're easy. First, with "Layer 1" selected in the Layers palette, I'm going to duplicate it using the keyboard shortcut Ctrl+J (Win) / Command+J (Mac). I now have an exact copy of it at the top of the Layers palette:

When I say "exact copy", I mean exact copy. Not only does the copy contain the image, it also contains a copy of the mask and the Outer Glow layer style, so we don't have to add another mask or another Outer Glow ourselves. Everything's already there for us. Also, because the layer contents and the layer mask on "Layer 1" were not linked, they're not linked on the copy, either, which is exactly what we want.
Step 8: Move The Layer Mask To A New Location To Create The Second Square
I'm going to grab my Move tool from the Tools palette:

I could also press V on my keyboard to select it. Then, in the Layers palette, I'm going to click on the duplicate layer's mask thumbnail to select it, making sure I have the mask selected and not the layer itself. The mask thumbnail will have a highlight box around it to indicate that it's selected:

Then, with the layer mask selected, I'm simply going to click inside the Document Window and drag the mask to a new location, which is going to create the second square. I'll drag it down and to the left so the top right corner is overlapping the bottom left corner of the original square:

I now have two squares, and if you look in the top right corner of the one I just created, you can see the white Outer Glow defining the edges of the square.
Step 9: Continue To Duplicate The Layer And Drag The Mask To Create More Squares
At this point, it's simply a matter of repeating the last two steps until the main areas of the image are visible inside the squares. So first you press Ctrl+J (Win) / Command+J (Mac) to duplicate the layer. Then, and this part's very important, click on the layer mask thumbnail of the newly created layer to make sure you have the mask selected, not the layer contents. If you try to drag the mask to create a new square and instead you see the image inside the square moving, you have the layer itself selected by mistake. In that case, press Ctrl+Z (Win) / Command+Z (Mac) to undo, then click on the layer mask thumbnail and try again.
Continue this process of duplicating the layer, selecting the mask, and dragging the mask to a new spot in the image until all the important areas of the image are showing. It's okay to overlap the squares, and don't be afraid to leave an occasional empty space between them either. It just adds to the effect.
I'm going to continue duplicating the layer and moving the mask until all four people in the photo are showing inside the squares. Here's my image after creating enough squares to bring the rest of the boy into the image:

After duplicating more layers and moving the masks around to create more squares, I've brought the boy's mom and younger brother into the effect:

Finally, I've added enough squares to bring all of the main areas of the photo into view. I've also made sure that all four people's faces are clearly visible in the photo and not being sliced up by the edges of any squares. That would just be wrong:

Step 10: Duplicate Another Layer And Reduce The Size Of The Square To 50%
The main part of the effect is now complete, and for the record, I now have a total of 36 squares in the image. You may have more, you may have less. It really depends on the image you're using and how many squares you think it takes before the effect looks "right". I'm going to finish off the effect by adding some smaller squares in the corners and around the outside edges.
To do that, I'm going to duplicate another layer with Ctrl+J (Windows / Command+J (Mac), and then I'll click on the layer mask to select it, just as I've done 36 times already. This time though, rather than simply moving the mask to create another square, I'm going to press Ctrl+T (Win) / Command+T (Mac) to bring up Photoshop's Free Transform box and handles around the square, and then I'm going to drag one of the corner handles inward to reduce the size of the square by about 50%. As I drag the handle inward, I'm going to hold down Shift+Alt (Win) / Shift+Option (Mac), which is going to constrain the mask to a perfect square and tell Photoshop to resize the square from its center:

Once I've resized the square to about half its original size, I'll press Enter (Win) / Return (Mac) to accept the transformation, and then just as I've done with the other squares, I'll use the Move tool to drag it to a new location, this time somewhere around the outside edge of the collage:

Step 11: Continue Adding More Smaller Squares Around The Outer Edges Of The Collage
Continue to duplicate the layer with the smaller square mask and moving the smaller squares to the outer edges of the collage. Again, add as many as you need to make the effect look "right" to you. Here's mine after adding several smaller squares around the edges. I've also added some here and there in the main part of the image to add a little variety:

Step 12: Merge All The Square Mask Layers Into One
After adding all of my smaller squares to the image, I now have a grand total of 56 squares, which means I have 56 layers that contain a square-shaped mask. I want to complete the effect by adding a drop shadow to the collage, but I can't do that very easily when the collage is made up of 56 separate layers. I need to merge them all onto one layer. To do that, in my Layers palette, I'm going to click on the top most layer to select it. Then I'm going to scroll all the way down and Shift-click on "Layer 1", which is the layer that started the whole collage. This will select all of the square mask layers at once (you'll see them all selected in the Layers palette).
With them all selected, press Ctrl+E (Win) / Command+E (Mac) to merge all of them onto a single layer above the white-filled layer. You'll now have only three layers in the Layers palette - the Background layer, the white-filled layer, and the merged layer:

Step 13: Add A Drop Shadow To Complete The Effect
With the merged layer selected, click once again on the New Adjustment Layer icon at the bottom of the Layers palette, and this time select Drop Shadow from the list:

This is going to bring Photoshop's Layer Style dialog box back up, this time set to the Drop Shadow options. The only option I'm going to change is the Opacity. I just want a subtle drop shadow, nothing that's going to take the attention away from the collage itself, so I'm going to lower the opacity value all the way down to 25%:
Click OK to exit out of the Layer Style dialog box, and we're done! Here's my final "Collage of Squares" effect:
And there we have it! That's how to turn a photo into a collage of squares with Photoshop! Visit our Photo Effects section for more Photoshop effects tutorials!