
Fun With Silhouettes In Photoshop
In this Photoshop tutorial, we're going to have some fun with silhouettes. By that, I mean we'll first create a basic silhouette using a technique that will give us the freedom to resize the silhouette as needed without any loss of image quality, and then we'll see how to fill the silhouette with a fun background to create interesting designs!
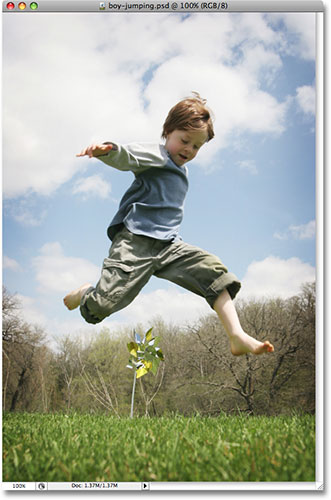
I'll be creating a couple of silhouettes for this tutorial. First, I'll use the boy from this photo:
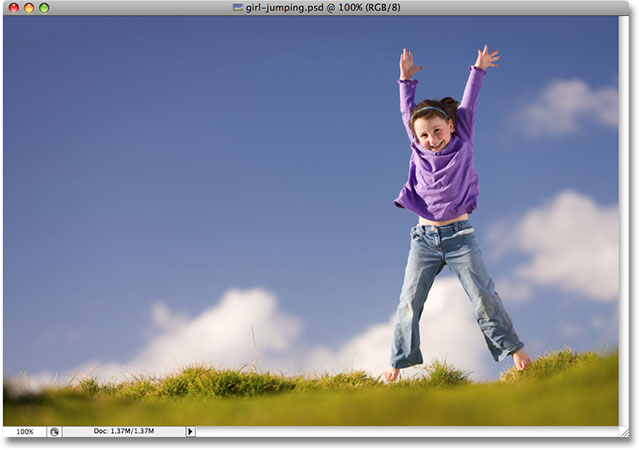
I'll also create a silhouette from the girl in this photo:
I'll be filling both silhouettes with a background, and I'll be using the background we created in our recent Classic Starburst Background tutorial:
Of course, you can use whichever background you like. If you're creating this starburst background from our tutorial, you'll want to make sure you flatten the starburst image when you're done by going up to the Layer menu at the top of the screen and choosing Flatten Image so that the starburst image is on a single Background layer, which will make things easier later on. As I said though, feel free to use whichever background image you want.
Here's the final effect we'll be working towards:
Before we get started, I should mention that we'll be using Photoshop's Pen Tool to create our silhouettes, as opposed to something more basic like the Lasso Tool. There's a couple of reasons why. First, getting professional quality selections with the Lasso Tool is next to impossible, and silhouettes created with the Lasso Tool generally look sloppy and amateurish. The Pen Tool gives us all the precision we need to create great looking shapes.
The second reason for choosing the Pen Tool is that it allows us to create vector-based shapes which are resolution-independent, meaning we can resize them as needed without any loss in image quality. The Lasso Tool, on the other hand, creates pixel-based selections which are not resize-friendly. They tend to lose image quality after being resized, especially if you need to make them larger. So, for great looking silhouettes that won't lose image quality no matter what size we make them, we need the Pen Tool!
Having said that, if you're not familiar with how to use the Pen Tool in Photoshop, be sure to check out our Making Selections With The Pen Tool tutorial first, where you'll find everything you need to know to get up and running with what is, without question, the single best selection tool in all of Photoshop.
Step 1: Select The Pen Tool
Open the first image that you want to create a silhouette from (in my case, it's the photo of the boy) and select the Pen Tool from Photoshop's Tools palette:
You can also select the Pen Tool by pressing the letter P on your keyboard.
Step 2: Select The "Shape Layers" Option In The Options Bar
As soon as you select the Pen Tool, the Options Bar at the top of the screen will change to show options specifically for the Pen Tool. Over on the left of the Options Bar, you'll see a series of three icons - one that looks like a square with a smaller square in each corner (the Shape Layers icon), one that has the Pen Tool in the center of the square (the Paths icon), and one that's just a simple square (the Fill Pixels icon). These icons control what it is we're doing with the Pen Tool. We can use the Pen to draw vector-based shapes, we can use it to draw paths (which are basically shape outlines), and we can use it to draw pixel-based shapes. To create our silhouette, we want to draw vector-based shapes, so click on the Shape Layers icon in the Options Bar to select it:

Step 3: Reset Your Foreground And Background Colors If Needed
As I mentioned, we'll be filling our silhouette with a background image, but let's first create a more traditional black-filled silhouette. For that, we'll need our Foreground color set to black, which happens to be its default color (white is the default color for the Background color). If your Foreground color is already set to black, you can skip this step. If it's not, you can easily reset the Foreground and Background colors by pressing the letter D on your keyboard. If you look at your Foreground and Background color swatches near the bottom of the Tools palette, you'll see that black is now the Foreground color (the left swatch) and white is now the Background color (the right swatch):
Step 4: Draw An Outline Around The Person In The Photo
With the Pen Tool in hand, the Shape Layers option selected in the Options Bar and your Foreground color set to black, begin drawing an outline around the person in your photo, adding anchor points and moving direction handles as needed. Again, be sure to read through our Making Selections With The Pen Tool tutorial first if you need help using the Pen Tool.
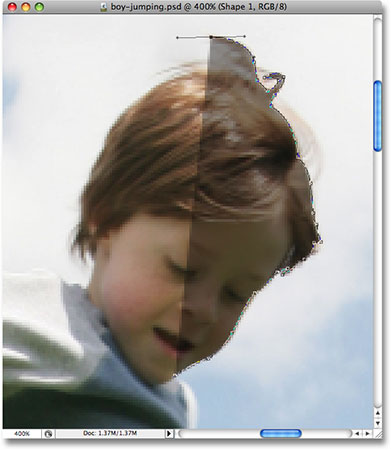
You'll quickly notice a bit of a problem as you work your way around the person. Since we're drawing a shape, Photoshop is filling the area inside the outline with black as you create it, which in itself is not a problem except that it tends to block your view of what you're doing. Here we can see that I've started drawing an outline around the boy's head, but the solid black is completely blocking him from view as I work my way around him:
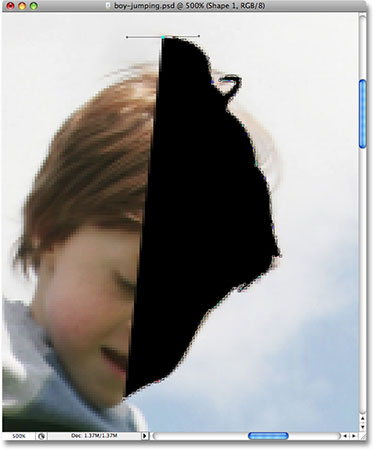
To get around this little problem, all we need to do is temporarily lower the opacity of our shape layer. If we look in our Layers palette, we can see that we now have two layers. Our photo is on the Background layer, and the shape we're drawing with the Pen Tool is on the shape layer, named "Shape 1", directly above it. The shape layer is currently selected (we know this because it's highlighted in blue), so go up to the Opacity option in the top right corner of the Layers palette and lower the opacity down to around 40% or so:
With the opacity of the shape lowered, we can now see through the solid black fill, which makes it much easier to see what we're doing:
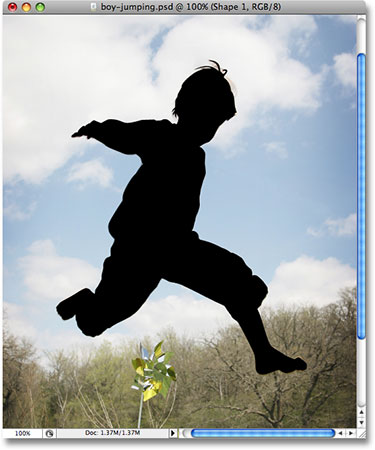
Continue drawing your outline around the person with the Pen Tool. When you're done, go back to the Opacity option in the Layers palette and raise the opacity back to 100%. Here's my completed shape around the boy, filled with solid black. I now have my first silhouette:
Step 5: Create A New Blank Photoshop Document
Now that we've created our first silhouette, let's move it into its own document. First, we'll need to create a new Photoshop document, so go up to the File menu at the top of the screen and choose New, which brings up the New Document dialog box. I'll name my new document "Silhouettes", although naming new documents is completely optional.
Choose whatever size you need for your document. For this tutorial, I'll create a 6x6 inch document and I'll set the Resolution to 300 pixels per inch, which is a standard resolution for professional quality printing. Make sure you choose White as your document's Background Contents:

Click OK to exit out of the dialog box when you're done, and the new document appears:
Step 6: Drag The Shape Layer Into The New Document
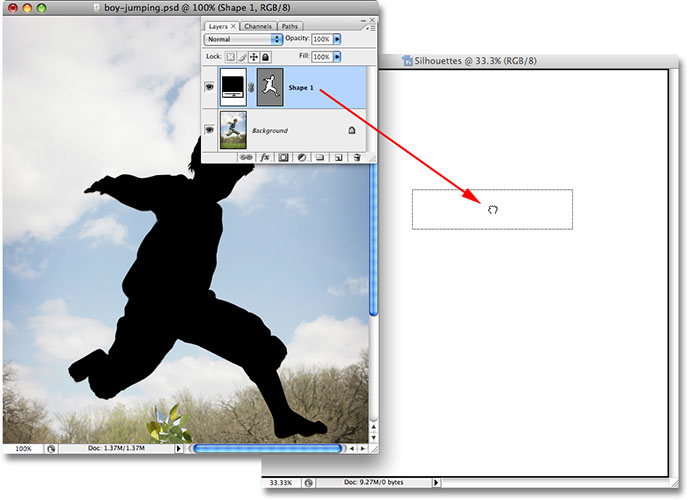
With both your original photo and the new blank document now open on your screen in their own separate document windows, click anywhere inside your original photo to select it, which will make it active. Then, go to the Layers palette, click on the shape layer which contains your silhouette and simply drag the layer into the new document:
Release your mouse button and your black-filled silhouette will appear inside the new document:
You can close out of the original photo's document window at this point, since we no longer need it. And now, if we look in the Layers palette once again, we can see that our shape layer has in fact been copied over to the new document and is sitting directly above the white-filled Background layer:
Step 7: Resize And Reposition The Silhouette With Free Transform
As I mentioned at the beginning of this tutorial, one of the main reasons why we used the Pen Tool to create our silhouette was because it allowed us to create our silhouette as a vector-based shape, and as a shape, we're free to resize it any way we want, making it as large or as small as we like, without any loss in image quality. Let's resize the silhouette using Photoshop's Free Transform command. With the shape layer selected in the Layers palette, press Ctrl+T (Win) / Command+T (Mac) to bring up the Free Transform box and handles around the silhouette. Hold down your Shift key to constrain the proportions of the silhouette so you don't distort the look of it and drag any of the corner handles to resize it. If you want to resize it from the center rather than from the corner, hold down your Alt (Win) / Option (Mac) key as you drag. You can also move the silhouette around inside the document by clicking anywhere inside the Free Transform box and dragging the shape around with your mouse. Just don't click on the small target icon in the center, otherwise you'll move the target icon, not the shape.
Here, I've made my silhouette larger and moved it into the top left corner of the document:
Press Enter (Win) / Return (Mac) when you're done to accept the transformation and exit out of the Free Transform command.
Step 8: Add Additional Silhouettes To The Document (Optional)
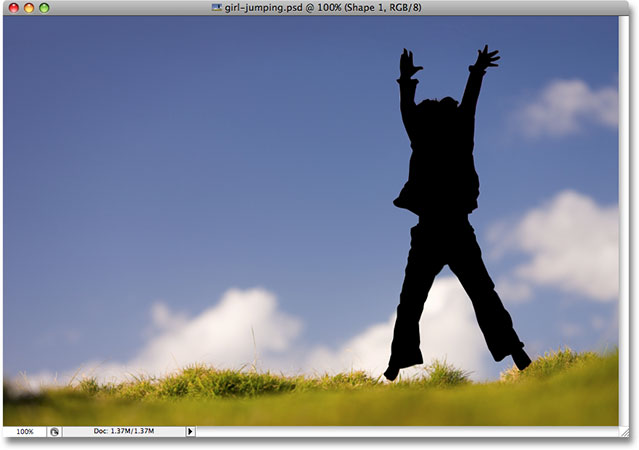
If you're using only one silhouette in your design, you can skip this step. I have a second silhouette
that I want to add to my design, so I'll open up my second photo, which is the image of the girl:
Using the same steps as before, I'll select the Pen Tool from the Tools palette and draw an outline around the girl, lowering the opacity of the shape layer in the Layers palette to around 40% so I can see what I'm doing as I make my way around her:
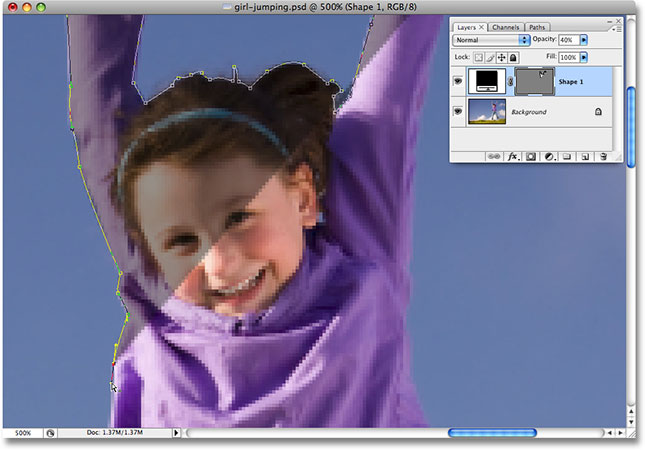
When I'm done, I'll raise the opacity of the shape layer back to a full 100%. Here's my image with the silhouette of the girl now complete:
I need to drag this second silhouette into my main "Silhouettes" document, so with both document windows open on my screen, I'll click on the girl's photo to select it and make it active, then I'll click on the shape layer in the Layers palette and simply drag the layer into the "Silhouettes" document:

With my second silhouette now inside the main document, I'll close out of the girl's photo since I no longer need to have it open. If we look in my "Silhouettes" document now, we can see that the girl's silhouette has been added:
Just as I did before with the first silhouette, I'll press Ctrl+T (Win) / Command+T (Mac) to bring up Photoshop's Free Transform box and handles around my new silhouette and I'll drag out any of the corner handles to resize it, holding Shift as I drag to constrain the proportions of the shape and holding Alt (Win) / Option (Mac) as well to force the shape to resize from its center. I'll also drag the shape down towards the bottom right corner of the document while I'm at it:
I'll press Enter (Win) / Return (Mac) when I'm done to accept the transformation and exit out of the Free Transform command.
If I look in my Layers palette, I can see that I now have two shape layers sitting above the white-filled Background layer. The boy's silhouette is on the bottom shape layer and the girl's is on the top one:
Unfortunately, both shape layers are named "Shape 1", which is a bit confusing. I'm going to rename the layers by double-clicking directly on their names and typing in new names. I'll name the bottom shape layer "Boy" and the top one "Girl":
Step 9: Open The Image You Want To Fill The Silhouettes With
Let's make our silhouettes look a bit more interesting by filling them with a fun background image rather than leaving them filled with solid black. Open the image you want to fill your silhouettes with. As I mentioned at the beginning of this tutorial, I'll use the starburst background we created in our recent Classic Starburst Background tutorial:
Step 10: Drag The Image Into The Silhouettes Document
With both your Silhouettes document and your background image open on your screen in their own separate document windows, click anywhere inside the background image to select it and make it active, then click on the Background layer in the Layers palette and drag the layer into the Silhouettes document:
Release your mouse button and the background image appears in front of the silhouettes in the "Silhouettes" document:
You can close out of the background image once you've dragged it into the "Silhouettes" document. If we look in the Layers palette, we can see that the background image now appears on a layer named "Layer 1" above the other layers in the document:
The reason why the image appeared above the other layers is because Photoshop automatically placed it directly above the layer that was currently selected. In my case, I had the "Girl" layer selected, so Photoshop placed the background image directly above it. If the "Boy" layer had been selected, Photoshop would have placed the background image between the "Boy" and "Girl" layers.
Step 11: Create A Clipping Mask
At the moment, the starburst image (or whatever image you're using) is blocking both of my silhouettes from view. Obviously, that's not what I want. What I want is for the starburst to appear inside one of my silhouettes. For that, we need to create a clipping mask, which will "clip" the starburst image to whatever is on the layer directly below it. In my case, the girl's silhouette is directly below it, so when I create the clipping mask, the only part of the starburst image that will remain visible is the area that falls within the silhouette. This will create the illusion that the silhouette is filled with the starburst pattern.
To create the clipping mask, make sure you have "Layer 1" selected in the Layers palette, then go up to the Layer menu at the top of the screen and choose Create Clipping Mask:
With the clipping mask created, the starburst image becomes clipped to the silhouette directly below it, making it appear as though the silhouette is being filled by the starburst:
Step 12: Resize and Reposition The Background Image If Needed With Free Transform
With "Layer 1" still selected, press Ctrl+T (Win) / Command+T (Mac) to bring up Photoshop's Free Transform box and handles around your background image, then resize and reposition the image as needed until you're happy with how it appears inside the silhouette. You can also rotate the image if needed by moving your mouse cursor outside of the Free Transform box, then clicking and dragging your mouse. The Free Transform box and handles will appear around the actual dimensions of your background image, even though the only part of the background image you can see is the area inside the silhouette:
Press Enter (Win) / Return (Mac) when you're done to accept the transformation and exit out of the Free Transform command. We now have our first background image-filled silhouette:
Step 13: Duplicate The Background Image And Move It Above The Second Silhouette
If you're using two silhouettes in your design as I am, we need to make a copy of our background image and move it directly above the second silhouette in the Layers palette. We can actually do both of these things at once. Go to your Layers palette and hold down your Alt (Win) / Option (Mac) key. This will tell Photoshop that we want to make a copy of the layer. Then click on "Layer 1" and, with Alt/Option held down, drag the layer down between the two shape layers. You'll see a thick black line appear between the two layers to let you know when you're in the right spot:
Release your mouse button when the black line appears. A copy of "Layer 1" now appears in the Layers palette directly between the two shape layers:
If we look in the document window, we can see that the background image is now once again blocking part of the design from view:
Step 14: Create A Clipping Mask
We need to clip the copy of our background image to the second silhouette so that it appears inside the silhouette, just as we did a moment ago with the first silhouette. Go up to the Layer menu at the top of the screen and choose Create Clipping Mask:
This clips the copy of the background image to the second silhouette, making it appear as though the background image is inside the silhouette:
Step 15: Resize And Reposition The Background Image With Free Transform
Press Ctrl+T (Win) / Command+T (Mac) to bring up Photoshop's Free Transform box and handles around the background image inside the silhouette, then resize, rotate and/or move it into place as needed:

Press Enter (Win) / Return (Mac) when you're done to exit out of the Free Transform command.
Step 16: Add A Stroke To The Silhouettes
At this point, our basic effect is done, but let's give our silhouettes a little more definition by adding a thin stroke around them. First, select either of the shape layers in the Layers palette. I'll click on the "Boy" layer to select it. Then, click on the Layer Styles icon at the bottom of the Layers palette:
Select Stroke from the bottom of the list:
This brings up the Layer Style dialog box set to the Stroke options in the middle column. I'm going to leave all of the default settings alone, except for the color. The default stroke color is red, and I want to use the orange color from the starburst background I'm filling my silhouettes with. To change the color of the stroke, click on the color swatch in the dialog box:
This brings up Photoshop's Color Picker, but rather than choosing a color with the Color Picker, I'm simply going to move my mouse cursor over an orange area inside the boy's silhouette and click on it to sample the color:
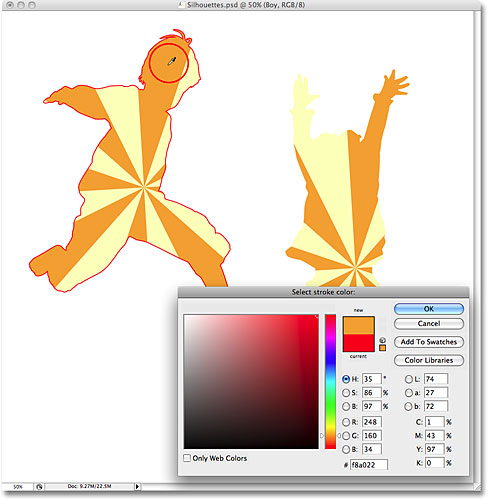
Click OK to exit out of the Color Picker when you're done, then click OK to exit out of the Layer Style dialog box. The boy's silhouette now has an orange stroke applied to it, giving it a bit more definition:
To quickly apply the stroke to the second silhouette, go up to the Layer menu at the top of the screen, choose Layer Style, and then choose Copy Layer Style:

Click on the second silhouette's layer in the Layers palette to select it. In my case, I'll click on the "Girl" layer. Then go back up to the Layer menu, choose Layer Style once again, and this time, choose Paste Layer Style:
And just like that, the stroke is now applied to the second silhouette as well:

I'm going to finish up my design by adding a few scattered stars around the silhouettes. I'll do that next.
Step 17: Create A New Layer Group
As I mentioned at the bottom of the previous page, I'm going to finish my design by adding a few scattered stars around the silhouettes. I could draw a star from scratch if I wanted, but Photoshop actually ships with a couple of star shapes that we can use. Before we add them, let's create a Layer Group to place all of our stars in. This way, we'll keep our Layers palette clean and organized. First, click on the top-most layer in your Layers palette to select it. Then, hold down your Alt (Win) / Option (Mac) key and click on the Layer Group icon at the bottom of the Layers palette (note: in earlier versions of Photoshop, Layer Groups are known as Layer Sets):
By holding down Alt/Option when clicking on the icon, we tell Photoshop to pop up the New Group dialog box for us where we can enter a name for our new layer group. I'm going to name mine "Stars":
Click OK when you're done to exit out of the dialog box. If we look in the Layers palette now, we can see that a new layer group named "Stars" has been added above the other layers. A layer group is basically a folder in the Layers palette that we can place multiple layers inside of, which helps keep everything organized:
Step 18: Select The Custom Shape Tool
Select Photoshop's Custom Shape Tool, which you'll find hiding behind the Rectangle Tool in the Tools palette. Click and hold your mouse down on the Rectangle Tool for a second or two until the fly-out menu appears, then select the Custom Shape Tool from the bottom of the list:
Step 19: Load The "Shapes" Custom Shape Set
Photoshop comes with a lot of custom shapes that we can use in our designs, but only a few of them are loaded in already for us. To access the star shapes, we'll need to load in one of the additional custom shape sets ourselves. With the Custom Shape Tool selected, right-click (Win) / Control-click (Mac) anywhere inside the document window to bring up the Custom Shape selection box, then click on the small right-pointing arrow in the top right corner of the selection box:
This bring up a fly-out menu, and at the bottom of the menu, you'll see a series of custom shape sets that we can load. Click on the Shapes set to select it:
Photoshop will pop up a dialog box asking if you want to replace the current shapes with the shapes in the Shapes set. Click Append, which will add the shapes in the Shapes set without removing the shapes that are already available:
If you scroll down inside the Custom Shape selection box now, you'll see the newly added shapes that are available. You'll find two star shapes, "5 Point Star" and "5 Point Star Frame" (if you have "Show Tool Tips" enabled in Photoshop's Preferences, the names of the shapes will appear as you mouse over them). I'm going to select the "5 Point Star Frame" shape by clicking on it:
I want to use the same orange color that I used for my stroke, so to change the shape color, I'll click on the color swatch in the Options Bar at the top of the screen:
This brings up Photoshop's Color Picker, but I'm not going to use. Instead, just as I did for the stroke color, I'm going to move my mouse cursor over an area of orange in my document window and I'll click on it to sample the color:
Step 20: Drag Out The First Star Shape
With the color now chosen, we can begin adding stars to the design. Hold down your Shift key to constrain the proportions of the star, making sure not to distort the look of it, then click inside the document where you want to add the first star and drag out a star shape. Hold down Alt (Win) / Option (Mac) as well if you want to drag the star shape out from its center. If you need to reposition the star as you're dragging, hold down your spacebar and move your mouse to reposition the shape, then release your spacebar and continue dragging. Here, I've added my first star shape in the bottom left corner of the image:
Step 21: Rotate The Star With Free Transform
Press Ctrl+T (Win) / Command+T (Mac) to bring up Photoshop's Free Transform box and handles around the star, then move your mouse cursor outside of the Free Transform box, click and drag your mouse to rotate the star if needed:
Press Enter (Win) / Return (Mac) when you're done to accept the rotation and exit out of the Free Transform command.
Step 22: Add Additional Star Shapes
Add additional star shapes by repeating the last couple of steps. First, drag out the shape, then rotate the shape if needed with Free Transform. Here's my image after adding a few more stars:
Step 23: Select the "5 Point Star" Shape
With the Custom Shape Tool still selected, right-click (Win) / Control-click (Mac) anywhere inside the document to once again bring up the Custom Shape selection box, then select the other star shape, the "5 Point Star" shape:
Step 24: Add More Stars
With the "5 Point Star" shape selected, follow the same steps to add more stars, first dragging them out and then rotating them with the Free Transform command. If we look in our Layers palette now, we can see all of the shape layers we've added, each one containing one of the star shapes. Notice how they all appear inside the "Stars" layer group:
To show you what I meant about using layer groups to keep things organized, click on the small triangle to the left of the layer group's name. This will close the layer group, and now all of the stars layers are conveniently tucked away inside the layer group, even though they still remain visible in the document:
And here's my final silhouette design after adding a few more stars using the "5 Point Star" shape:
And there we have it! That's how to create fun, interesting designs with images and silhouettes in Photoshop! Visit our Photo Effects section for more Photoshop effects tutorials!