
Photo Effects Tip: Restore Missing Filters In Photoshop CS6
Adobe made some major changes to Photoshop's interface with CS6. The new darker color may be the most immediately obvious change, but it's not the only one. Another big change in particular may cause some confusion when creating photo effects, especially if you use Smart Filters.
If you've used earlier versions of Photoshop and upgraded to CS6, you may have noticed that the Filter menu in the Menu Bar along the top of the screen has been, well, filtered. Some of the filter groups from Photoshop CS5 and earlier - Artistic, Brush Strokes, Sketch and Texture - are completely missing from the Filter menu in CS6, while other groups have had filters removed. The good news is, the missing filters and groups are not actually gone. Adobe simply removed them from the Filter menu to streamline the interface and as of Photoshop CS6, they're now found exclusively in the main Filter Gallery.
That may be fine for some people, but what if you're not one of these "some people"? What if you prefer having access to all of Photoshop's filters directly from the Filter menu, the way things used to be? As we'll see, this isn't just about a personal preference. Being forced to select filters from the Filter Gallery can actually make Smart Filters a bit less useful than they were before. Let's look at the problem, and then we'll learn how to easily fix it.
How To Restore Missing Filters In Photoshop
The Problem
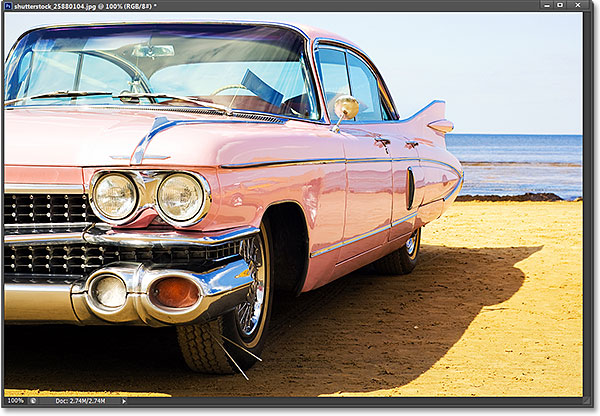
First, the problem. Here's an image I currently have open in Photoshop CS6 (classic car photo from Shutterstock):
Let's say I want to apply the Cutout filter to this image, one of Photoshop's more popular creative-type filters. Let's also say that I want to apply it as a Smart Filter, which will keep the Cutout filter fully editable in case I want to make changes later. To apply the Cutout filter, or any filter, as a Smart Filter, I first need to convert the layer my image is sitting on into a Smart Object. If we look in my Layers panel, we see my photo sitting on the Background layer. To convert the layer into a Smart Object, I'll click on the small menu icon in the top right corner of the Layers panel:
Then I'll choose Convert to Smart Object from the menu that appears:

The photo still looks the same in the document window, but a small Smart Object icon in the lower right corner of the preview thumbnail in the Layers panel tells us the layer is now a Smart Object (Photoshop has also renamed the layer from Background to Layer 0):
Now that I've converted the layer to a Smart Object, I can apply the Cutout filter to it as a Smart Filter. In Photoshop CS5 and earlier, the Cutout filter was found in the Artistic group under the Filter menu, but when I open the Filter menu from the Menu Bar in Photoshop CS6, we see that something has changed. There no longer is an Artistic group, which means I can no longer access the Cutout filter from here:

In CS6, to access the Artistic group, as well as the missing Brush Strokes, Sketch and Texture groups, we need to open the Filter Gallery by going up to the Filter menu and choosing Filter Gallery:

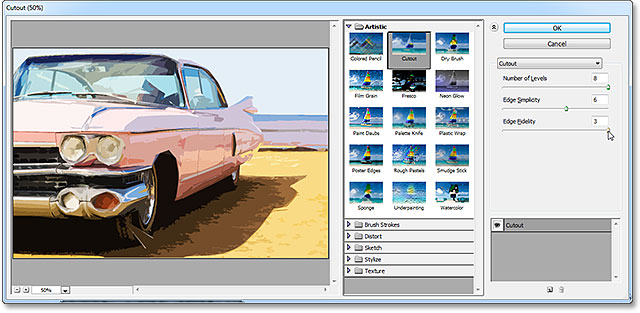
The middle column of the Filter Gallery is where we find all of our Filter groups. We can twirl each group open or closed to show or hide the filters inside it by simply clicking on the name of a group. The Artistic group is at the very top, so I'll click on its name to twirl the group open. Then, I'll click on the Cutout filter's thumbnail to select it. The controls and options for the selected filter (in this case, Cutout) appear in the column on the right. Since this isn't meant to be a lengthy tutorial on using the Filter Gallery or on any specific filter, I'll quickly set the Number of Levels to 8, Edge Simplicity to 6 and Edge Fidelity to 3:

I'll click OK to close out of the Filter Gallery, and here's my image with the Cutout filter applied:

And here's where the problem comes in. Normally when we apply filters as Smart Filters, the name of each filter we used appears below the Smart Object in the Layers panel. If we later need to go back and re-edit a filter's settings, we simply double-click on the specific filter's name. That's still the case in Photoshop CS6, with one small hitch. Any filters we had to access from the Filter Gallery (because they're no longer available to us under the Filter menu) are not listed by their actual name. Instead, they're listed under the generic name "Filter Gallery", which doesn't tell us which filter was actually used:

That may be fine in a case like this where I've only applied one filter. I can pretty easily remember it was the Cutout filter. But what happens if we add additional Smart Filters and they all had to be accessed from the Filter Gallery? I'll quickly apply two more Smart Filters to the image (Spatter from the Brush Strokes group and Diffuse Glow from the Distort group). Since I was forced to access them from the Filter Gallery, these new filters are also listed only as "Filter Gallery" in the Layers panel, making it not so easy to tell which is which:

Restoring The Missing Filters In The Filter Menu
Is this a huge problem? No, but it could potentially slow down your workflow. Thankfully, Adobe realized this and included the option to revert the Filter menu back to the way it used to be in every version of Photoshop before CS6, and that option is found in the Preferences. On A Windows PC, go up to the Edit menu at the top of the screen, choose Preferences, then choose Plug-Ins. On a Mac, go up to the Photoshop menu, choose Preferences, then choose Plug-Ins:

This opens Photoshop's Preferences dialog box set to the Plug-Ins preferences. The option we want is Show all Filter Gallery groups and names. By default, this option is unchecked. If you want to revert the Filter menu back to the way it used to be in earlier versions of Photoshop and be able to access all the filters directly from the Filter menu, simply check this option, then click OK to close out of the dialog box (note that you'll need to restart Photoshop for the change to take effect):

Through the magic of you not being here as I'm writing this, I've gone ahead and restarted Photoshop, and I've re-opened the same photo. I've also again converted it to a Smart Object by clicking on the menu icon in the Layers panel and choosing Convert to Smart Object:

With the Show all Filter Gallery groups and names option selected in the Preferences, I'll once again go up to the Filter menu at the top of the screen, and this time, all of the filter groups are available, just as they were in Photoshop CS5 and earlier:

To access the Cutout filter, I'll choose the Artistic group, then I'll choose Cutout:

Now, this does still open the Filter Gallery, which is where we still set the options for filters like Cutout, but the important thing here is that I was able to select the Cutout filter directly from the Filter menu. I did not select it from the Filter Gallery itself. I'll use the same settings as before for the Cutout filter, then I'll click OK to close out of the Filter Gallery:
Just like last time, Cutout is applied to my Smart Object as a Smart Filter, but now we see an important difference in the Layers panel. Because I was able to choose the Cutout filter directly from the Filter menu this time, not from the Filter Gallery, Photoshop displays the filter by its actual name:

I'll quickly apply the Spatter filter by going to Filter > Brush Strokes > Spatter, then the Diffuse Glow filter by going to Filter > Distort > Diffuse Glow. Here's what my image looks like with all three Smart Filters applied (again, I'm skipping over details with the filters because this is not a tutorial on creating any specific effect):

And again, because I was able to select these filters directly from the Filter menu this time, not from the Filter Gallery, Photoshop lists them by their actual filter names under the Smart Object. If I want to change a setting for any of the filters by double-clicking on its name, or re-arrange the order the filters are applied to the image by clicking and dragging one above or below another, I no longer have to guess which filter is which:

One thing to keep in mind, though, is that even with the Show all Filter Gallery groups and names option checked in Photoshop's Preferences, if you select a filter from the Filter Gallery rather than from the Filter menu in the Menu Bar, it will still appear as "Filter Gallery" in the Layers panel when you apply it as a Smart Filter. If you want the filter's actual name to appear, you must select it directly from the Filter menu.