
Creative Vignette Effects With The Radial Filter In Photoshop CC
Photoshop CC (Creative Cloud) brings with it lots of exciting new features, including the brand new Camera Raw Filter that lets us apply any or all of Camera Raw's powerful image editing abilities as a filter to any layer we want in our Photoshop document! What's more, Camera Raw (and the Camera Raw Filter) in Photoshop CC includes new features of its own, like the amazing Radial Filter. In this tutorial, we'll learn how the Radial Filter can be used to add highly customizable, creative vignette effects to your images!
As we'll see, the Radial Filter even lets us add multiple vignettes at the same time so we can darken some areas of the image while brightening and enhancing others! And, we'll create the entire effect non-destructively using Smart Objects and Smart Filters so our original image remains completely unharmed.
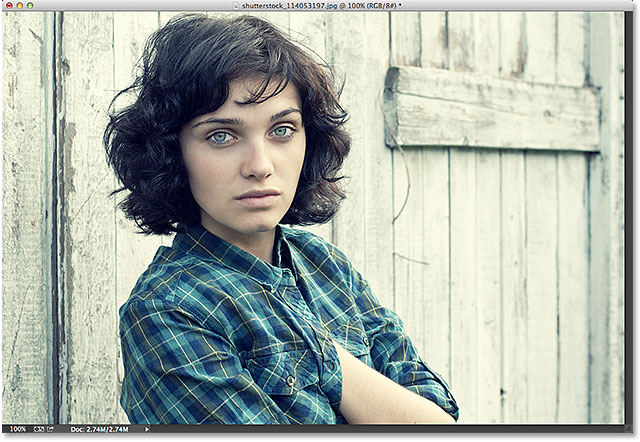
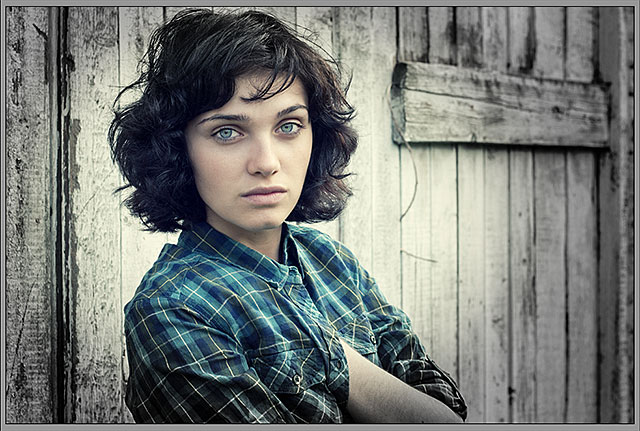
Since the Radial Filter is only available as part of Camera Raw in Photoshop CC, you'll need Photoshop CC to follow along. Here's the photo I'll be starting with (serious girl photo from Shutterstock):
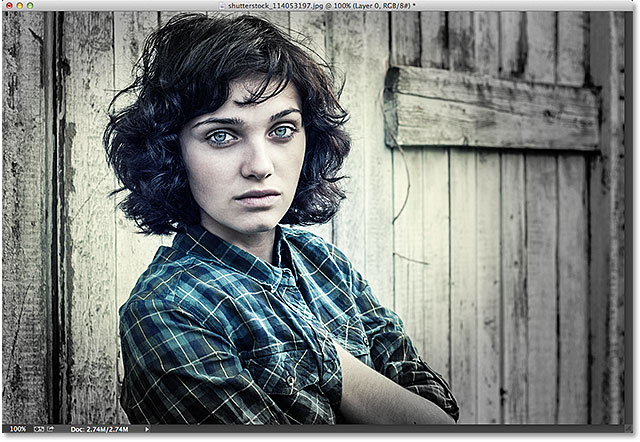
And here's what the final result will look like. Of course, this is just one possible result using this specific image. What's more important, as with all of our tutorials, is that you'll learn all the steps needed to create your own customized Radial Filter vignette effects with your own images:
How To Create Vignettes With The Radial Filter
Step 1: Convert The Background Layer Into A Smart Object
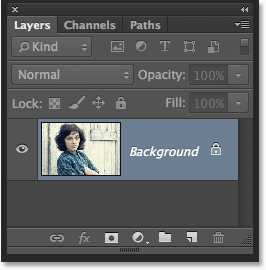
We'll start by converting the layer our photo is sitting on into a Smart Object. This way, the Camera Raw Filter will be applied as a Smart Filter, keeping the vignette effect itself fully editable while the original image remains untouched and unharmed. With my photo newly opened in Photoshop CC, if we look in the Layers panel, we see the image sitting on the Background layer:
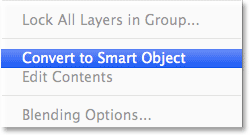
To convert the layer into a Smart Object, click on the small menu icon in the top right corner of the Layers panel:
Choose Convert to Smart Object from the menu that appears:
Nothing will seem to have happened to the image in the document window, but a small Smart Object icon appears in the lower right corner of the layer's preview thumbnail, letting us know that the layer is now a Smart Object:
Step 2: Select The Camera Raw Filter
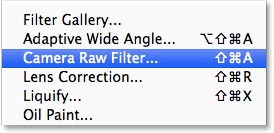
Go up to the Filter menu in the Menu Bar along the top of the screen and choose Camera Raw Filter:
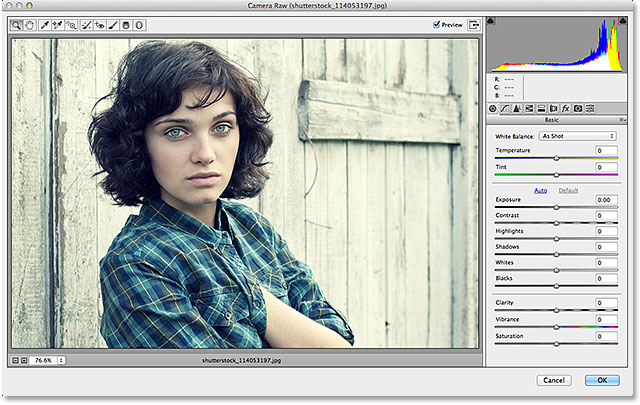
The image will appear inside the large Camera Raw dialog box. Technically, this is the Camera Raw Filter dialog box, but with few exceptions, all of the tools, controls and options that we'd find in the main Camera Raw dialog box are here:
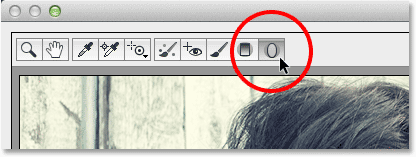
Step 3: Select The Radial Filter
Along the top left of the Camera Raw dialog box is where we find its various tools. Click on the Radial Filter to select it (it's the last tool on the right):
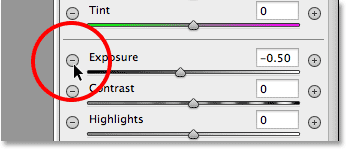
Step 4: Lower The Exposure
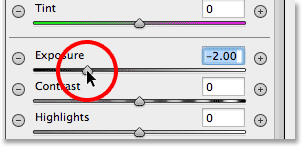
With the Radial Filter selected, the panel on the right of the Camera Raw dialog box displays the Radial Filter's various options for making adjustments to the image. Start by clicking the round minus icon ( - ) directly to the left of the word Exposure. This will set the Exposure slider to a preset value of -50, but the main reason we're doing this is because it instantly resets all of the other sliders to 0, allowing us to focus just on the Exposure setting:
Then, click on the Exposure slider itself and drag it further to the left to a value of around -2.00. This will give us a good initial darkening value to start with. The image itself won't appear any darker at the moment because we haven't yet added the actual filter, but we'll do that next:
Step 5: Drag Out The Radial Filter In The Image
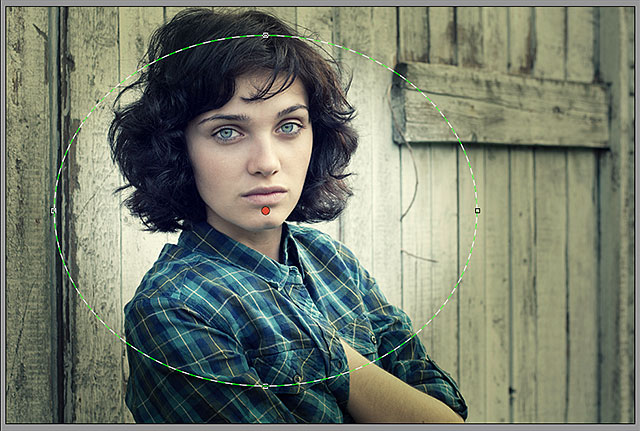
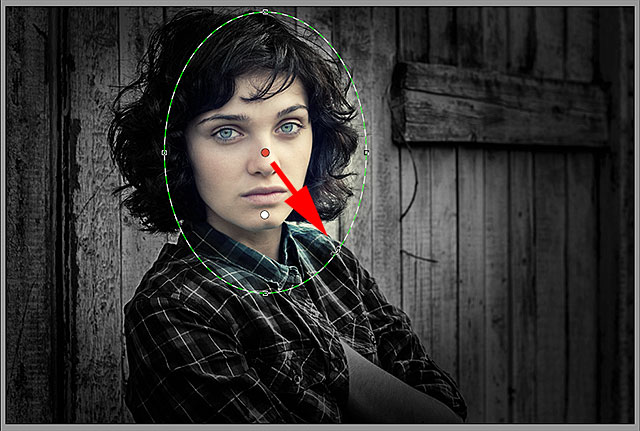
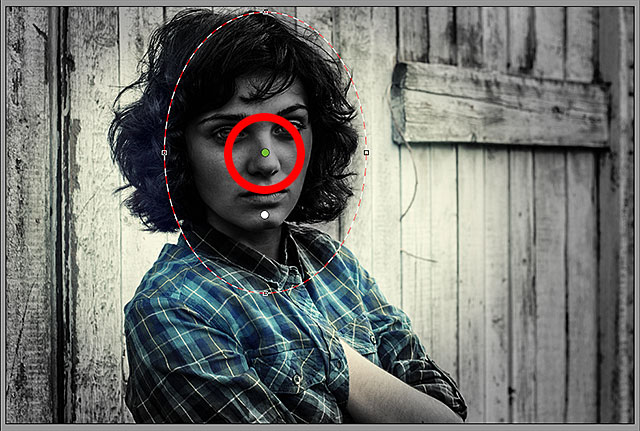
With the Exposure value lowered, click somewhere near the center of where you want your vignette effect to appear in the image. Then, with your mouse button still held down, drag outward from that point. You'll see the elliptical Radial Filter shape appearing as an outline as you drag (if you want to force the Radial Filter shape into a perfect circle, press and hold the Shift key on your keyboard as you're dragging). You can move the filter shape around inside the image as you're dragging it by pressing and holding the Spacebar on your keyboard. Release the Spacebar once you've positioned the filter where you want it to continue dragging out its shape, then release your mouse button when you're done:

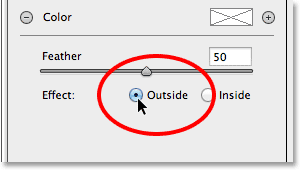
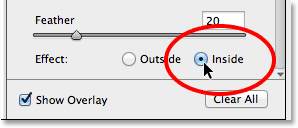
The Outside / Inside Effect Option
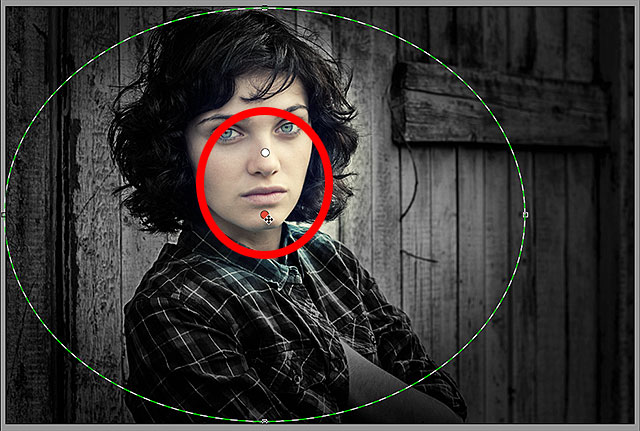
Notice, though, that with my image, the inside of the Radial Filter shape is being darkened while the area outside the shape remains at its original brightness level. That's the exact opposite of what I wanted for my vignette effect. If you're seeing the same thing with your image, look down at the bottom of the Radial Filter options in the panel along the right (you may need to scroll down using the scroll bar along the right of the panel if you're not in Camera Raw's Fullscreen mode). There, at the bottom of the list, is an option called Effect with two checkboxes that control where the image adjustments are applied - inside the shape or outside. Mine is currently set to Inside so I'll click the Outside option to change it:
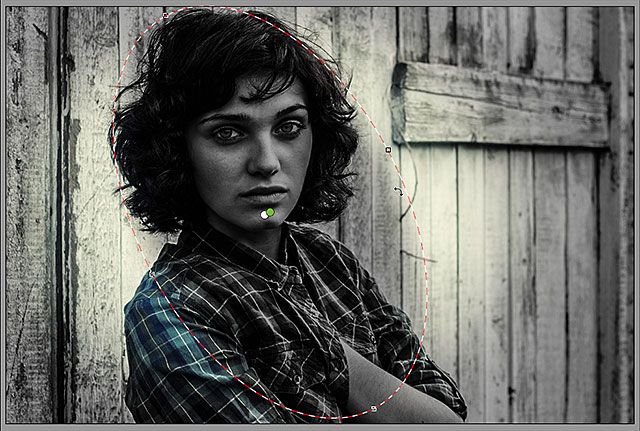
And now, we see the darkening effect appearing around the outside of the shape where it should be:
Resizing, Moving And Rotating The Shape
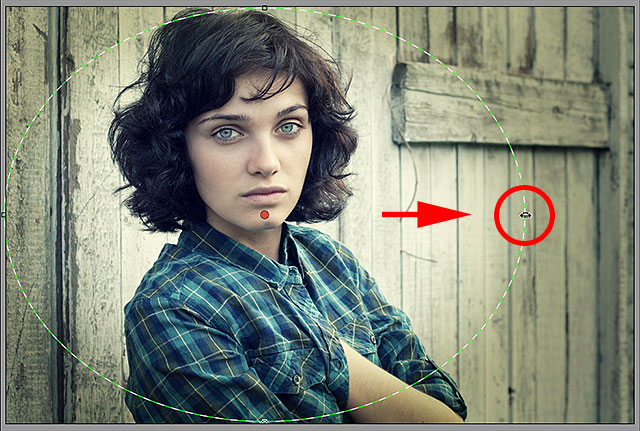
Once you've dragged out your initial Radial Filter shape, you can resize and reshape it, making it taller, shorter, wider or more narrow, by clicking and dragging any of the four handles (the little squares). You'll find one at the top, bottom, left and right of the shape. You can continue moving the shape around inside the image if needed by moving your mouse cursor inside the shape. When your cursor changes to a four-pointed direction arrow, click and drag your mouse. Also, you can rotate it by moving your mouse cursor near the edge of the shape, then clicking and dragging when you see your cursor change into a curved, double-pointed arrow. In my case, I'm just going to make my shape larger by clicking and dragging the handles:
Step 6: Adjust The Image Using The Sliders
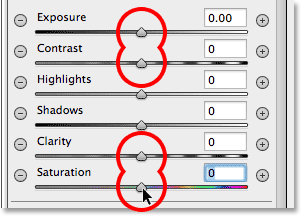
Now that we've added the filter to the image, we can use the various image adjustment sliders in the panel along the right to make further changes to the effect. We can start by fine-tuning the Exposure amount to either darken the effect further or lighten it by clicking and dragging the slider left (darker) or right (lighter). But there's a lot more we can do besides that. We have sliders for adjusting the contrast, the highlights and shadow areas, color saturation, and more! You can experiment with these sliders all you want because everything we're doing to the image here is non-destructive, and you'll see a live update of your changes to the image as you try different settings.
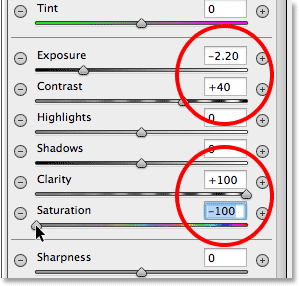
For my image, I think I'll darken the edges a bit more by lowering the Exposure value further to -2.20. I'll bump up the contrast of the edges by increasing the Contrast value to +40. I'll leave the Highlights and Shadow sliders alone for now, but I'll drag the Clarity slider all the way to the right to increase it to its maximum value of +100 (Clarity increases or decreases contrast in the midtones of an image, and setting it to a high amount often creates a harsh, grungy look that I think suits my image well). Finally, I'll drag the Saturation slider all the way to the left to -100 to remove all the color from the edges of the image. Of course, these are just the settings that I think work well with the specific image I'm using. The adjustments you make with your image may be different:
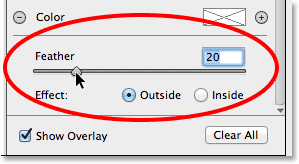
Adjusting The Feathering
We can also adjust the feathering amount for the vignette, or in other words, increase or decrease the size of the transition area between the main image in the center and the darker area surrounding it, by dragging the Feather slider left (to decrease it) or right (to increase it). You'll find the Feather slider near the bottom of the options on the right (directly above the Outside / Inside Effect option):
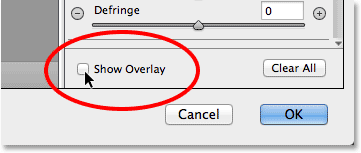
Showing And Hiding The Overlay
To get a better view of what your vignette effect looks like, you can temporarily hide the Radial Filter overlay in the preview area by unchecking the Show Overlay option in the lower right of the Camera Raw dialog box. Select the option again to turn the overlay back on. Or, you can quickly turn the overlay on and off simply by pressing the letter V on your keyboard. Here, I'm unchecking the option to turn the overlay off:
And here's what my image looks like so far with the overlay turned off:
Showing And Hiding The Preview
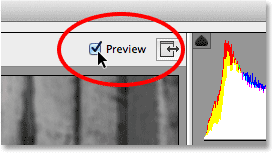
The reason we're seeing a live preview of our changes to the image is because by default, the Preview option at the top of the Camera Raw dialog box is checked. We can turn the preview off at any time to compare our changes with the original image by simply unchecking the Preview option. Check it again to turn the preview back on. Or, you can press the letter P on your keyboard to quickly toggle the preview on and off:
Step 7: Add A Second Radial Filter
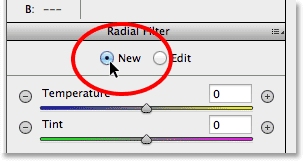
One of the most powerful features of Camera Raw's Radial Filter is that we can add additional Radial Filters to the same image, each with separate image adjustments! To add a new Radial Filter, select New at the top of the Radial Filter panel:
Then, just use everything we've learned from adding our initial filter to add the second one. First, click inside the image and drag outward to create the new filter shape, holding down your Spacebar as you drag to reposition it if needed:
Switching Between Radial Filters
Notice that there are now two round dots on my screen. Each dot represents one of the filters. At any time, we can switch between filters to re-adjust their settings simply by clicking on their dots. The currently active filter will have a colored dot while the other dot(s) appear white. Here, I've clicked on the initial filter's dot to re-select it and make it active:
I'll switch back to my new filter by clicking on its dot. Notice that a couple of things are happening with this second filter. First, all of my settings from the initial Radial Filter have been copied to this second filter. We'll change that in a moment, but the second thing to notice is that my effect is again being applied outside the shape. With this second filter, I want the effect to appear inside the shape, so once again, I'll scroll down to the bottom of the Radial Filter panel along the right and switch the Effect option from Outside to Inside. Or, I could just press the letter X on my keyboard to instantly switch from Outside to Inside and vice versa:
And now, the effect appears inside the second filter. Notice also that the filter's selection dot has changed from red to green. A red dot means the effect is being applied outside the shape, while a green dot indicates it's being applied inside:
I'll resize, move and rotate my second filter using the steps we learned earlier, dragging the handles to resize and reshape it, clicking and dragging inside the shape to move it, and clicking and dragging near the edge of the shape to rotate it:
Next, I want to reset my image adjustment sliders in the Radial Filter panel, and another easy way to reset them is to double-click on them. Here, I've double-clicked the Exposure, Contrast, Clarity and Saturation sliders to reset them all to 0 (the others were already set to 0):
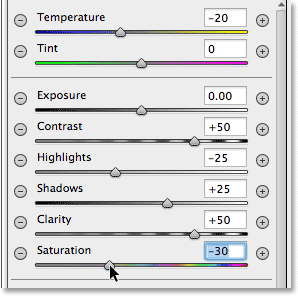
Now that my second filter has been reset, this time I'll start by cooling down the overall color temperature inside the shape by dragging the Temperature slider at the top of the panel a little to the left. A value of around -20 will add a slight blue color cast. I'll leave the Tint slider directly below it set to 0 since I don't want to add any green or magenta to the image. I'll also leave the Exposure slider set to 0, but I'll increase the Contrast to +50. Again, these are just settings that I've found, after some experimenting, that they work well with this particular image.
I'll dial down the highlights, bringing out a bit more detail in the lightest areas inside the shape, by lowering the Highlights value to around -25. Then I'll do the opposite with the Shadows slider, increasing it to +25 to brighten up some of the darkest areas, again bringing out more detail. I'll bump the Clarity value up to +50 to bring out more contrast in the midtones, and finally, I'll lower the Saturation value to -30 to reduce the color saturation:
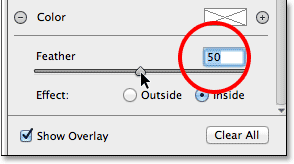
Lastly, I'll increase the size of the transition area for the second filter by bumping the Feather amount up to 50:
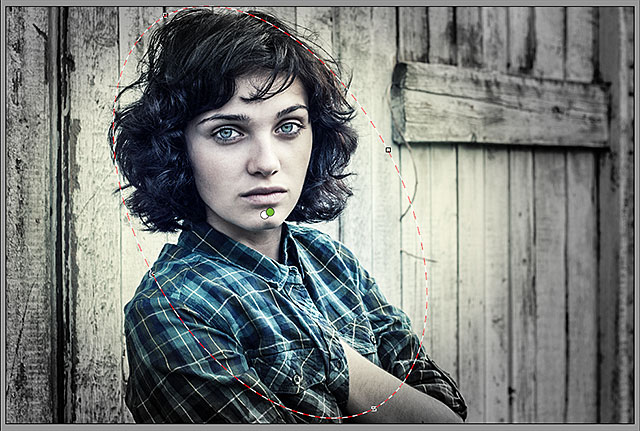
Here's what the image looks like now with both Radial Filters applied:
Step 8: Close Out Of The Camera Raw Dialog Box
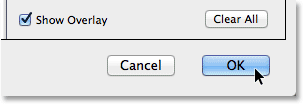
I'm happy with my effect, so I'll click the OK button in the lower right corner of the dialog box to accept my settings and close out of the Camera Raw Filter:
If we look again in the Layers panel in Photoshop itself, we now see the Camera Raw Filter listed as a Smart Filter below the image. I'll click on the Smart Filters visibility icon to temporarily hide the effects of the Camera Raw Filter from view in the document window:
This hides all of the changes I made with the Radial Filter and re-displays the original image. Notice that it remains untouched and unaffected by anything we've done:
I'll click again on the Smart Filter visibility icon to turn the Camera Raw Filter back on, and now we see the final Radial Filter vignette effect:
And there we have it! Visit our Photo Effects section for more Photoshop effects tutorials! And don't forget, all of our Photoshop tutorials are ready to download as print-ready PDFs!