
Punch Through Image Effect In Photoshop
In this Photoshop Effects tutorial, we'll learn how to create a popular "punch through image" effect, often seen in sports and movie advertising (and weekly store flyers announcing their "incredible knock out prices!"), as if a person or object has punched a hole right through the page or image.
There's quite a few steps involved in the tutorial, but as usual, they're all very simple.
As we make our way through it, we'll cover some interesting techniques like converting layer styles to actual layers so we can apply filters to them, moving drop shadows around just by dragging them, and using layer groups to move multiple layers at once! I'll be using Photoshop CS5 here but any recent version of Photoshop will work.
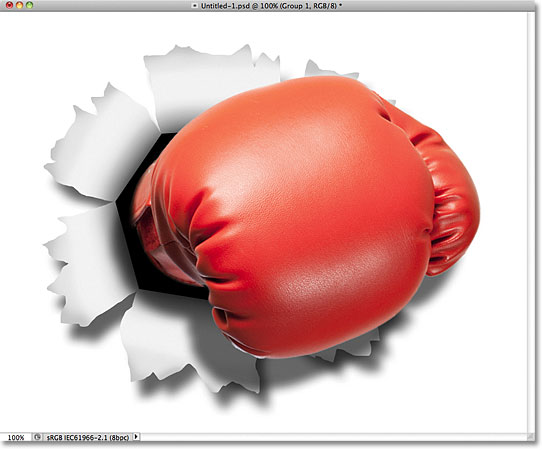
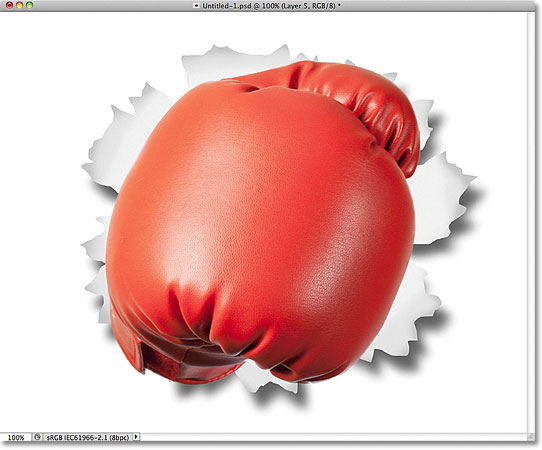
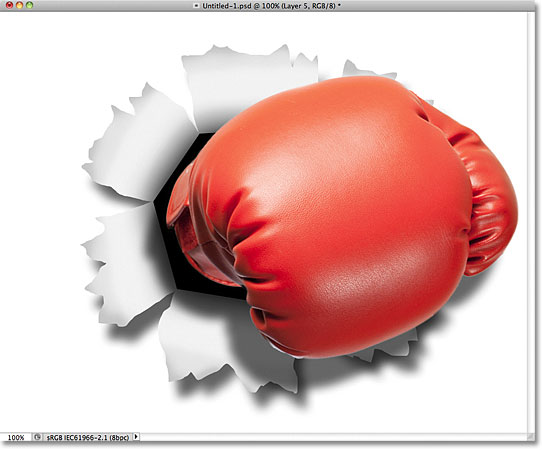
We'll be drawing most of the effect from scratch, but to complete it, you'll also need a photo of the object that will be punching through the image. Here's what the final result will look like:
How To Create A Punch Through Image Effect
Step 1: Create A New Document
Start by creating a new Photoshop document. Go up to the File menu in the Menu Bar along the top of the screen and choose New:
This opens the New Document dialog box. Enter the width, height and resolution you need for your effect. For this tutorial, I'll enter 1000 pixels for the Width, 800 pixels for the Height, and I'll leave my Resolution set to 72 pixels/inch. The size you need for your document may be different. Click OK when you're done to close out of the dialog box. Your new document will appear on your screen:
Step 2: Add A New Layer
Click on the New Layer icon at the bottom of the Layers panel:
Nothing will happen in the document window, but a new blank layer named Layer 1 appears above the Background layer:
Step 3: Select The Polygonal Lasso Tool
Select the Polygonal Lasso Tool from the Tools panel. By default, it's hiding behind the standard Lasso Tool, so click on the Lasso Tool and hold your mouse button down for a second or two until a fly-out menu appears, then select the Polygonal Lasso Tool from the list:
Step 4: Draw A Polygonal Shape In The Center Of The Document
Use the Polygonal Lasso Tool to draw a polygonal-shaped selection in the center of the document, which will become the hole that's being punched through the image. Simply click at the points where you want the corners of the shape to appear and Photoshop will automatically connect them to create the sides of the shape as you go. There's no need to drag the tool inside the document (in fact, it won't work if you drag it). Just click at a corner point, release your mouse button, click at another corner point, release your mouse button, and so on as you make your way around the shape. Click back on the original spot to complete the shape. It should look something like this when you're done:
Step 5: Fill The Selection With Black
Go up to the Edit menu at the top of the screen and choose Fill:
This opens Photoshop's Fill dialog box which we can use to fill the selection with a color. Set the Use option at the top of the dialog box to Black:
Click OK to close out of the dialog box. Photoshop fills the selection with black. Press Ctrl+D (Win) / Command+D (Mac) to remove the selection outline from around the shape:
Step 6: Add A New Layer Below Layer 1
Hold down your Ctrl (Win) / Command (Mac) key and click again on the New Layer icon at the bottom of the Layers panel:
Normally, Photoshop adds new layers directly above the layer that's currently selected in the Layers panel, but by holding down the Ctrl / Command key while clicking the New Layer icon, we told Photoshop to add the new layer below it instead. The new layer, Layer 2, appears between Layer 1 and the Background layer:
Step 7: Select The Lasso Tool
Select the Lasso Tool from the Tools panel. It will now be hiding behind the Polygonal Lasso Tool, so click and hold on the Polygonal Lasso Tool until the fly-out menu appears, then select the Lasso Tool from the list:

Step 8: Draw The Torn Paper Shapes
Use the Lasso Tool to draw the shape of the first piece of torn paper. Since the black polygonal shape will become the hole that's being punched through the image, each of its sides will need its own separate torn paper piece, but we'll just draw one for now. It doesn't matter which side you start with, but make sure the shape you draw covers the entire length of the side from corner to corner. Here's what my first torn paper shape looks like. Notice that I've extended the selection into the black-filled area, which made the shape easier to draw. That's okay because only the part of the selection that extends outside the black-filled shape will be visible later:
With the first shape drawn, hold down your Shift key and draw the second shape. Holding the Shift key down will add this new selection to the previous one. Again, it's okay to extend the selection into the black-filled area. Just make sure the width of the shape extends from one corner of the side to the other:
Continue holding down your Shift key and draw the remaining torn paper shapes. Each new selection will be added to the previous ones. If you're not happy with the look of your shape, press Ctrl+Z (Win) / Command+Z (Mac) to undo the selection and try again. You can also press Ctrl+Alt+Z (Win) / Command+Option+Z (Mac) repeatedly to undo multiple selections. When you're done, it should look something like this:
Step 9: Fill The Selection With Light Gray
Go up to the Edit menu at the top of the screen and once again choose Fill. This time, when the Fill dialog box appears, set the Use option to Color:

As soon as you select Color, Photoshop pops open the Color Picker so we can choose the color we want to use. Choose a light gray. If you want to use the same color I'm using, enter 230 for the R, G and B options near the bottom center of the dialog box:
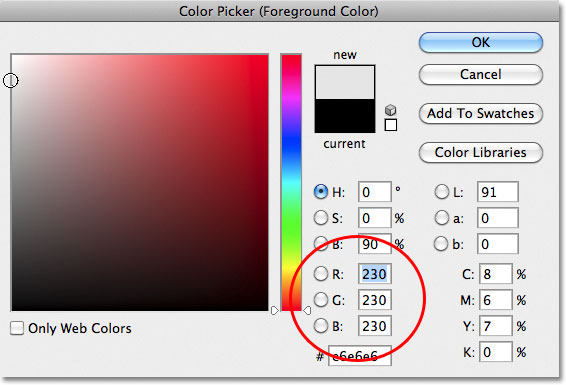
Click OK when you're done to close out of the Color Picker, then click OK to close out of the Fill dialog box. Photoshop fills the torn paper selection with gray. Press Ctrl+D (Win) / Command+D (Mac) to remove the selection outline. Notice that since the black-filled shape in the center is on a layer above the torn paper pieces, only the parts of them that extend outside the black-filled shape are visible in the document:
Step 10: Select Layer 1
Now let's begin adding some depth to our effect. Click on Layer 1 in the Layers panel to make it the active layer. Active layers are highlighted in blue:
Step 11: Add An Outer Glow Layer Style
With Layer 1 selected, click on the Layer Styles icon at the bottom of the Layers panel:
Choose Outer Glow from the list of layer styles that appears:
This opens Photoshop's Layer Style dialog box set to the Outer Glow options in the middle column. The only problem is, we don't actually need an outer glow. We need an outer shadow. Luckily, we can easily change the glow effect to a shadow effect simply by changing a couple of options. First, change the Blend Mode from Screen to Multiply. Then click on the color swatch just below the word Noise, which opens the Color Picker, and choose black as the color for the shadow. Click OK to close out of the Color Picker when you're done, but don't close out of the Layer Style dialog box just yet:
With the glow now changed to a shadow, keep an eye on the effect in the document window as you drag the Size slider towards the right, which will increase the size of the shadow (in case you didn't guess that already). The value you end up choosing will depend on the size of the document you're working with. For me, I'll set my size value to around 70 px (pixels). Finally, if you find the shadow is too dark, lower the Opacity value, again while judging the result in the document window. I'm going to lower mine down to 65%:
Click OK when you're done to close out of the Layer Style dialog box. The shadow should now look something like this, giving the torn paper pieces more of a 3D look to them:

Step 12: Create A Layer From The Layer Style
One slight problem with the shadow we've applied is that it's appearing not only on the torn paper pieces but also on the white background behind them. We need the shadow to appear only on the paper pieces themselves. To fix the problem, we first need to convert the layer style into an actual separate layer. That may sound like something complicated, but it's very easy. Simply right-click (Win) / Control-click (Mac) directly on the layer effects symbol on the far right of Layer 1 in the Layers panel:
Choose Create Layer from down near the bottom of the menu that appears:
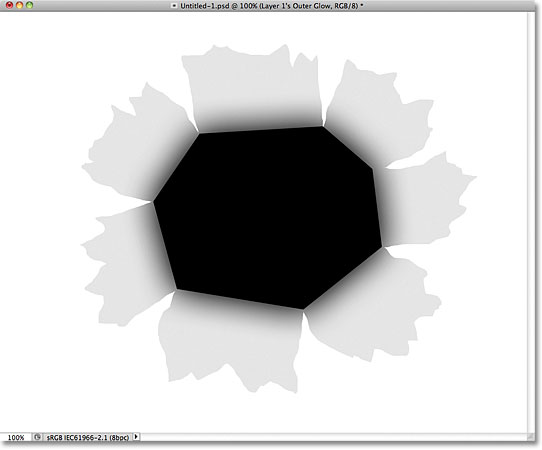
Photoshop converts the layer style into a normal layer named Layer 1's Outer Glow, and places it directly below Layer 1. This means we can now work with it the same way we'd work with any other normal layer:
Step 13: Create A Clipping Mask
The next thing we need to do is tell Photoshop that we want our new outer glow layer to affect only the layer directly below it, and we can do that using a clipping mask. Go up to the Layer menu at the top of the screen and choose Create Clipping Mask:
If we look again in the Layers panel, we see that the outer glow layer is now indented to the right, which tells us that the layer is "clipped" to the contents of the layer directly below it (Layer 2):
And in the document window, we see that the shadow now appears only on the torn pieces of paper. It no longer appears on the white background:
Step 14: Select Layer 2
Click on Layer 2 in the Layers panel to make it the active layer:
Step 15: Add A Drop Shadow
With Layer 2 selected, click again on the Layer Styles icon at the bottom of the Layers panel and this time, choose Drop Shadow from the top of the list:
This again opens the Layer Style dialog box, this time to the Drop Shadow options in the middle column. Set the Angle of the drop shadow to 120°, then keep an eye on the effect in the document window as you drag the Distance and Size sliders. The Distance slider controls the position of the shadow, while the Size slider controls the softness of its edges. The values you end up choosing will depend on the size of the image you're working with. I'm going to set my Distance value to 35 px and my Size value to 20 px:
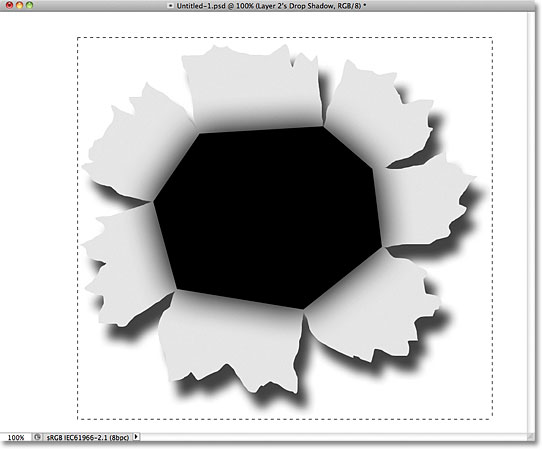
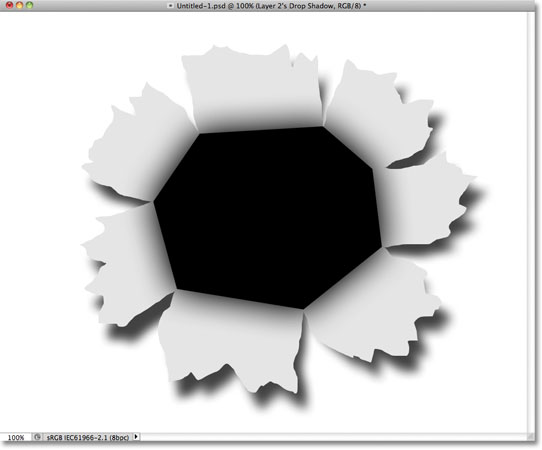
Click OK when you're done to close out of the Layer Style dialog box. The shadow behind the torn paper looks a bit too extreme at the moment, but we'll be fixing that next:

Step 16: Create A Layer From The Drop Shadow
Just as we did with the Outer Glow layer style, let's convert the drop shadow into a normal layer. Right-click (Win) / Control-click (Mac) on the layer effects symbol on the right of Layer 2 in the Layers panel:
Choose Create Layer from the menu that appears. Photoshop may pop open a warning box telling you that some aspects of the effect can't be reproduced with layers. Just click OK to close out of it:

The drop shadow now appears on its own layer named "Layer 2's Drop Shadow" directly below Layer 2:
Step 17: Select The Drop Shadow Layer
Click on the drop shadow layer to make it the active layer:
Step 18: Draw A Selection Around The Drop Shadow
In a moment, we're going to run a filter on the drop shadow to make it look more realistic, but let's make sure the filter centers on the drop shadow itself, not on the entire dimensions of the document, by first drawing a selection around the drop shadow. Select the Rectangular Marquee Tool from the Tools panel:
With the Rectangular Marquee Tool selected, click above and to the left of the drop shadow, then drag down to the bottom right to draw a rectangular selection around it:
Step 19: Apply The Pinch Filter
Go up to the Filter menu at the top of the screen, choose Distort, and then choose Pinch:
The Pinch filter will "pinch" the drop shadow inward towards its center, which will distort its shape and help create a more realistic looking shadow effect for the torn paper pieces. The default Amount value of 50% should work fine:
Click OK to accept the default settings and exit out of the dialog box. The distorted shadow helps give the paper pieces more of a 3D appearance. Press Ctrl+D (Win) / Command+D (Mac) to remove the selection outline from around the shadow:
Step 20: Lower The Opacity Of The Shadow
Finally, to reduce the intensity of the shadow, lower the layer's opacity. You'll find the Opacity option at the top of the Layers panel. I'm going to lower mine down to around 82%:
Here's the shadow after lowering its opacity value:

Step 21: Select Layer 2
Click on Layer 2 to make it the active layer:
Step 22: Add A New Layer
Click on the New Layer icon to add a new layer above Layer 2:
Since the Outer Glow layer was clipped to Layer 2, Photoshop will automatically clip the new layer (Layer 3) to Layer 2 as well, which means that anything we do on this new layer will affect only the contents of the layer below it:
Step 23: Select The Brush Tool
Select the Brush Tool from the Tools panel:
Step 24: Paint With Black Around The Outer Edges Of The Torn Paper
We're going to paint with black around some of the outer edges of the torn paper pieces. Photoshop paints with the current Foreground color, so press the letter D on your keyboard to quickly reset the Foreground and Background colors, which sets the Foreground color to black (and the Background color to white). You can see the current Foreground and Background colors in the color swatches near the bottom of the Tools panel:
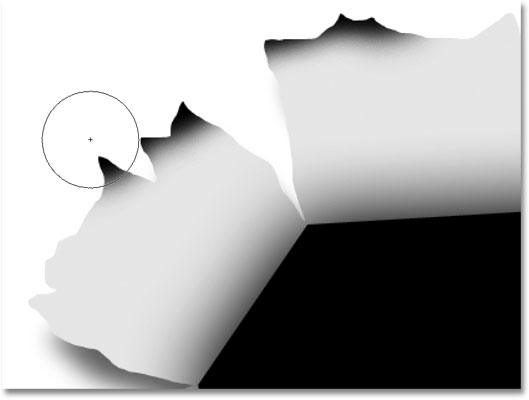
Then, with the Brush Tool selected and black as the Foreground color, use a small to medium size, soft-edge brush to paint along some of the outer edges of the torn paper, which will again help create an illusion of depth. You can press the left bracket key ( [ ) on your keyboard to make the brush smaller or the right bracket key ( ] ) to make it larger. Hold Shift and press the left bracket key a few times to make the brush edges softer, or hold Shift and press the right bracket key to make them harder.
Keep the center of the brush cursor outside the torn paper as you make your way around it so only the edge of the brush passes over the paper. Notice that because the layer we're painting on is clipped to the layer below it, only the paper itself is affected by the brush as you paint:
Continue painting around the outer edges of the paper. Don't worry that the black appears too dark for now. Here's what it should look like when you're done:
Step 25: Lower The Opacity Of The Layer
Just as we did with the drop shadow, lower the Opacity of the layer to reduce the intensity of the black around the edges. I'm going to lower my opacity way down to around 13%:
With the opacity lowered, the black around the edges now appears as a soft shadow:

Step 26: Add Another New Layer
Let's add one final layer to complete the look of the torn paper. Click again on the New Layer icon to add a new layer, Layer 4, above Layer 3. The new layer will also be clipped to the torn paper layer (Layer2) below it:
Step 27: Paint With White To Add Some Highlights
Press the letter X on your keyboard to swap the Foreground and Background colors, which sets the Foreground color to white. Then, again using a small to medium size, soft-edge brush, paint with white through the center of each piece of torn paper to add a highlight. It will look too bright at the moment but we'll fix that next:

Step 28: Lower The Layer Opacity
And finally, lower the opacity of the layer so the white brush strokes look more like subtle highlights. I'll lower my opacity down to 50%:
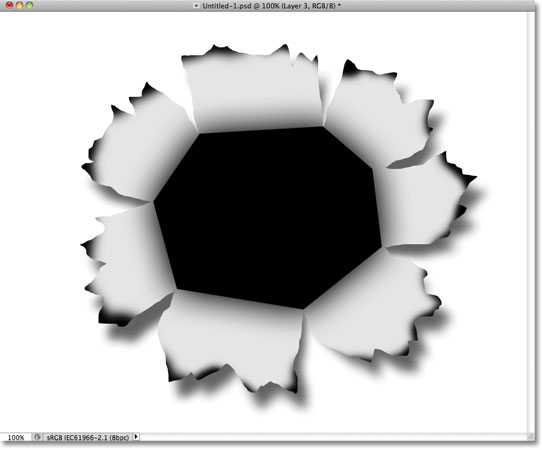
And with that, the main part of the "punch through image" effect is complete! Your effect should now look similar to this:

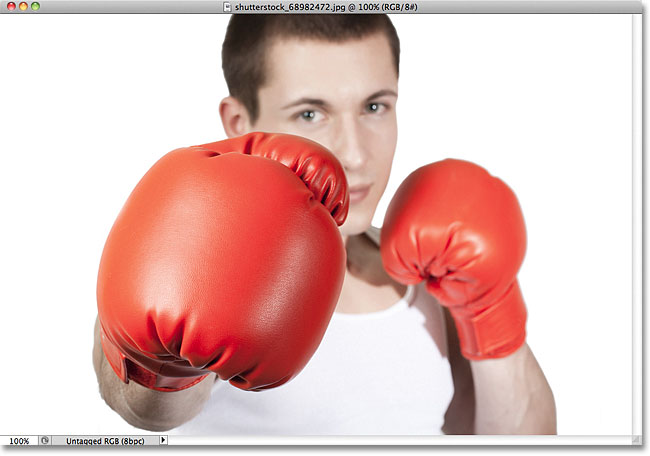
Step 29: Open The Photo
Open the photo that contains the person or object that will appear to be punching through the image. I'll use this photo of a boxer:
Step 30: Select The Object
Use your favorite selection tool (Lasso Tool, Quick Selection Tool, Pen Tool, etc.) to select the object that will be punching through the image. I'll select the boxing glove:

Step 31: Copy And Paste The Selection Into The "Punch Through" Document
With the object selected, press Ctrl+C (Win) / Command+C (Mac) to copy it to the clipboard. Switch back over to the original "punch through" document and select the top layer, Layer 1, to make it the active layer. Then press Ctrl+V (Win) / Command+V (Mac) to paste the object into the document. It will appear on its own layer above Layer 1 in the Layers panel:
In the document window, the object appears in front of the the torn paper effect:
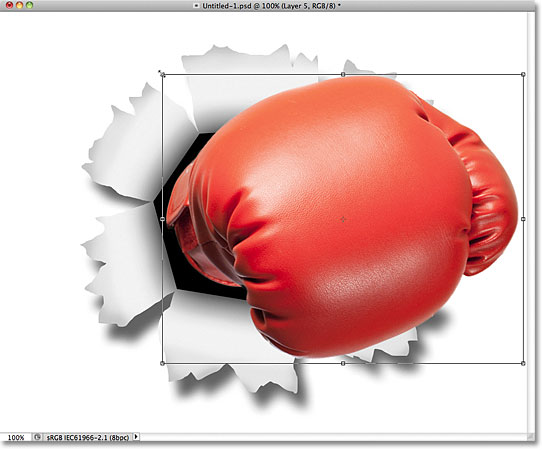
Step 32: Move And Resize The Object With Free Transform
Press Ctrl+T (Win) / Command+T (Mac) to quickly bring up Photoshop's Free Transform box and handles around the object. Hold down your Shift key and drag and of the four corner handles to resize the object as needed. Holding down Shift as you drag will keep the aspect ratio of the object intact as you resize it, preventing you from accidentally distorting the shape of it. To move the object into position, simply click anywhere inside the Free Transform bounding box and drag the object around with your mouse. To rotate it, move your cursor outside the bounding box, then click and drag. When you're done, press Enter (Win) / Return (Mac) to accept the transformation and exit out of Free Transform:
Step 33: Add A Drop Shadow To The Object
Click on the Layer Styles icon at the bottom of the Layers panel and select Drop Shadow from the list, just as we did back in Step 15. This time, rather than setting the Angle and Distance of the drop shadow in the Layer Style dialog box, simply click inside the document window and, with your mouse button held down, manually drag the drop shadow into position where you want it. Not only will the shadow move in the document window as you drag, but you'll see the Angle and Distance values changing in the Layer Style dialog box:
Once you have the shadow where you want it, lower its opacity in the Layer Style dialog box. I'll lower mine down to 60%:
Click OK when you're done to close out of the Layer Style dialog box. Here's my boxing glove's shadow after lowering its opacity:
Step 34: Add A Layer Mask
As a final step, let's quickly blend the edge of the object in with the black polygonal "hole" shape in the center so it looks more like the object is actually punching through the hole, not just sitting in front of it. Click on the Layer Mask icon at the bottom of the Layers panel:
A layer mask thumbnail will appear on the object's layer:
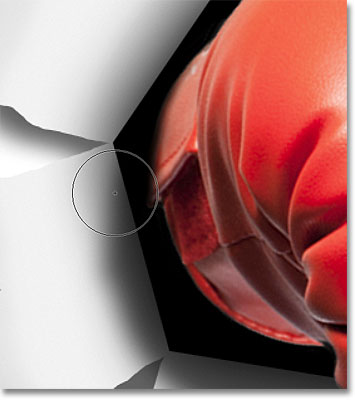
Step 35: Paint With Black On The Mask To Blend The Object Into The Shape
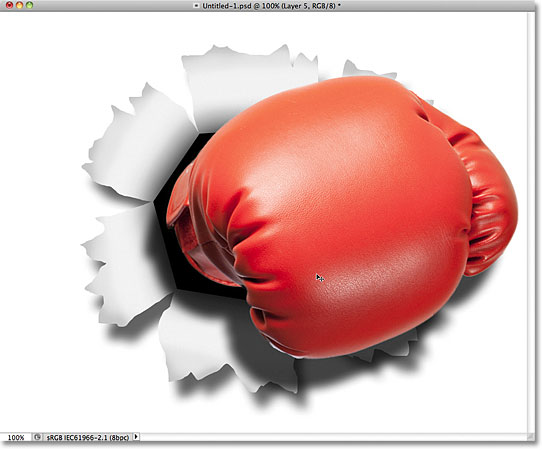
With the Brush Tool selected and black as my Foreground color, I'll paint with a small, soft-edge brush just along the left edge of the boxing glove to blend it in with the black shape behind it:
I'll finish painting along the edge, and with that, the effect is complete! Here is the final "punch through image" effect:
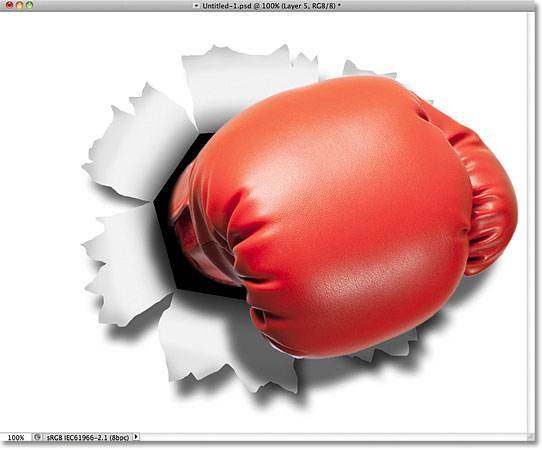
This last part is totally optional so I won't include it as an actual step, but if, after completing the effect, you need to reposition the effect inside the document, with the top layer selected in the Layers panel, hold down your Shift key and click on the layer just above the Background layer (Layer 2's Drop Shadow) to select it. This will select every layer in the Layers panel except for the Background layer. In other words, it will select any layer that has anything to do with the actual effect. You'll see them all highlighted in blue:
With all the layer selected, go up to the Layer menu at the top of the screen and choose Group Layers:
This places all of the layers inside a layer group, which is essentially a folder in the Layers panel:
With the layers now part of a single group, press the letter V on your keyboard to quickly select Photoshop's Move Tool, then click anywhere on the effect and drag it around inside the document window to reposition it as needed. The entire effect will move at once in front of the background. I'll move mine a bit over to the left so it appears more centered in the document: