
Making Your Subject Pop Out Of A Photo With Photoshop
In this Photoshop Effects tutorial, we're going to learn how to make it look as if the subject of a photo is popping right out of the image. Not only is it a great way to add interest to a sports photo, a wedding photo, product shot, or even a photo of your kids playing in the backyard, it also happens to be very easy to do, as we'll see.
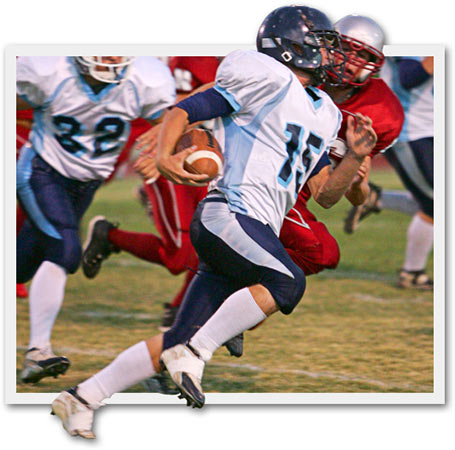
Here's the photo I'll be starting with:

And here's the finished effect:
This tutorial is from our Photo Effects series. Let's get started!
Step 1: Duplicate The Background Layer
To begin, I'm going to duplicate my Background layer using the simple keyboard shortcut Ctrl+J (Win) / Command+J (Mac). I now have my original Background layer and a copy of it, which Photoshop has named "Layer 1", in the Layers palette:

Step 2: Add A New Blank Layer Between The Two Existing Layers
Next, I'm going to add a new blank layer in between the Background layer and "Layer 1". Since I already have "Layer 1" selected, I'm going to hold down my Ctrl (Win) / Command (Mac) key and then click on the New Layer icon at the bottom of the Layers palette:
By holding down the Ctrl/Command key, this tells Photoshop to add the new layer below the currently selected layer in the Layers palette rather than above it, which it does by default. I now have my new blank layer between the two initial layers:

Step 3: Fill The New Layer With White
Press the letter D on your keyboard to quickly reset your Foreground and Background colors, so white is now your Background color. Then use the keyboard shortcut Ctrl+Backspace (Win) / Command+Delete (Mac) to fill the new layer with the Background color, which in this case is white. You won't see anything happen in the Document Window since "Layer 1" is blocking the new layer from view, but if you look in the Layers palette, you'll see the thumbnail preview area for the new layer now filled with white:

Step 4: Select The Object(s) In The Photo You Want To Have Pop Out
Click back on "Layer 1" in the Layers palette to select it. Then, using the selection tool of your choice, make a selection around the object(s) you want to have popping out of your photo.
In my case, I want the football player in the center of the image, as well as the player in red directly behind him, to pop out, so I'll use the Pen Tool to select them. You can use the Pen tool, the Lasso tool, or whichever selection tool you prefer:

Step 5: Copy The Selection To A New Layer
Once you've made your selection, with "Layer 1" selected in the Layers palette, press Ctrl+J (Win) / Command+J (Mac) to copy the selection onto a new layer. Again, you won't see anything happening in the Document Window, but you'll see your selection copied to a new layer at the top of the Layers palette:

Step 6: Drag A Selection Around The Rest Of The Photo You Want To Keep
Click back on "Layer 1" in the Layers palette to select it. Then press M on your keyboard to quickly select the Rectangular Marquee Tool and drag a selection around the rest of the photo that you want to keep, essentially creating a smaller, cropped version of the image. Make sure you select an area small enough so that some of the object(s) you selected a moment ago will stick out, which is what's going to create our "popping out" effect:

Step 7: Add A Layer Mask
Once you've dragged out your selection, click on the Add A Layer Mask icon at the bottom of the Layers palette:

This will add a layer mask to "Layer 1", and because we had part of the layer selected, only the area inside the selection will remain visible. The rest of the photo that fell outside of the selection will now be hidden from view:

We can now see the "popping out" effect taking shape.
Step 8: Add A Stroke To "Layer 1"
We're going to make our smaller photo look more like an actual small photo by adding a border to it. To do that, with "Layer 1" still selected, click on the Layer Styles icon at the bottom of the Layers palette:
Then select Stroke from the list of Layer Styles:

This brings up Photoshop's Layer Style dialog box set to the Stroke options:

First, change the Position of the stroke to Inside. Then use the slider bar at the top to increase the Size of the stroke to give the photo a "polaroid" style border around the edge. I've increased my stroke size to 13 pixels. Finally, click on the Color swatch, which will bring up Photoshop's Color Picker:

Choose a light gray for your stroke color. Click OK when you're done to exit out of the Color Picker, and then click OK to exit out of the Layer Style dialog box.
Your image should now look something like this:

Step 9: Merge The Top Two Layers In The Layers Palette
Since "Layer 1" is already selected, hold down your Shift key and click on the top layer in the Layers palette to select it as well. You should now have both layers selected at once:

Use the keyboard shortcut Ctrl+E (Win) / Command+E (Mac) to merge both layers together so the smaller photo and the object(s) above it end up on the same layer. You'll now have just one layer instead of two:

Notice that your Stroke is no longer a separate layer style. It's now simply part of the image.
Step 10: Add A Drop Shadow To Complete The Effect
We're almost done. We're just going to add a drop shadow to finish things off. With the newly merged layer selected, click on the Layer Styles icon once again at the bottom of the Layers palette and this time, select Drop Shadow from the list:

This brings the Layer Style dialog box back up, this time set to the "Drop Shadow" options:

I find the default Opacity value of 75% is a bit too strong, so I've lowered mine to 60%. Set your Angle to 120°, Distance to 5 pixels, and finally, increase the Size of the drop shadow effect to 10 pixels. Click OK to exit out of the Layer Style dialog box, and you're done!
Here, after applying the drop shadow, is the final "popping out of a photo" result:
And there we have it! That's how to make your subject pop out of a photo with Photoshop! Check out our Photo Effects section for more Photoshop effects tutorials!