
Create A Photo Within A Photo With Photoshop
In this Photoshop Effects tutorial, we'll learn how to add excitement to a photo (not that your photos aren't exciting enough, of course) and bring more focus and attention to your main subject by creating the illusion of a smaller, cropped version of the image within itself. We'll be using a vector shape to create the dimensions of the smaller photo so we can easily rotate and resize it without any loss of image quality, adding a couple of layer styles to it, creating a clipping mask, sampling colors from the original photo, using Adjustment Layers, and adding a fun Radial Blur filter. Lots of good stuff. Any recent version of Photoshop will work just fine for this effect. I'll be using Photoshop CS3.
Here's the original image I'll be using for this tutorial:

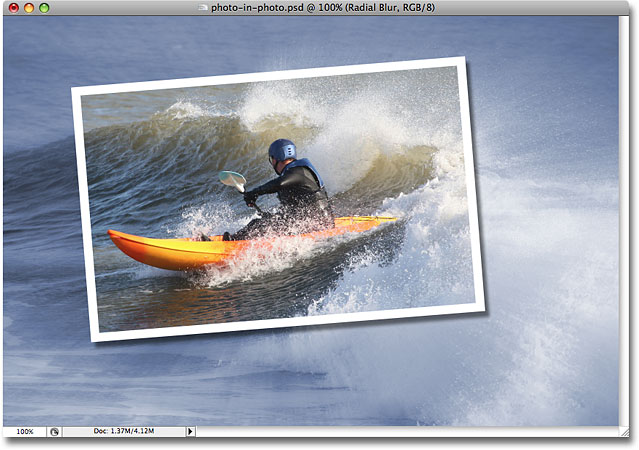
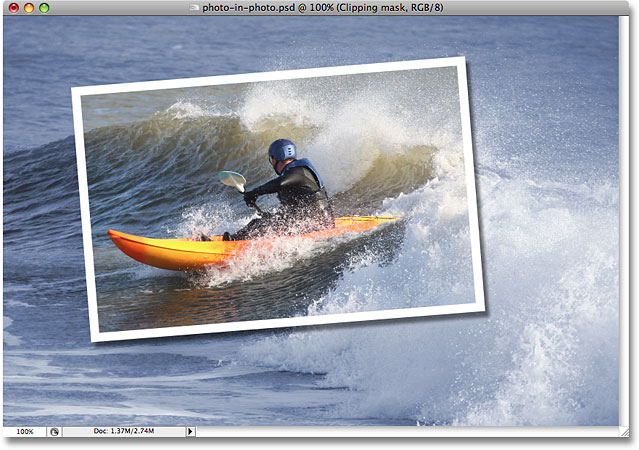
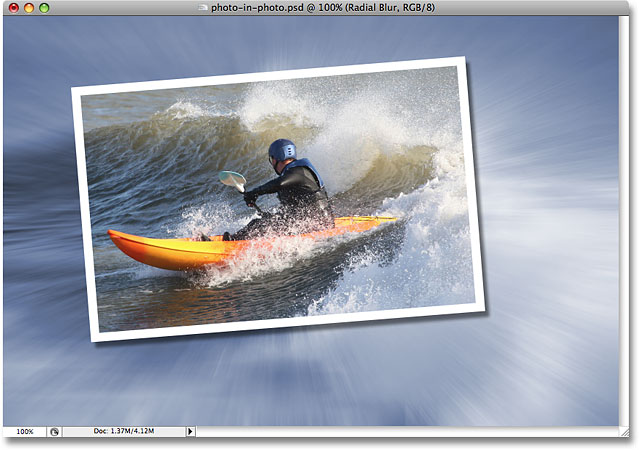
And here's what we'll be working towards throughout the steps:
This tutorial is from our Photo Effects series. Let's get started!
Step 1: Duplicate The Background Layer
With my original photo open inside Photoshop, I can see in my Layers palette that I currently have just one layer, the Background layer:
The first thing I need to do is duplicate the Background layer, so I'll use the quick keyboard shortcut, Ctrl+J (Win) / Command+J (Mac). I now have my copy of the Background layer showing in the Layers palette, which Photoshop automatically names "Layer 1":
To keep things easier to follow as we go along, and as a good habit to get into, I'm going to rename this layer to something more descriptive. Since "Layer 1" will eventually become the smaller, cropped version of the photo, I'm going to double-click on the name of the layer and change its name from "Layer 1" to "Smaller version":
Step 2: Create A New Layer Below The 'Smaller Version' Layer
The next thing we need to do is create a new layer below the "Smaller version" layer, so it ends up between the two layers we currently have. What most people would do here is click on the Background layer to select it and then create a new layer, since by default, Photoshop always creates your new layer directly above the layer currently selected in the Layers palette.
Here's a neat trick I prefer to use instead, and if you don't know about it, once you do know it, you'll use it a lot. Rather than creating a new layer above the currently selected layer, you can tell Photoshop to create it below the currently selected layer by holding down the Ctrl key (Win) / Command key (Mac) while you click the New Layer icon at the bottom of the Layers palette, as I'll do here:
And now, thanks to that little trick, Photoshop has created a new blank layer for me directly below the "Smaller version" layer:
Since I renamed the previous "Layer 1" to "Smaller version", Photoshop has gone and named this second new layer "Layer 1" in its place. I'm going to double-click the layer's name and rename it to "Clipping mask", since in a moment, we're going to be using this layer to "clip" the layer above it:
Step 3: Drag Out The Shape Of The Smaller Photo With The Rectangle Tool
With the "Clipping mask" layer selected in the Layers palette, select the Rectangle tool either from Photoshop's Tools palette or by pressing U on your keyboard:
The Rectangle tool draws rectangular vector-based shapes, and with it selected, I'm going to drag out the approximate shape and location of my smaller, cropped photo. I want to bring focus and attention to the subject of the photo, which in this case is the guy in the kayak, so I'll drag out a rectangular shape around him:
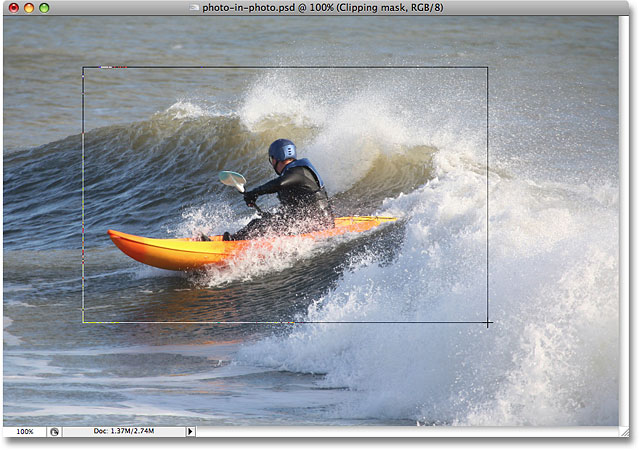
With the vector shape drawn, notice what's happened in the Layers palette. The "Clipping mask" layer, which was a normal, blank layer a moment ago, has now become a vector shape layer:

Step 4: Use The Vector Shape To Create A Clipping Mask
Now that we have the shape of our smaller, cropped version of the photo drawn out, we can use this shape as a clipping mask, which will "clip" the layer above it to the dimensions of the shape. To do that, hold down the Alt key (Win) / Option key (Mac) and move your mouse cursor directly between the "Smaller version" and "Clipping mask" layers, until you see your cursor change into the clipping mask icon (circled in red below):

Once your clipping mask icon appears, simply click with your mouse to create the clipping mask. It won't seem like anything has happened yet in your image, but in the Layers palette, the "Smaller version" layer will indent to the right, indicating that it's now being clipped by the vector shape below it:

Nothing much has happened yet to the image, but we're about to change that. We're going to create the appearance of our smaller, cropped photo around the subject by adding a couple of layer styles to the vector shape.
Step 5: Add A White Stroke To The Vector Shape To Create The Border Of The Smaller Photo
Make sure the "Clipping Mask" layer is still selected in the Layers palette (selected layers are highlighted in blue), then click on the Layer Styles icon at the bottom of the palette and select Stroke from the list of layer styles that appears:
This brings up the rather massive Layer Style dialog box set to the Stroke options in the middle column:
There's three options we want to change here, and I've circled them in red in the screenshot above. I've set my Stroke Size to 12px to create a standard photo border around my smaller photo. Depending on the size of the photo you're working with, you may find that a different value works better. Below that, make sure Position is set to Inside. This means our stroke will appear inside the boundaries of the shape. By default, Position is set to "Outside", which causes the corners of the stroke to appear rounded. We want our corners nice and sharp, and "Inside" does that for us. Finally, by default, Photoshop sets the stroke color to red, which makes absolutely no sense, and obviously we don't want a red border around our image, so change the stroke Color to white by clicking on the color swatch and selecting white from Photoshop's Color Picker.
Here's what my image looks like so far with the 12px white stroke applied:
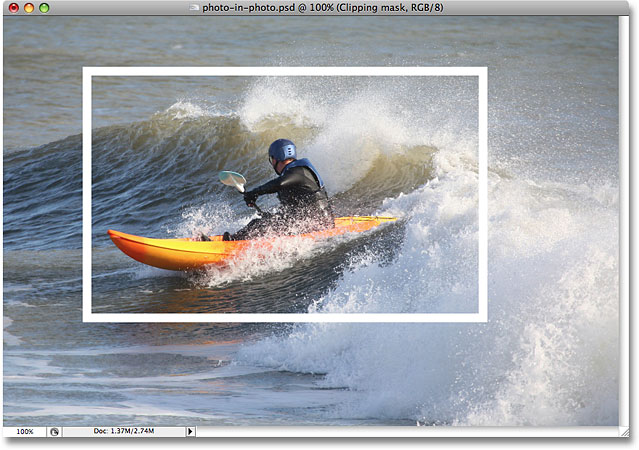
Don't exit out of the Layer Style dialog box just yet. We have one more layer style to apply.
Step 6: Apply A Drop Shadow
With the Layer Style dialog box still open, click on the very first layer style at the top of the list on the left, Drop Shadow. Make sure you click directly on the words "Drop Shadow" and don't simply click inside the check box to the left of them. We want to bring up the options for the drop shadow effect, and you need to click directly on the words themselves for that.
This changes the options in the middle column of the the Layer Style dialog box from the Stroke options to the Drop Shadow options. Lower the Opacity of the drop shadow to around 50% so it doesn't appear so dark, then change the Angle of the shadow to 130°. Finally, set the Distance to around 10 pixels, although you may need to increase this amount if you're using a larger image than the one I'm using:
Here's my image now with both the white stroke and the drop shadow applied:

Step 7: Use 'Free Transform' To Rotate And/Or Resize The Shape As Needed
If you need to rotate, resize or reposition your vector shape at this point, make sure the shape layer is selected in the Layers palette, then use the keyboard shortcut Ctrl+T (Win) / Command+T (Mac) to bring up Photoshop's Free Transform box and handles around the smaller photo.
To move the shape, click anywhere inside the Free Transform box and drag the shape to a new location, or use the arrow keys on your keyboard to nudge it. To resize the shape, click and drag any of the Free Transform handles. To simply make the shape larger or smaller while keeping the same proportions for width and height, hold down the Shift key as you drag any of the corner handles. Holding down Alt (Win) / Option (Mac) as you drag will cause the shape to resize from the center rather than from the side or corner opposite from where you're dragging. Finally, to rotate the shape, click and drag your mouse anywhere outside of the Free Transform box:
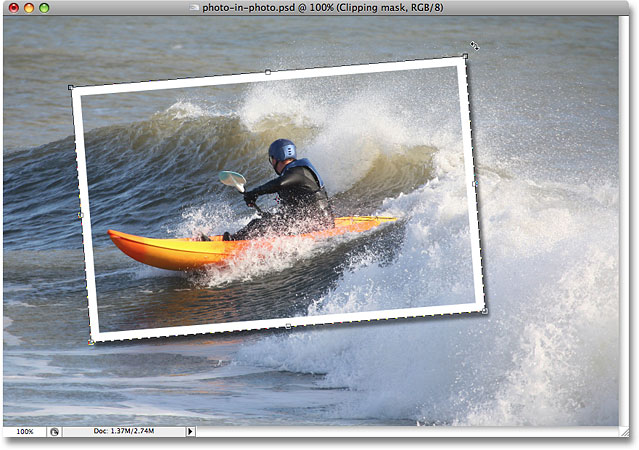
Press Enter (Win) / Return (Mac) when you're done to accept the transformation. Rotating the shape adds a bit more excitement to the image. I've also made slight changes to the size and position of my shape. And with that, our smaller cropped photo around the subject is now complete! We'll finish the effect off by colorizing and blurring the original image in the background next.
We're almost done. All of the work on creating the illusion of the smaller, cropped photo inside the main image is complete, and all that's left to do now is some work on the original image in the background. There's all sorts of things you could do with it. You could technically leave it alone and be happy with what you have at this point, but now that we've increased the focus on the main subject, the idea is to lessen the focus on the rest of the image that's in the background. You could desaturate it and make it black and white. You could add a simple Gaussian Blur filter to blur out the background. You could use Levels or Curves to lighten the background and give it a "washed out" appearance. There's plenty of options, and you certainly don't have to do what I'm about to do here, which is to colorize it and add a Radial Blur effect, but if you do want the same look for your background, here's how you do it.
Step 8: Use The Eyedropper Tool To Sample A Color From Inside The Smaller Photo Area
Select the Eyedropper Tool from the Tools palette, or press I on your keyboard to select it. I'm going to use the Eyedropper to sample a color from inside the smaller photo area and then use that color to colorize the original image in the background:

With the Eyedropper selected, I'm going to click somewhere on the helmet of the guy to sample that blue color:

Notice that my foreground color in the Tools palette has now changed to that blue color I just sampled. I can now use this color to colorize the original photo in the background, using a Hue/Saturation adjustment layer:
Step 9: Colorize The Background With A Hue/Saturation Adjustment Layer
Click on the Background layer in the Layers palette to select it. Then click on the New Adjustment Layer icon at the bottom of the palette and select Hue/Saturation from the list:
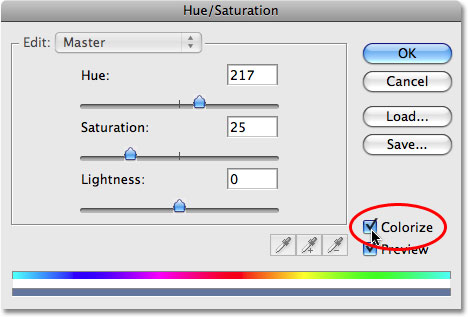
This brings up the Hue/Saturation dialog box, which I'm going to use to colorize my background. No need to start dragging sliders around to select a color here. I've already sampled my color from the image, so all I need to do is click the Colorize option in the bottom right corner of the dialog box:
Click OK to exit out of the Hue/Saturation dialog box. Photoshop uses the sampled color to colorize my original image in the background:
Step 10: Duplicate The Background Layer Once Again
Before we go applying our Radial Blur, let's duplicate the Background layer one more time so that we have a separate layer on which to apply the filter, since we never want to touch the original pixel information of our image on the Background layer. Select the Background layer in the Layers palette, then press Ctrl+J (Win) / Command+J (Mac) to duplicate it. Double-click on the new layer's name and rename it "Radial Blur:
Step 11: Apply The Radial Blur Filter To The New Layer
With the new "Radial Blur" layer selected in the Layers palette, go up to the Filter menu at the top of the screen, select Blur, and then select Radial Blur, which brings up the Radial Blur dialog box. First, set the Blur Method to Zoom, then set the Quality to Best. The Amount option at the top determines how much of a blur effect you'll get. I'm going to set mine to 40, but you may want to to use a different value. The Blur Center option in the bottom right of the dialog box determines where the blur will originate from in your image. Try to position the blur center close to where the subject in your photo is by clicking at that approximate location in the Blur Center box. It's not the most accurate thing in the world and it make take you a couple of tries before you get it right, so don't be afraid to undo the filter with Ctrl+Z (Win) / Command+Z (Mac) and try again if at first you don't succeed:
Click OK when you're done to exit out of the dialog box and apply the radial blur to the image:
Step 12: Lower The Opacity Of The Radial Blur Layer
This last step is optional, but I think my radial blur is too intense. I want it to blend in more with the original image on the Background layer, and I can do that simply by going up to the Opacity option at the top of the Layers palette and lowering the opacity to around 60%, which I think works nicely:
For comparison, here's my original image once again:
And here, after lowering the opacity of my Radial Blur layer, is my final "photo within a photo" result:
And there we have it! That's how to create a photo within a photo with Photoshop! Visit our Photo Effects section for more Photoshop effects tutorials!