
Creating Photo Borders In Photoshop With Masks And Filters
In this Photoshop tutorial, we're going to learn how easy it is to create fun and interesting photo borders using nothing more than a simple layer mask and your choice of Photoshop filter. I say "your choice" because there's no shortage of filters to choose from in Photoshop and many of them are great for creating unique photo borders. We'll look at a few examples of ones that work really well, but you'll definitely want to experiment on your own with the various filters to see what sort of photo border effects you can come up with!
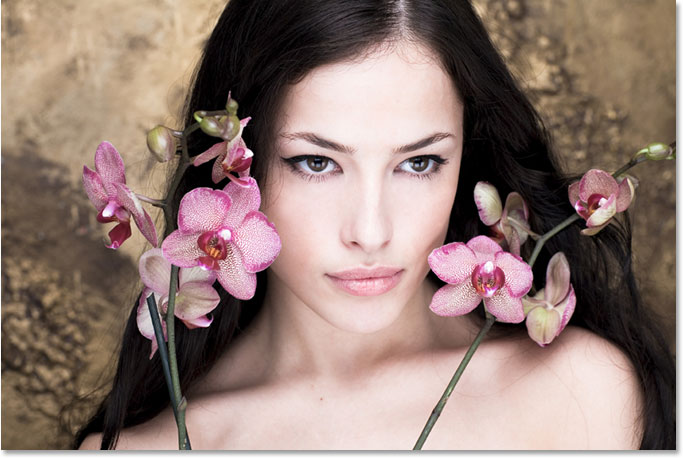
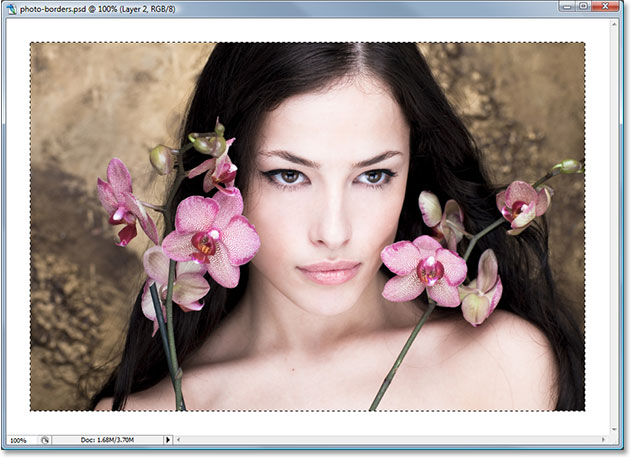
Here's the image I'll be using for this tutorial:
Step 1: Duplicate The Background Layer
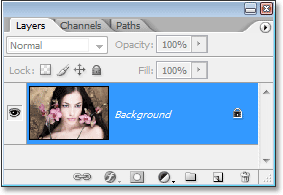
With my image newly opened in Photoshop, I can see in my Layers palette that I currently have one layer, the Background layer, which contains my image:
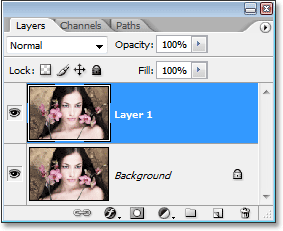
Since our Background layer contains our original image information, it's always a good idea to duplicate it before doing any work. That way, we won't touch the original and we'll always have it to fall back on if we need it. The easiest way to duplicate a layer in Photoshop is by using the keyboard shortcut Ctrl+J (Win) / Command+J (Mac). If we look again in the Layers palette, we can see that we now have two layers - the original Background layer on the bottom and a copy of it, which Photoshop has named "Layer 1", on top:
Step 2: Add A New Blank Layer Between The Two Existing Layers
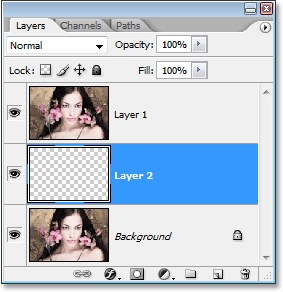
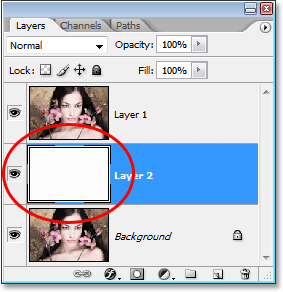
Next, we need to add a new layer between our two existing layers. To do that, make sure "Layer 1" is currently selected in the Layers palette (it should be highlighted in blue). Then, hold down your Ctrl (Win) / Command (Mac) key and click on the New Layer icon at the bottom of the Layers palette:
Normally, Photoshop adds the new layer above the currently selected layer in the Layers palette, but by holding down the "Ctrl" / "Command" key, this tells Photoshop to add it below the currently selected layer instead. We can now see in the Layers palette that we have a new blank layer between the Background layer and "Layer 1":
Step 3: Fill The New Layer With White
We're going to use white as our border color, so we need to fill our new blank layer with white. To do that, let's first make sure that our Foreground and Background colors in Photoshop are set to their defaults by pressing the letter D on the keyboard. This sets the Foreground color to black and the Background color to white. We can see this by looking at the Foreground and Background color swatches near the bottom of the Tools palette. The square in the top left represents the current Foreground color, while the square in the bottom right shows us the current Background color:
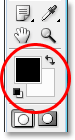
Tools palette. Press the letter "D" on your keyboard to reset them to the defaults.
With the Foreground and Background colors set to the defaults, make sure the new blank layer is currently selected in the Layers palette. Then use the keyboard shortcut Ctrl+Backspace (Win) / Command+Delete (Mac) to fill the layer with the current Background color, which is white. Nothing will appear to have happened in the document window since the image on "Layer 1" is blocking the new layer from view, but if we look in our Layers palette, we can see in the layer's preview thumbnail that the layer has indeed been filled with white:
Step 4: Add Extra Canvas Space Around The Image
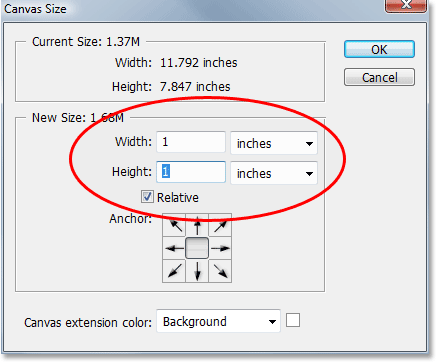
Let's give ourselves a little room to play around with when creating our border. First, we'll add some extra canvas space around the photo. To do that, go up to the Image menu at the top of the screen and choose Canvas Size. When the Canvas Size dialog box appears, enter a value of 1 inch for both the Width and the Height. This will add an extra inch of canvas space around the image. Also, make sure the Relative option is checked:
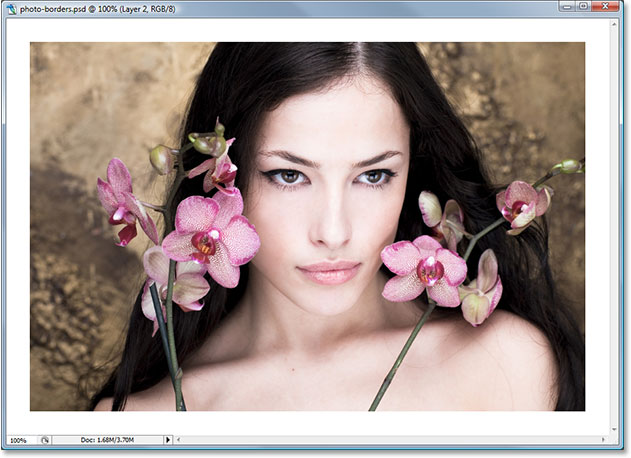
Click OK to add the extra canvas space and exit out of the dialog box. You'll see the extra white space added around the image in your document window:
Step 5: Load A Selection Around The Photo
We'll add a bit of space just inside the edges of the photo as well. Hold down your Ctrl (Win) / Command key and click directly on the layer preview thumbnail for "Layer 1" in the Layers palette:

This loads a selection around the contents of the layer, and if you look in your document window, you'll see that a selection has appeared around the photo:
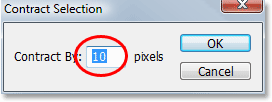
Step 6: Contract The Selection
We need to make the selection a bit smaller, and we can do that easily using one of Photoshop's built-in features for working with selections. Go up to the Select menu at the top of the screen, choose Modify, and then choose Contract. When the Contract Selection dialog box appears, enter in a value of somewhere between 5-15 pixels for the Contract By option, depending on the size and resolution of your image. This tells Photoshop how many pixels to contract the selection by, or in other words, how much smaller we want to make it. I'm going to enter a value of 10 pixels:
Click OK to exit out of the dialog box, and the selection around the photo is reduced in size, leaving a bit of room between the selection box and the edges of the photo:

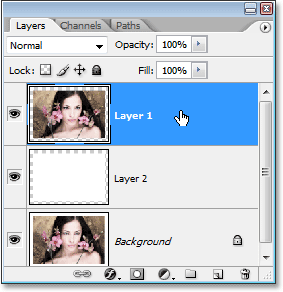
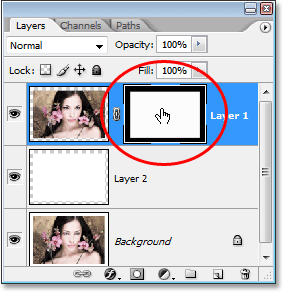
Step 7: Add A Layer Mask
We're going to add a layer mask to "Layer 1". Before we can do that though, we need to have "Layer 1" selected, so click on it in the Layers palette to select it. It will appear highlighted in blue:
Then, with "Layer 1" selected, click on the Layer Mask icon at the bottom of the Layers palette:
This adds a layer mask to "Layer 1", and we can see in the Layers palette that a layer mask thumbnail has been added to the right of the layer's preview thumbnail:
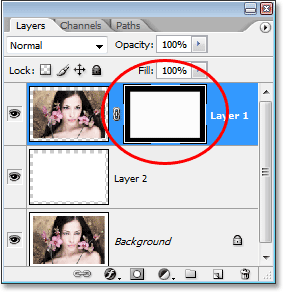
Notice that the area that was inside of our selection appears white in the thumbnail, while the area that was outside of our selection appears black. If you're not familiar with how layer masks work and want to learn more, be sure to check out our Understanding Layer Masks tutorial in the Photoshop Basics section of the website.
We're going to create our border effect with our first Photoshop filter next!
Step 5: Load A Selection Around The Photo
We'll add a bit of space just inside the edges of the photo as well. Hold down your Ctrl (Win) / Command key and click directly on the layer preview thumbnail for "Layer 1" in the Layers palette:
This loads a selection around the contents of the layer, and if you look in your document window, you'll see that a selection has appeared around the photo:
Step 6: Contract The Selection
We need to make the selection a bit smaller, and we can do that easily using one of Photoshop's built-in features for working with selections. Go up to the Select menu at the top of the screen, choose Modify, and then choose Contract. When the Contract Selection dialog box appears, enter in a value of somewhere between 5-15 pixels for the Contract By option, depending on the size and resolution of your image. This tells Photoshop how many pixels to contract the selection by, or in other words, how much smaller we want to make it. I'm going to enter a value of 10 pixels:
Click OK to exit out of the dialog box, and the selection around the photo is reduced in size, leaving a bit of room between the selection box and the edges of the photo:
Step 7: Add A Layer Mask
We're going to add a layer mask to "Layer 1". Before we can do that though, we need to have "Layer 1" selected, so click on it in the Layers palette to select it. It will appear highlighted in blue:
Then, with "Layer 1" selected, click on the Layer Mask icon at the bottom of the Layers palette:
This adds a layer mask to "Layer 1", and we can see in the Layers palette that a layer mask thumbnail has been added to the right of the layer's preview thumbnail:
Notice that the area that was inside of our selection appears white in the thumbnail, while the area that was outside of our selection appears black. If you're not familiar with how layer masks work and want to learn more, be sure to check out our Understanding Layer Masks tutorial in the Photoshop Basics section of the website.
We're going to create our border effect with our first Photoshop filter next!
Step 8: Apply The "Spatter" Filter To The Layer Mask
At this point, creating our border effect is simply a matter of applying one of Photoshop's filters to the layer mask we just created. The only thing you need to make sure of is that you have the layer mask, not the layer itself, selected before applying the filter, otherwise you could end up applying the filter to the contents of the layer by mistake. Since we just finished adding our layer mask, it should be selected, but just in case, look at the two thumbnails for "Layer 1" in the Layers palette. Whichever one has the white highlight box around it is the one that's currently selected. You should see the highlight box around the layer mask thumbnail, but if for some reason you don't, simply click on the layer mask thumbnail to select it:
Now that we're sure we have the layer mask selected and not the layer itself, we can apply our filter. As I mentioned at the beginning of this tutorial, there's lots of filters to choose from in Photoshop that work great when it comes to creating interesting photo borders. We'll look at a few examples here, but you'll definitely want to experiment on your own with other filters. First, we'll try one of my favorite filters, the "Spatter" brush filter. Go up to the Filter menu at the top of the screen, choose Brush Strokes, and then choose Spatter. When the dialog box appears, I'm going to enter a value of 10 for the Spray Radius and 5 for the Smoothness:

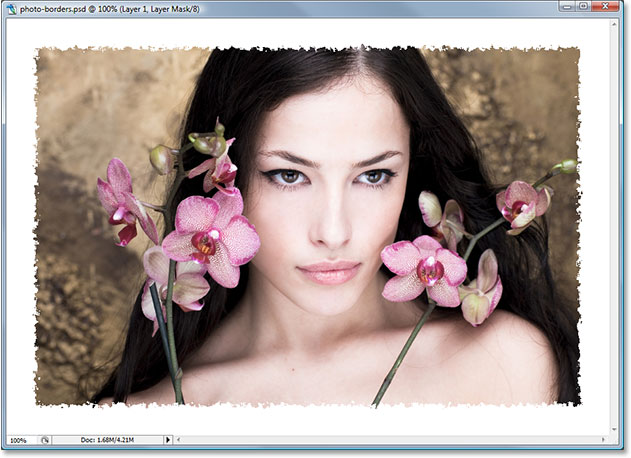
You can see a preview of what the border is going to look like in the large preview area on the left of the dialog box, so feel free to experiment with different values for the Spray Radius and Smoothness to see what sort of effect you get. Click OK when you're done to exit out of the dialog box and apply the filter. Here's my photo border after applying the Spatter filter to the layer mask:
Step 9: Apply The "Glass" Filter
Let's try a different filter for a different photo border effect. First, press Ctrl+Z (Win) / Command+Z (Mac) to undo the Spatter filter. Then go back up to the Filter menu, this time choose Distort, and then choose Glass. When the "Glass" filter dialog box appears, I'm going to enter 8 for the Distortion amount and 4 for Smoothness. I'm going to leave the Texture option set to Frosted and the Scaling set to 100%:
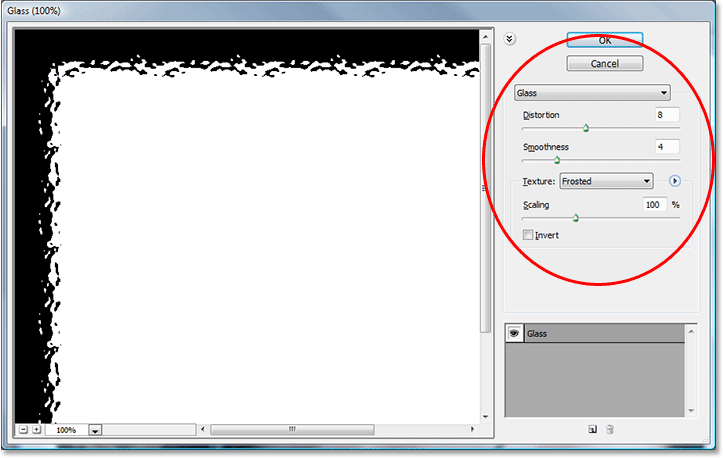
Again, you can experiement on your own with these settings if you like using the large preview area on the left of the dialog box to preview the border effect you're creating. Click OK when you're done to apply the filter to the layer mask and exit out of the dialog box. Here's my photo border created using the "Glass" filter:

Step 10: Apply The "Sprayed Strokes" Filter
Let's try one more. Press Ctrl+Z (Win) / Command+Z (Mac) once again to undo the last filter we applied. This time, go up to the Filter menu, choose Brush Strokes, and then choose Sprayed Strokes. When the dialog box appears, I'm going to enter 6 for the Stroke Length, 10 for the Spray Radius, and I'll set the Stroke Direction to Right Diagonal:
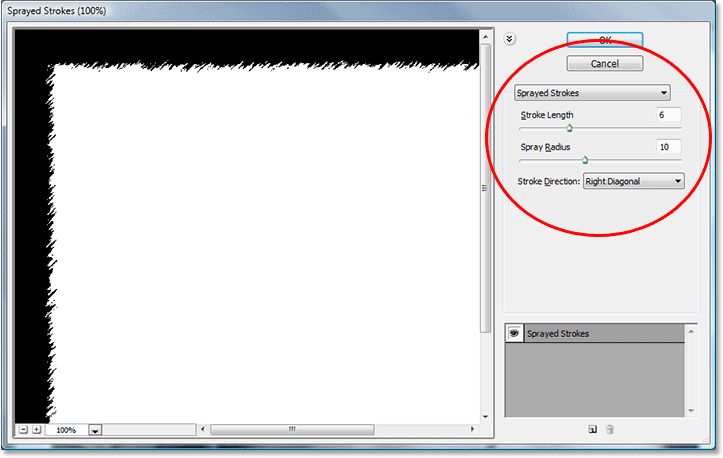
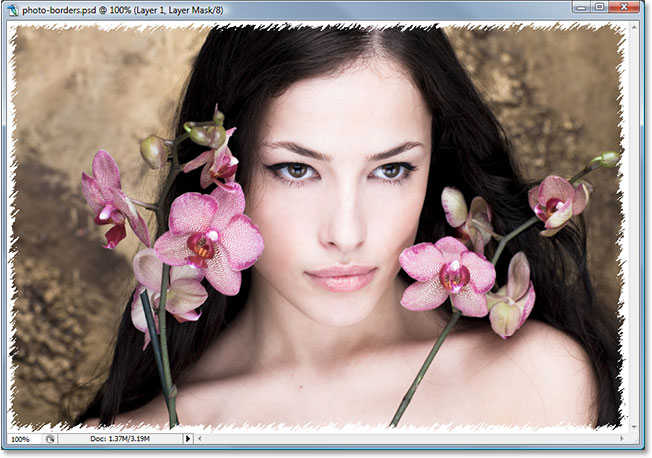
Again, you can experiment on your own with these settings if you like using the preview area on the left. When you're done, click OK to exit out of the dialog box and apply the filter to the layer mask. Here's my photo border created using the "Sprayed Strokes" filter:

We've looked at just three of the many filters in Photoshop that you can use to create interesting and unique photo borders, but this should give you an idea of how easy they are to create simply by applying various filters to the layer mask. We're going to finish things off by removing all the excess border area around our photo next.
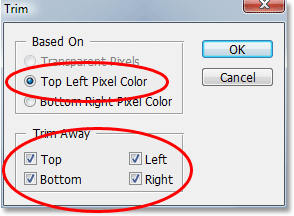
Step 11: Trim Away The Excess White Space Around The Photo
Once you're happy with the photo border effect you've created, you'll probably want to clean things up by trimming away all the extra white area around the photo. To do that, go up to the Image menu at the top of the screen and choose Trim. When the "Trim" dialog box appears, make sure you have the Top Left Pixel Color option selected in the Based On section at the top, which is going to tell Photoshop to trim away everything that's the same color as the color of the pixel in the top left corner of the document. Also, make sure you have all four options at the bottom - Top, Bottom, Left, and Right - selected:
Click OK to exit out of the dialog box and have Photoshop trim away all the extra white space, leaving only your image and the photo border effect around it:
And there we have it! There's just a few examples of how easy it is to create interesting photo borders in Photoshop using nothing more than a simple layer mask and Photoshop's filters! Visit our Photo Effects section for more Photoshop effects tutorials!