
Turn A New Photo Into An Old Photo With Photoshop
In this Photoshop Effects tutorial, we're going to look at how to do a bit of reverse photo restoration, turning a new or recent photo into an old photo, one that looks like it was taken many years ago, and we'll be doing it by combining several separate effects to create our final result.
We'll be looking at how to replace a photo's original colors with a classic sepia tone, how to add a soft glow to an image, how to darken edges, how to add noise, dust and scratches, how to fade an image by brightening the blacks and darkening the whites, and we'll even see how to bring back some of the photo's original color when we're done. Lots of fun stuff!
Of course, as with many photo effects, the results you end up with will depend a lot on the photo you're using. If you have a picture of someone sitting in their new 2008 model car wearing the latest fashions while listening to an iPod, trying to make the photo look like it was taken 40 or 50 years ago isn't really going to work, unless your goal is to use the photo as proof that time machines really do exist.
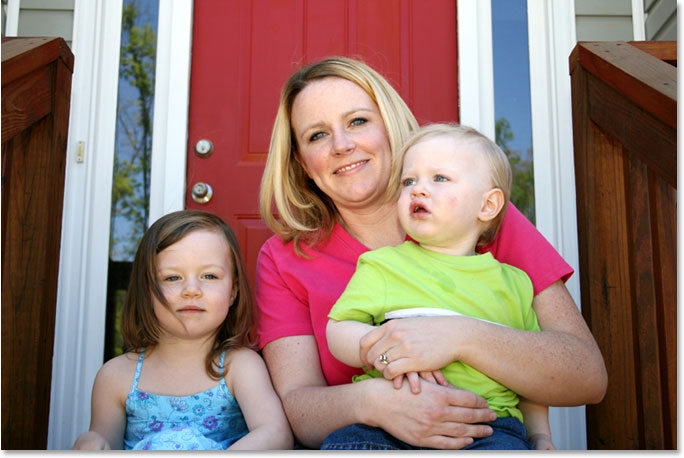
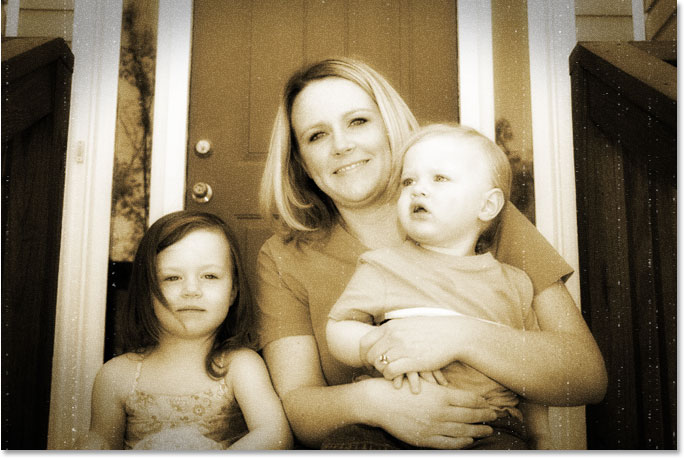
Here's the image I'll be working with in this Photoshop tutorial:
And here's what it will look like when we're done:

Of course, there's lots of different ways to age a photo in Photoshop. This, as they say, is one of them.
Step 1: Add A Hue/Saturation Adjustment Layer
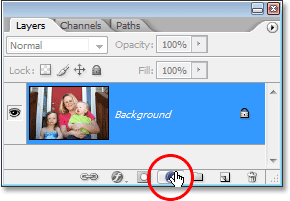
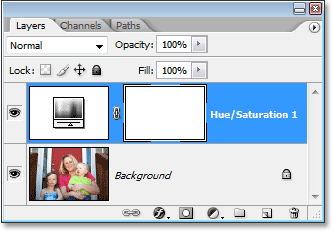
With our image newly opened in Photoshop, the first thing we're going to do is replace the photo's bright colors with a classic sepia tone, and we can do that easily using a Hue/Saturation adjustment layer. Click on the New Adjustment Layer icon at the bottom of the Layers palette:
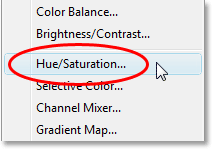
Then choose Hue/Saturation from the list of adjustment layers that appears:
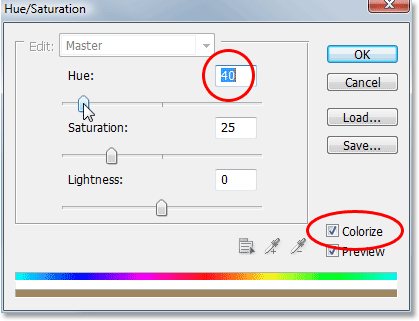
This brings up the Hue/Saturation dialog box. Click inside the checkbox to the left of the Colorize option in the bottom right of the dialog box, then drag the Hue slider to around 40 for a nice sepia tone:
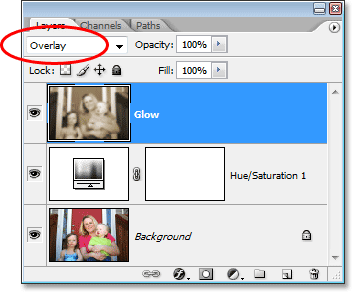
Click OK when you're done to exit out of the dialog box. If we look in our Layers palette now, we can see the Hue/Saturation adjustment layer that we've added above the Background layer (the layer which contains our original image):
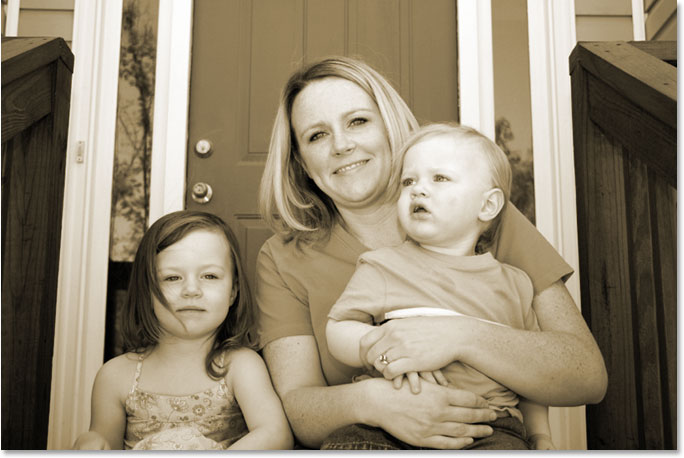
And if we look at our image in the document window, we can see that the original color has been replaced with a sepia tone:
Step 2: Merge Both Layers Onto A New Layer
For our next step, we need to have of our existing layers merged on to a new layer above them. To do that, with the adjustment layer still selected in the Layers palette, hold down your Alt (Win) / Option (Mac) key, then while holding the key down, go up to the Layer menu at the top of the screen and select Merge Visible. You can also use the keyboard shortcut for this, which is Shift+Ctrl+Alt+E (Win) / Shift+Command+Option+E (Mac):

Normally when we select the Merge Visible option, Photoshop merges all the layers onto an existing layer in the Layers palette, which is usually not what we want to have happen since we lose the original layers in the process. By holding down the Alt/Option key while selecting Merge Visible (or adding it to the keyboard shortcut), we tell Photoshop to create a brand new layer for us and merge everything onto that new layer while keeping our original layers intact. If we look now in the Layers palette, we can see that sure enough, Photoshop has created a new layer above the previous two layers and has merged the other two layers onto it. We can see our sepia tone image in the new layer's preview thumbnail:
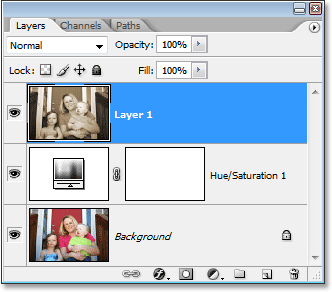
Step 3: Rename The New Layer "Glow"
We're going to use our merged layer to give our image a nice high contrast glow to it, and since we'll be adding a few more layers after that, let's keep track of what we're doing with each layer by giving them more informative names than simply "Layer 1", "Layer 2", and so on. Double-click directly on the name "Layer 1" in the Layers palette and rename it to "Glow":

Of course, you don't have to rename your layers if you feel you don't have that extra 5 seconds of your life to spare, but when you get into some serious Photoshop work where you could easily have hundreds of layers and they all have names like "Layer 10 copy 2" and "Layer 50 copy 7", you'll probably find yourself spending a lot more than 5 seconds trying to find the layer you're looking for.
We'll add our glow effect next!
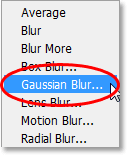
Step 4: Apply The Gaussian Blur Filter To The Merged Layer
To create our high contrast glow effect, we need to blur out our merged layer. To do that, with the "Glow" layer selected in the Layers palette (I'll assume from here on that you're renaming your layers), go up to the Filter menu at the top of the screen, choose Blur, and then choose Gaussian Blur, which is by far the most commonly used filter for blurring an image in Photoshop:
When the Gaussian Blur dialog box appears, drag the Radius slider at the bottom of the dialog box towards the right until your Radius value is around 6 pixels. I'm working with a low resolution image for this tutorial, but if you're using a high resolution image, you'll want to try a slightly higher setting. You want to apply just enough blur so that you remove most of the detail from the image without going so far that you can't make anything out at all:
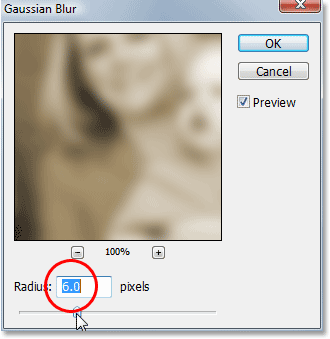
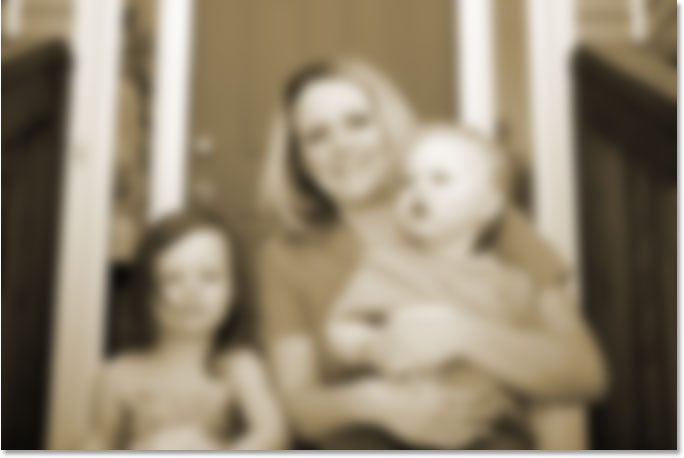
Click OK when you're done to exit out of the dialog box. Here's my image after applying the blur to the merged layer. Notice how I've blurred it without going beyond the point where it would be impossible to figure out what's in the photo:
Step 5: Change The Blend Mode Of The Blurred Layer To "Overlay"
Now that we've blurred out our merged layer, go up to the Blend Mode option in the top left corner of the Layers palette. It doesn't actually say "Blend Mode" anywhere, so just look for the selection box that is currently set to "Normal". Click on the down-pointing arrow to bring up a list of available blend modes and select Overlay from the list:
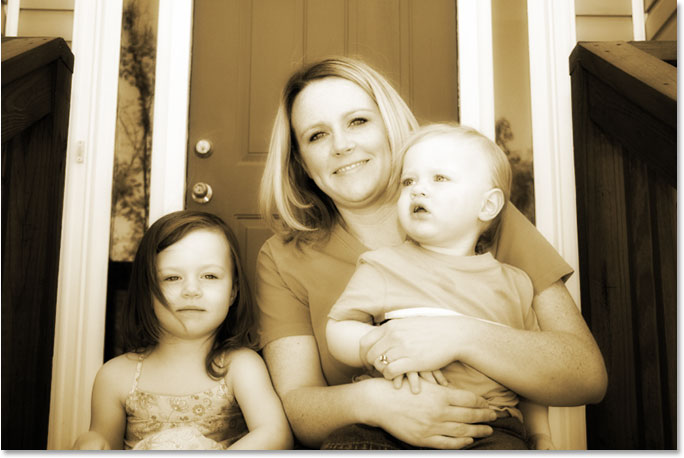
If we look at our image in the document window, we can see that it now has a soft, high contrast glow to it, which is a great effect to use on a photo even if you're not trying to make it appear older:
Step 6: Lower The Opacity Of The "Glow" Layer
If you find, and you most likely will, that your glow effect appears too intense, you can adjust it by simply lowering the opacity of the "Glow" layer. The Opacity option is directly across from the Blend Mode option at the top of the Layers palette. I'm going to lower mine all the way down to about 70%:
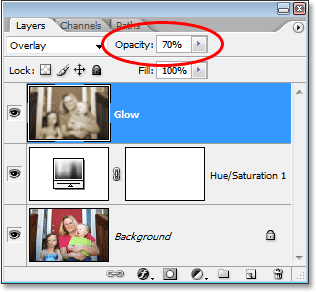
If we look at my image again, the glow effect isn't quite as intense as it was before:
Step 7: Add A New Blank Layer And Name It "Edges"
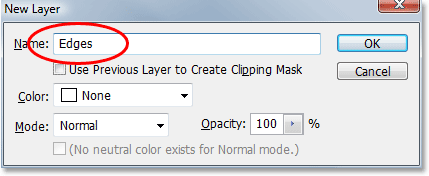
So far in our quest to turn a new photo into an old photo in Photoshop, we've replaced the photo's original colors with a classic sepia tone and we've given our photo a soft glow effect which helps remove some of the finer details from the image. The next thing we'll do is darken the edges of the photo. For that, we'll need a new layer. With the "Glow" layer currently selected in the Layers palette, hold down your Alt (Win) / Option (Mac) key and click on the New Layer icon at the bottom of the Layers palette:
By holding down the "Alt/Option" key when we click on the "New Layer" icon, we tell Photoshop to pop up the New Layer dialog box for us so we can name the layer before it's added. We can also set some other options in the dialog box, but all we need to do here is name it. Name your layer "Edges":
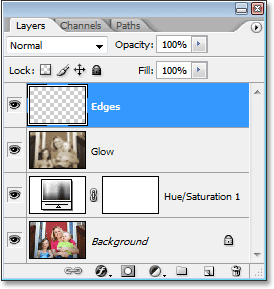
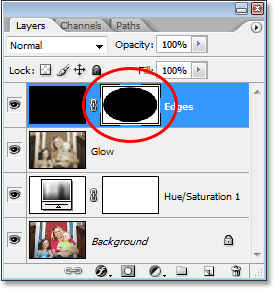
Click OK when you're done to exit out of the dialog box and Photoshop will add the new layer. If we look in the Layers palette, we can see our new layer, named "Edges", above the other layers:
Step 8: Fill The Layer With Black
We need to fill the new layer with black. To do that, we'll use Photoshop's Fill command. Go up to the Edit menu at the top of the screen and choose Fill, or use the keyboard shortcut Shift+F5. Either way brings up the Fill dialog box. Use the selection box in the Contents section at the top of the dialog box to select Black as the color we want to fill the layer with. Also, make sure in the Blending section in the bottom half of the dialog box that Mode is set to Normal and Opacity is set to 100%. They probably are, but better safe than sorry:
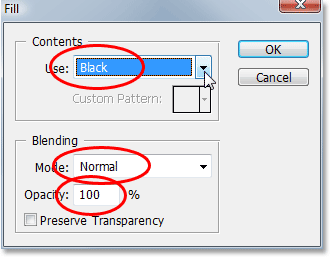
Click OK when you're done to exit out of the dialog box and have Photoshop fill the new layer with black. Your image will now appear filled with solid black in the document window:

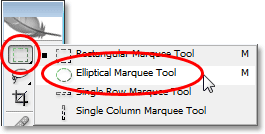
Step 9: Select The Elliptical Marquee Tool
Select the Elliptical Marquee Tool from the Tools palette. By default, it's hiding behind the Rectangular Marquee Tool, so you'll need to hold your mouse down on the Rectangular Marquee Tool for a second or two until a fly-out menu appears, then select the Elliptical Marquee Tool from the menu:
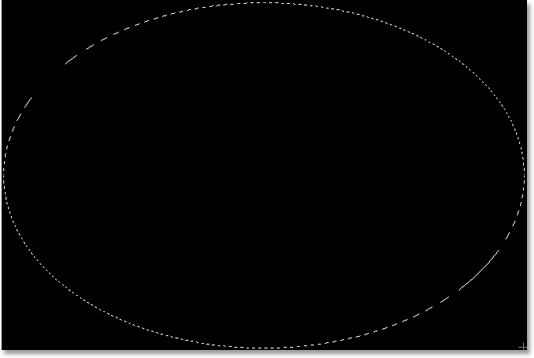
Step 10: Drag Out A Large Elliptical Selection
With the Elliptical Marquee Tool selected, click in the top left corner of the image and drag down to the bottom right corner, which will create a large elliptical selection inside the document:
Step 11: Add A Layer Mask
We're going to use our elliptical selection to punch a hole through the solid black fill, allowing us to see our photo underneath, and we can do that by adding a layer mask. Now, whenever we add a layer mask with a selection active, Photoshop uses the selection to determine which part(s) of the layer should remain visible and which part(s) should be hidden. By default, anything inside the selection remains visible, while anything outside the selection becomes hidden from view. That means that if we were to add a layer mask right now with our elliptical selection active, Photoshop would keep the solid black fill area inside the selection visible and it would hide the area outside the selection, which is exactly the opposite of what we want. We want the area inside the selection to be hidden so we can see our photo underneath, while the area outside the selection remains visible.
We need to tell Photoshop to do the exact opposite of what it normally would when we add our layer mask, and we can do that simply by holding down the Alt (Win) / Option (Mac) key and then clicking on the Layer Mask icon at the bottom of the Layers palette:
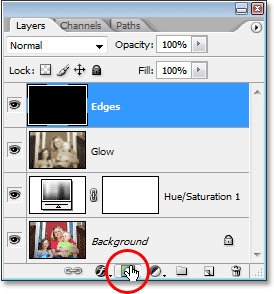
We can see in the Layers palette now that Photoshop has added a layer mask thumbnail to the "Edges" layer, and we can see in the thumbnail that the area inside the selection was filled with black, which means it's being hidden from view, while the area outside the selection was filled with white, meaning it remains visible in the document:
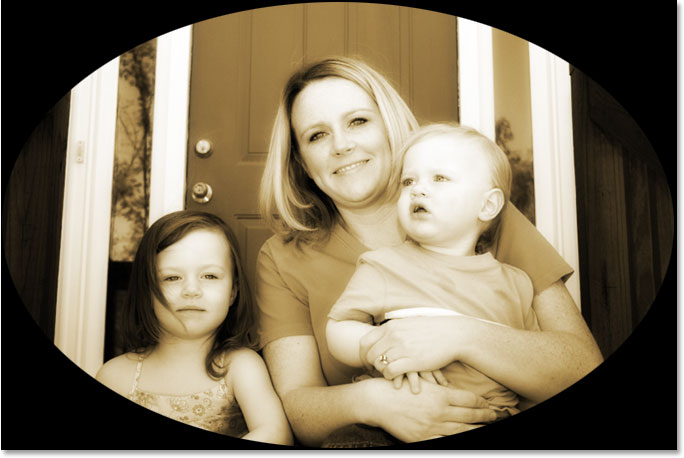
And if we look at the image in the document window, we can see that we've successfully punched a hole through the solid black fill, allowing us to see our photo through it:
Just as a side note before we continue, you may have noticed that this was the third time in this tutorial that we've managed to do something a little differently by holding down the Alt/Option key when we did it. The next time you go to do something in Photoshop, try holding down your Alt/Option key while you do it and see what happens. The worst that will happen is absolutely nothing. But who knows that sorts of little-known features you may discover!
Step 12: Apply The Gaussian Blur Filter
At the moment, all we've really created is a rather uninteresting photo frame. Let's apply Photoshop's Gaussian Blur filter to the "Edges" layer to soften the transition between the solid black area and the photo. With the "Edges" layer selected in the Layers palette, go up to the Filter menu just as we did before, choose Blur, and then choose Gaussian Blur to once again bring up the Gaussian Blur dialog box. Drag the Radius slider at the bottom towards the right and as you drag, you'll see the sharp edge separating the black area from the photo begin to blur and soften. I'm going to increase my Radius value to somewhere around 25 pixels. For a high resolution image, you'll want to use an even higher setting, maybe around 40 pixels or so:
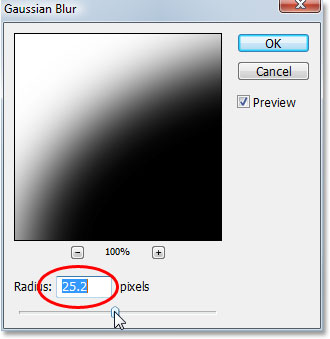
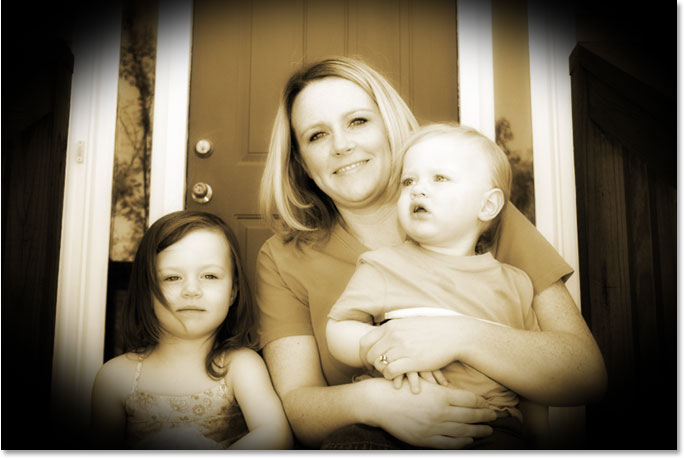
Click OK when you're done to exit out of the dialog box and apply the blurring effect. Here's my image now with a smooth transition between the outer black area and the photo:
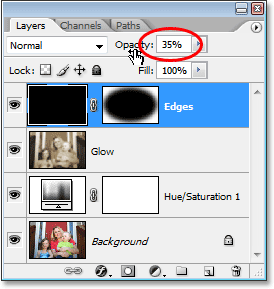
Step 13: Lower The Opacity Of The "Edges" Layer
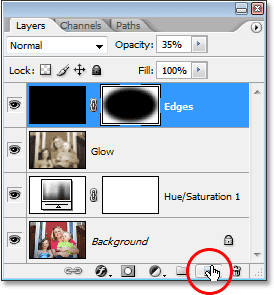
The only problem remaining with our darkened edge effect is that the solid black area is completely blocking the areas of the photo underneath it from view. We want to darken the edges of the photo, not cover them up. As a final step then with our edge effect, all we need to do is lower the opacity of the "Edges" layer. With the "Edges" layer still selected, go up to the Opacity option at the top of the Layers palette and lower the opacity value all the way down to around 35%:
This gives us a much more subtle edge darkening effect:
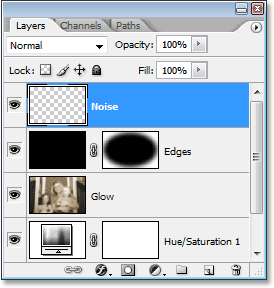
Step 14: Add A New Blank Layer And Name It "Noise"
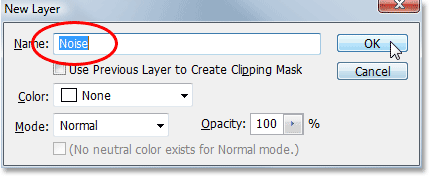
At this point, we're done with our edge effect, so let's move on by adding a little noise to the image, giving it a slightly grainy look. Again, we'll need a new layer for this, so once again hold down your Alt (Win) / Option (Mac) key and click on the New Layer icon at the bottom of the Layers palette:
Just as before, by holding down "Alt/Option", we tell Photoshop to pop up the New Layer dialog box which allows us to name the new layer before it's added. Name this layer "Noise":
Click OK when you're done to exit out of the dialog box, at which point Photoshop creates a new blank layer for us at the top of the Layers palette and names it "Noise":
Step 15: Fill The New Layer With Black
Again, we're going to fill this new layer with black, so let's again bring up Photoshop's Fill command by going up to the Edit menu and choosing Fill or by using the keyboard shortcut Shift+F5. When the Fill dialog box comes up, you should see that all of the options are automatically set to the way we set them last time, with the Contents section at the top set to Black, the Mode option set to Normal and the Opacity option set to 100%:
Click OK to accept the options and exit out of the dialog box. Photoshop again fills the new layer with black:

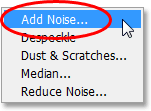
Step 16: Add Noise
With the "Noise" layer selected, go up to the Filter menu at the top of the screen, choose Noise, and then choose Add Noise:
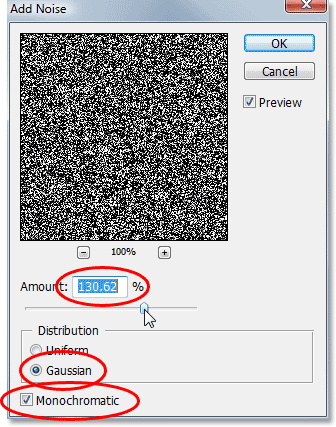
This brings up Photoshop's "Add Noise" dialog box. We want to add a lot of noise, so drag the Amount slider to somewhere around 130% or so. There's no exact value to set it to. Just make sure you're adding lots of noise. Also, make sure you select the Gaussian and Monochromatic options at the bottom of the dialog box:
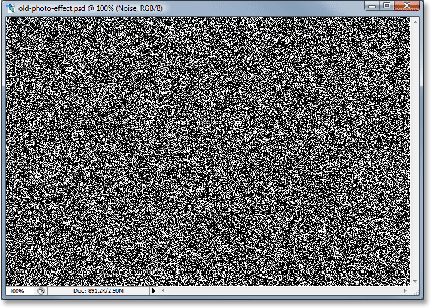
Click OK to exit out of the dialog box. Your image in the document window will now appear completely filled with black and white noise:
Step 17: Change The Blend Mode Of The "Noise" Layer To "Soft Light"
We need to blend all that noise into our image, and the first step in doing that is to change the layer's blend mode. With the "Noise" layer still selected, go up to the Blend Mode option in the top left corner of the Layers palette and change it from "Normal" to Soft Light:
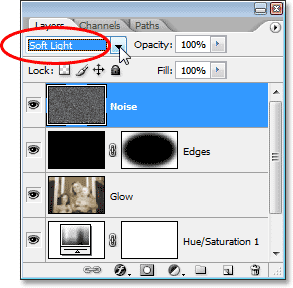
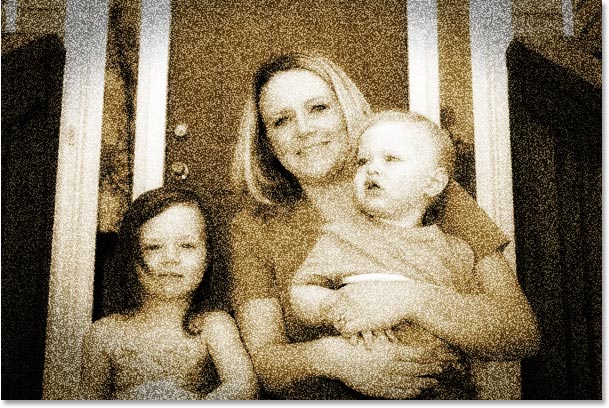
As soon as you change the blend mode to "Soft Light", you'll be able to see your photo through the noise, even though there's still far too much of it:
Step 18: Lower The Opacity Of The "Noise" Layer
Go up to the Opacity option at the top of the Layers palette and lower the opacity of the "Noise" layer all the way down to somewhere between 10-15% so there's just a hint of graininess remaining. I'm going to lower mine to 13%:
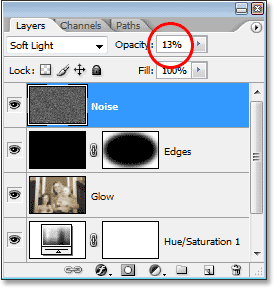
Here's my photo now after lowering the opacity of the noise:
Another effect complete! Now let's add a little bit of wear and tear to the image by creating a few specks of dust and some scratches. Nothing extreme, just a subtle amount.
Step 19: Add A New Layer Named "Grain" And Fill It With Black
We need yet another new layer and we need to fill it with black. Since we've already done this twice, I'll save us a little time here and combine the whole process into one step. Hold down your Alt (Win) / Option (Mac) key and click on the New Layer icon at the bottom of the Layers palette. When the New Layer dialog box appears, name the layer Grain. We're naming it that because we'll be using Photoshop's "Grain" filter in a moment. Click OK to exit out of the dialog box and have Photoshop add the new layer at the top of the Layers palette.
Then, to fill the layer with black, go up to the Edit menu at the top of the screen and choose Fill or use the keyboard shortcut Shift+F5. When the Fill dialog box appears, make sure all the options are still set to the way we had them before, with Contents set to Black, Mode set to Normal and Opacity set to 100%, then click OK to exit out of the dialog box and have Photoshop fill the new layer with black.
When you're done, you should have a new layer at the top of your Layers palette named "Grain", and the layer should be filled with solid black:
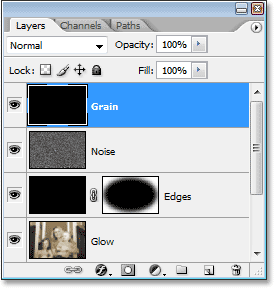
Your image in the document window will also once again be filled with black.
Step 20: Apply The "Grain" Filter
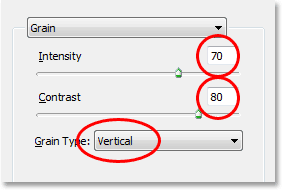
We're going to use Photoshop's "Grain" filter to add a little wear and tear to our image by adding some dust and scratches. Again, we're not going for an extreme amount of wear and tear here, just a little something to help make the photo look like it's been sitting in someone's shoe box for a few years. With the new "Grain" layer selected in the Layers palette, go up to the Filter menu at the top of the screen, choose Texture, and then choose Grain:

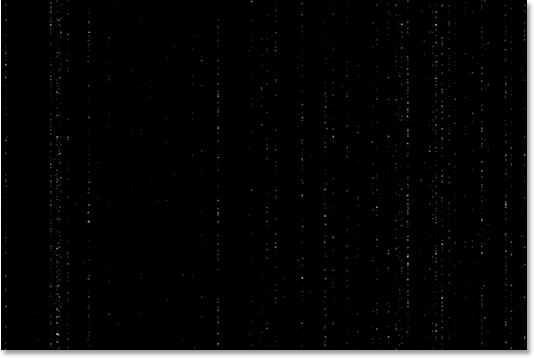
When the Grain filter dialog box appears, first set the Grain Type option to Vertical, then increase the Intensity value to around 70 and the Contrast value to around 80. You may need to play around with those values a bit while keeping an eye on the preview area. What you're looking for is just a few broken vertical white lines which will become dust and scratches on the image:
Click OK when you're done to exit out of the dialog box. If you look at your image in the document window, you should see something like this:
Step 21: Change The Blend Mode Of The "Grain" Layer To "Screen"
To turn those white dots and lines into something that looks more like dust and scratches, simply go up to the Blend Mode option at the top of the Layers palette and change the "Grain" layer's blend mode from "Normal" to Screen:
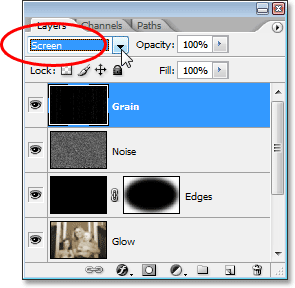
The "Screen" blend mode will instantly hide all the black areas on the layer, leaving only the white dots and lines visible, creating our subtle dust and scratches effect:
You may be wondering why we named this layer "Grain" and not something more obvious like "Dust & Scratches". The reason is simply because there is an actual Dust & Scratches filter in Photoshop which is used to remove things like, well, dust and scratches. To avoid confusion, I thought it would be easier to name the layer based on the name of the filter we used to create the effect, which was the "Grain" filter. It doesn't really matter what name you give to your layers as long as the name makes sense to you.
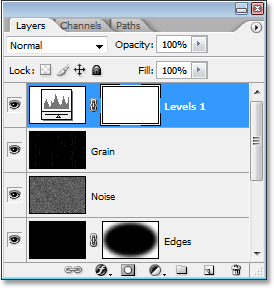
Step 22: Add A "Levels" Adjustment Layer
One of the things that tends to happen to photos over time is that they begin to fade. The deep blacks and bright whites in the image become dark and light shades of gray, resulting in a loss of contrast in the photo and an overall "dull" appearance. Normally, Photoshop's Levels command is used to restore those shadows and highlights that have fallen victim to the ravages of time, but we can just as easily use Levels to advance the aging process.
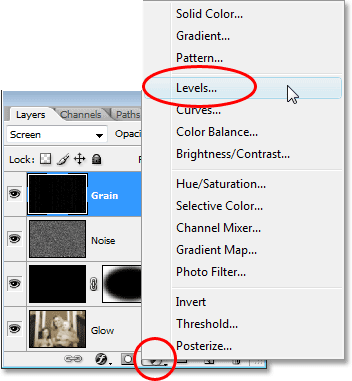
Before we can do anything though, we need to add a Levels adjustment layer, so with the "Grain" layer still selected, click on the New Adjustment Layer icon at the bottom of the Layers palette and select Levels from the list:
Step 23: Reduce The Overall Contrast Of The Image With The Output Sliders
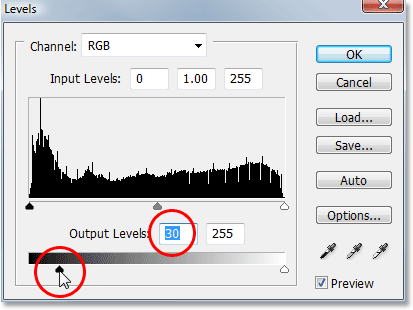
When the Levels dialog box appears, look down at the very bottom and you'll see a gradient bar going from black on the left to white on the right, with two small sliders below it on either end - a black one on the left and a white one on the right. These are called output sliders and they control the maximum tonal range of an image. We can use them to control how dark the blacks in an image can appear and how bright the whites can appear.
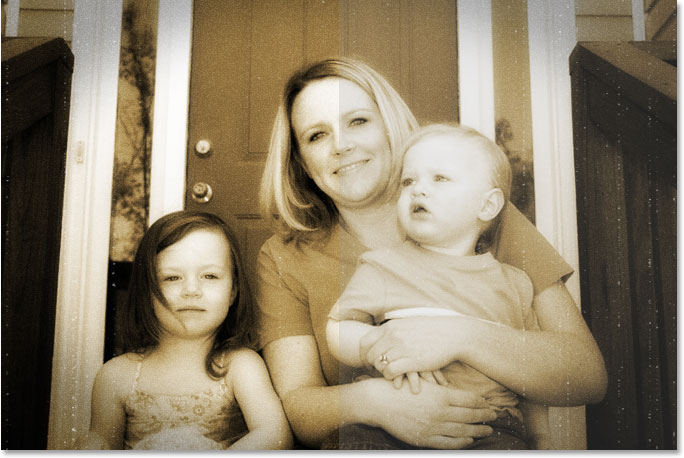
As I mentioned a moment ago, the deep blacks in a photo tend to lighten over time, so to lighten the blacks in our image, simply click on the black slider on the left and drag it towards the right. As you drag, you'll see the darkest parts of the image begin to lighten. We don't want to go too far, so continue dragging until you've set the number in the left value box of the Output Levels option to around 30:
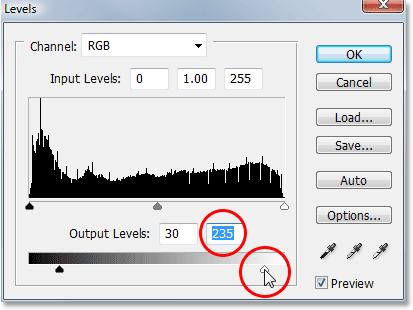
The bright whites in the photo need to be darkened a little as well, so click on the white slider on the right and begin dragging it towards the left. As you drag, you'll see the brightest areas in the image begin to fade. Again, we don't want to go too far, so drag the slider until you've set the number in the right value box of the Output Levels option to around 235:
Click OK when you're done to exit out of the Levels dialog box. If we look in our Layers palette, we can see the Levels adjustment layer that we've added:
And if we look at our image, we can see that it has now lost a bit of its overall contrast. To make it easier to see what we've done, I've split my photo up into a "before and after" image. The left side is how the image looked before fading it with the Levels adjustment layer, and the right side is how it appears after fading it. Notice how the blacks are no longer pure black and the whites are no longer pure white:
We're just about done, and you could actually stop here if you wanted to. But as a final step, I'm going to bring back just a hint of the photo's original color, and I'll do that next!
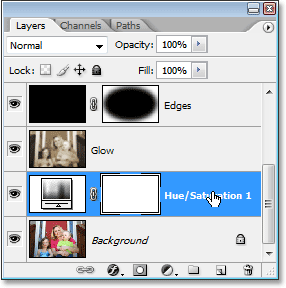
Step 24: Select The Hue/Saturation Layer
As I mentioned at the end of the previous page, this last step is optional. I'm going to bring back some of the photo's original color, as if the color in the photo has also faded over time.
If you remember from the very beginning of the tutorial, we replaced the photo's original color with a sepia tone using a Hue/Saturation adjustment layer. The original photo with all of its original colors is sitting safely below that adjustment layer on the Background layer. To bring back some of the color, all we need to do is lower the opacity of that Hue/Saturation layer.
First, we need to select it, so click on the Hue/Saturation adjustment layer in the Layers palette:
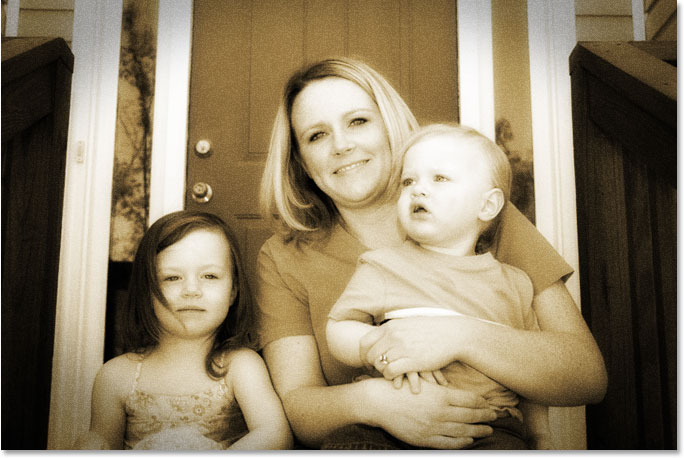
Step 25: Lower The Layer's Opacity
With the Hue/Saturation adjustment layer selected, go up to the Opacity option at the top of the Layers palette and lower the opacity to around 90%:
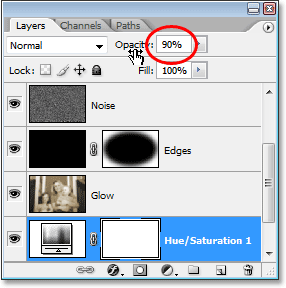
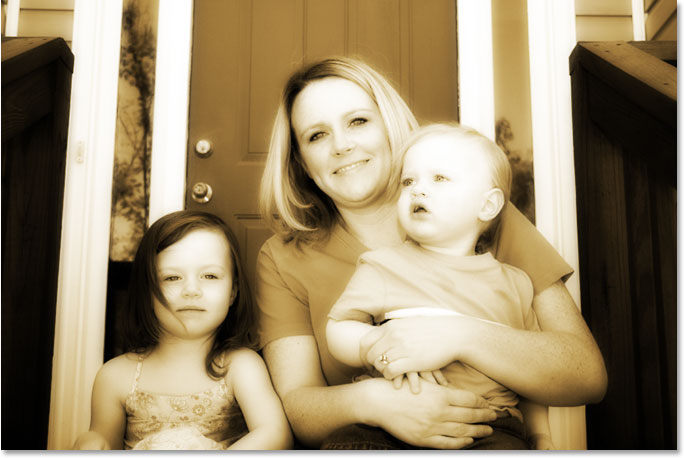
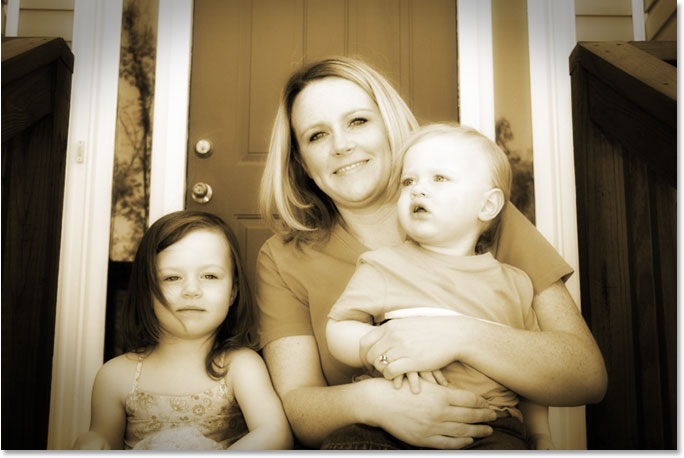
This brings back 10% of the photo's original color, and with that, here's my final "old photo" result:
And there we have it! That's how to create an old, antique photo effect with Photoshop! Visit our Photo Effects section for more Photoshop effects tutorials!