
Lightning Effect With Photoshop
In this Photoshop effects tutorial, we'll learn how to easily create and add lightning to an image with Photoshop! There's a few different ways to create lightning using Photoshop. The way we'll learn here is my favorite because, unlike real lightning in nature, this technique gives us lots of control over where the lightning appears and what it looks like in our image.
After we've created the initial lightning bolt, we'll learn how to colorize it and how to brighten things up with some highlights to complete the effect!
I'll be using Photoshop CS5 throughout this tutorial but there's nothing we'll be doing that's specific to CS5 so any recent version of Photoshop will work.
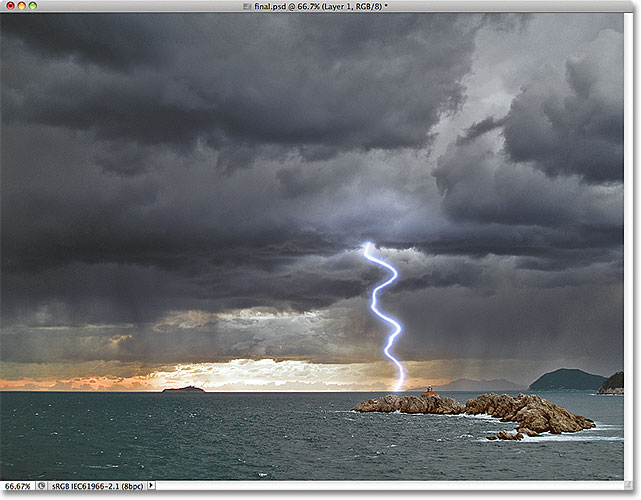
Here's what the final lightning effect will look like (the original image without the lightning is available from the Fotolia image library):
How To Add Lightning To A Photo
Step 1: Add A New Blank Layer
With the photo newly opened in Photoshop, if we look in the Layers panel, we see that we currently have one layer - the Background layer - which is the layer the photo is sitting on. We're going to add our lightning above this layer so we don't damage the original image. Click on the New Layer icon at the bottom of the Layers panel:
This adds a new blank layer named "Layer 1" above the Background layer:

Step 2: Select The Lasso Tool
Select the Lasso Tool from the Tools panel:

Step 3: Draw A Selection Around The Area Where The Lightning Will Appear
With the Lasso Tool selected, decide where you want the lightning bolt to appear in the image and draw a selection outline around that general area. Here, I've drawn my selection outline in the lower right of the photo:

Step 4: Fill The Selection With White
Go up to the Edit menu in the Menu Bar along the top of the screen and choose Fill:

This opens the Fill dialog box. Set the Use option at the top of the dialog box to White:

Click OK to close out of the Fill dialog box. Photoshop fills the selected area with white in the document:

Step 5: Select The Brush Tool
Select the Brush Tool from the Tools panel:

Step 6: Set The Foreground Color To Black
We need to paint with black, and Photoshop uses the current Foreground color as the paint color, which means we need to make sure our Foreground color is set to black before we start painting. Press the letter D on your keyboard, which resets the Foreground and Background colors to their defaults, making black the Foreground color (white becomes the Background color). You can see what the colors are set to by looking at the Foreground and Background color swatches near the bottom of the Tools panel:

Step 7: Choose A Round, Hard Edge Brush
With the Brush Tool selected, right-click (Win) / Control-click (Mac) anywhere inside the document, which opens the Brush Picker, and choose a round, hard edge brush by clicking on its thumbnail. I'm using Photoshop CS5 here, but don't worry if you're using CS4 or earlier and your selection of brushes looks different from mine. Any round, hard edge brush will do. Once you've selected a brush, press Enter (Win) / Return (Mac) to close out of the Brush Picker:

Step 8: Paint A Jagged Black Stroke Through The White-Filled Selection
Paint a jagged black stroke through the white-filled selection where you want the lightning bolt to appear. The lightning will eventually appear along the right edge of the paint stroke, where the black and white meet. For best results, use a fairly small brush. You can change the size of the brush from the keyboard. Press the left bracket key ( [ ) to make the brush smaller. Pressing the right bracket key ( ] ) makes the brush larger. When you're done, your black stroke should look something like this:

Step 9: Paint The Area To The Left Of The Stroke Black
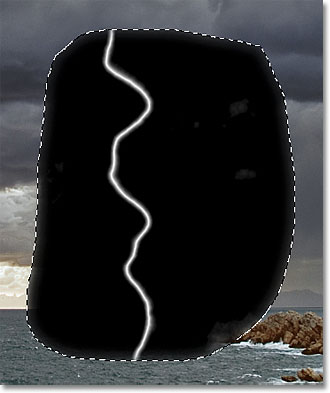
Once you have your initial black stroke, continue painting over the area to the left of the stroke until it's completely covered in black as well. Only the area to the right of the stroke should remain white. You may want to increase the size of your brush so you can paint over this area more quickly by pressing the right bracket key ( ] ) a few times:

Step 10: Apply The Gaussian Blur Filter
Next, we need to soften the edge where the black and white areas meet, and we can do that by blurring it. Go up to the Filter menu at the top of the screen, choose Blur, then choose Gaussian Blur:

This opens the Gaussian Blur filter's dialog box. Keep an eye on the document as you drag the Radius slider at the bottom of the dialog box towards the right. The further you drag the slider, the more blurring you'll apply and the softer the edge will become. The transition area between black and white created by the soft edge is what will eventually become the lightning bolt, so the softer the edge, the wider the lightning bolt will be. For my image, I'm going to set my Radius value to around 9 pixels. The Radius value you end up using may be different depending on the size of the image you're working with:

Click OK to close out of the dialog box. The edge should now look similar to this:

Step 11: Apply The Difference Clouds Filter
Go up to the Filter menu, choose Render, then choose Difference Clouds:

There's no dialog box for the Difference Clouds filter, so Photoshop simply goes ahead and runs it. We can see in the document that the soft edge we created a moment ago now begins to look like a lightning bolt, although it's the wrong color at the moment:

Step 12: Invert The Image
Go up to the Image menu, choose Adjustments, then choose Invert:

This inverts the brightness values in the selected area, making light areas dark and dark areas light, which turns our lightning bolt from black to white:

Step 13: Apply The Levels Command
Go back up to the Image menu, choose Adjustments once again, and this time, choose Levels:

This opens the Levels dialog box. We're going to use Levels to darken the "clouds" around the lightning bolt so the area surrounding it is black. First, click on the black slider below the bottom left side of the histogram in the center of the dialog box and begin dragging it towards the right. As you drag, you'll see the areas around the lightning bolt begin to fade into black. Continue dragging the black slider towards the right until most of the "clouds" have disappeared:

Most of the area should now be darkened to black. A few gray areas will remain:

Click on the gray slider in between the black and white sliders and begin dragging it towards the right as well, which will fade the remaining gray areas to black. It's important, though, that you don't darken things so much that the lightning bolt becomes harsh looking with hard, jagged edges. You want to keep a soft, subtle fuzziness to the lightning, so darken things as much as you can with the black and gray sliders, but don't worry if there's still a few remaining areas of gray. We'll clean things up next:

Click OK when you're done to close out of the Levels dialog box. The image should now look similar to this:
Step 14: Deselect The Area
Go up to the Select menu at the top of the screen and choose Deselect to remove the selection outline from around the area. Or, for a faster way to deselect a selection, press Ctrl+D (Win) / Command+D (Mac) on your keyboard. Either way will do:

Step 15: Paint With Black To Clean Up Any Remaining Gray Areas
With your Brush Tool still selected, right-click (Win) / Control-click (Mac) anywhere inside the document to once again open the Brush Picker. Keep the same round brush selected, but lower the Hardness of the brush to 50%. This will soften the brush edge. Press Enter (Win) / Return (Mac) when you're done to close out of the Brush Picker:

Then, with black still as your Foreground color, paint over any remaining gray areas around the lightning bolt to clean them up. The reason we softened the brush edge is in case there are any remaining gray areas close to the lightning bolt itself. This way, we can paint close to the lightning without flatting its soft edge:

Also, if you look around the outer edges of the black area, you'll see that they appear somewhat transparent, which is a result of us running the Gaussian Blur filter earlier. These transparent edges will cause problems, so paint around the outer edges with your brush to cover them with solid black. When you're done, everything other than the lightning bolt should be black. Don't worry that the whole thing looks like an ugly mess for now. It will look much better in a moment:

Step 16: Change The Blend Mode To Screen
With everything now black except the lightning bolt itself, go up to the Blend Mode option at the top of the Layers panel and change the blend mode from Normal to Screen:

The Screen blend mode hides all the black areas on the layer, keeping only the lightning bolt itself visible:

Step 17: Move And Resize The Lightning With Free Transform
Go up to the Edit menu at the top of the screen and choose Free Transform, or press Ctrl+T (Win) / Command+T (Mac) to access the Free Transform command with the keyboard shortcut:

This places Photoshop's Free Transform box and handles around the lightning bolt. Move the lightning into position by clicking anywhere inside the bounding box and dragging it with your mouse. To resize the lightning, simply drag any of the handles. If you hold down your Ctrl (Win) / Command (Mac) key, this will temporarily switch you to Distort mode which will give you more freedom when dragging the handles. Release the key to switch back to standard Free Transform mode. Once you've moved and resized the lightning, press Enter (Win) / Return (Mac) to accept the change and exit out of Free Transform:

Step 18: Duplicate The Layer
Let's add a glow to the lightning. Go up to the Layer menu, choose New, then choose Layer via Copy, or press Ctrl+J (Win) / Command+J (Mac) to access the same command with the keyboard shortcut:

Either way tells Photoshop to make a copy of Layer 1 and place it above the original in the Layers panel. Notice that the copy is automatically set to the Screen blend mode for us:

Step 19: Apply The Gaussian Blur Filter
To create a glow around the lightning, we just need to blur the copy we created. Go up to the Filter menu, choose Blur, then choose Gaussian Blur as we did before. I'm going to again set my Radius value to around 9 pixels, which adds a nice glow effect. The value you use may be different depending on the size of your image:

Click OK when you're done to close out of the Gaussian Blur dialog box. You should now see a subtle glow around the lightning:
Step 20: Duplicate The Layer
The initial glow effect is a bit too subtle so let's increase its intensity. Press Ctrl+J (Win) / Command+J (Mac) to quickly duplicate the blurred layer. The glow will appear stronger. If you find that it's now too strong, lower the layer's opacity to fine-tune the results. You'll find the Opacity option at the top of the Layers panel directly across from the Blend Mode option. I'm going to leave my opacity set to 100%:

Here's my result with the glow now more intense:

Step 21: Merge The Lightning Layers
Go up to the Layer menu and choose Merge Down, or press Ctrl+E (Win) / Command+E (Mac) to access the Merge Down command with the keyboard shortcut. Then do the same thing a second time. This will merge the two glow effect layers down onto Layer 1 with the initial lightning bolt:

You should now be back to a single layer, Layer 1, above the Background layer in the Layers panel:

Step 22: Colorize The Lightning With Hue/Saturation
If you want to colorize the lightning, go up to the Image menu, choose Adjustments, then choose Hue/Saturation:

This opens the Hue/Saturation dialog box. Select the Colorize option, then drag the Hue slider to select a color for the lightning. I'm going to select a blue/purple color by setting my Hue value to 232. Of course, you can choose any color you like. To make the color appear more intense, increase the Saturation value. I'll set mine to 50%. Click OK when you're done to close out of the dialog box:

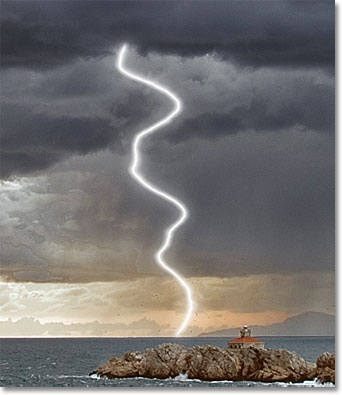
Here's what my lightning looks like after colorizing it:
Step 23: Merge The Layers Onto A New Layer
Hold down your Alt (Win) / Option (Mac) key and with the key held down, go up to the Layer menu and choose Merge Visible:

This merges the existing layers onto a new layer above them in the Layers panel:

Step 24: Select The Dodge Tool
Select the Dodge Tool from the Tools panel:

Step 25: Set The Range Option To Highlights And Deselect Protect Tones
With the Dodge Tool selected, set the Range option in the Options Bar along the top of the screen to Highlights. Leave Exposure set to 50%, and uncheck the Protect Tones option:

Step 26: Lower The Brush Hardness To 0%
The Dodge Tool is considered a brush in Photoshop and we can adjust the softness of its edges the same way we can with the standard Brush Tool. Right-click (Win) / Control-click (Mac) anywhere inside the document to bring up the Brush Picker, then lower the Hardness for the Dodge Tool all the way down to 0% to give us the softest edges possible. Press Enter (Win) / Return (Mac) when you're done to close out of the Brush Picker:

Step 27: Paint With The Dodge Tool To Brighten Areas
Finally, paint over certain areas with the Dodge Tool to brighten them and add some lighting highlights. Each time you paint over the same spot with the Dodge Tool, you'll brighten that area a little more. The clouds around where the lightning bolt is shooting out from would be brightened by the lightning, so I'll use a medium size brush to paint over that area a few times:

I'll use a smaller brush and simply click a couple of times on the spot where the lightning strikes the ground (or in this case water) to add a highlight there as well:

And finally, I'll paint over a couple of spots along the lightning bolt itself to add some highlights to it:

Step 28: Lower The Opacity Of The Top Layer If Needed
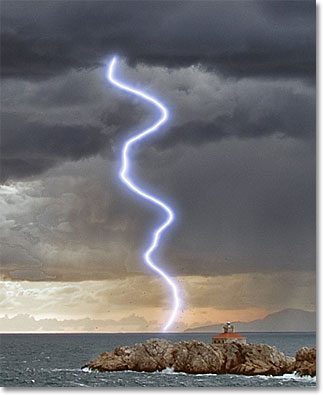
If, after adding your highlights with the Dodge Tool, you find they look a bit too intense, simply lower the opacity of the top layer. I'm going to lower mine down to 70%:

Here, after lowering the opacity, is my final lightning effect: