
Halftone Pattern Photo Border With Photoshop
In this Photoshop Effects tutorial, we'll learn how to create a fun and simple halftone pattern photo border using a couple of Photoshop's filters, a basic selection tool, a layer mask, and a layer blend mode. We'll be using Smart Filters to create the effect, which will allow us to easily make changes to the photo border after we've created it without having to undo or redo any steps. Smart Filters were first introduced in Photoshop CS3, which means you'll need at least Photoshop CS3 if you want the added benefits that Smart Filters offer (I'll be using Photoshop CS4 myself), but this effect can be created with any version of Photoshop, including Photoshop Elements, so don't lose hope just because you don't have CS3 or CS4.
If you're using Photoshop CS2 or earlier, or Photoshop Elements, simply ignore the few steps that deal specifically with Smart Filters and apply regular filters to the layer as you normally would. The only thing you'll be missing out on is the added flexibility and editability that Smart Filters give us.
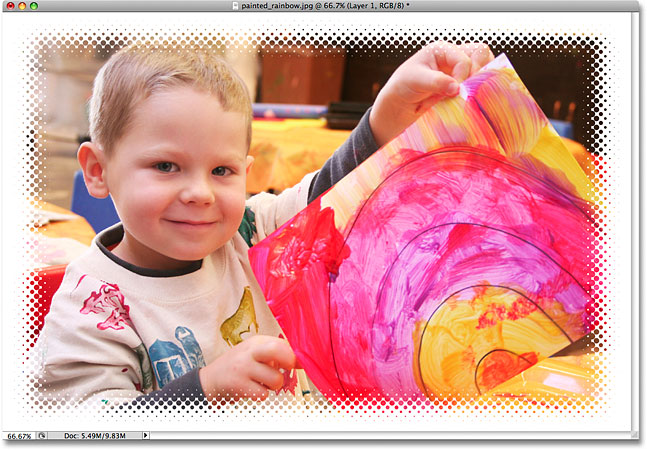
Here's the halftone pattern photo border that we'll be creating:
How To Create A Halftone Pattern Photo Border
Step 1: Add A New Blank Layer
With our photo newly opened in Photoshop, we can see in our Layers palette that we currently have one layer named Background. This is the layer that contains our image. We're going to create our photo border on a separate layer above the image, which means we need to add a new layer to our Photoshop document. To add a new layer, click on the New Layer icon at the bottom of the Layers palette:

A new blank layer appears in the Layers palette directly above the Background layer. Photoshop automatically names the new layer "Layer 1". If we look at the preview thumbnail to the left of the layer's name, we can see a gray and white square pattern. This is how Photoshop represents transparency, letting us know that our new layer is currently transparent. In other words, there's nothing on it at the moment:

Step 2: Fill The New Layer With White
We're going to use white as the color for our photo border, so we'll need to fill our new layer with white. Go up to the Edit menu at the top of the screen and choose Fill:

This brings up Photoshop's Fill dialog box. Choose White from the list to the right of the word Use in the top half of the dialog box. Also, make sure the Mode option in the bottom half of the dialog box is set to Normal and the Opacity is set to 100%. These are the default settings for these options so you probably won't need to worry about them unless you've made changes to them previously:

Click OK to exit out of the dialog box. Photoshop will fill the new layer with white, temporarily blocking the photo on the Background layer from view:

Step 3: Select The Rectangular Marquee Tool
We need to define the edges of our photo border, and for that, we'll use Photoshop's Rectangular Marquee Tool which allows us to easily draw rectangular-shaped selections. Click on the Rectangular Marquee Tool in the Tools palette to select it, or press the letter M on your keyboard to quickly select it with the shortcut:

Then, with the Rectangular Marquee Tool selected, click in the top left of the document and drag out a selection outline to define the edges of the photo border. The area outside of the selection (between the selection outline and the edges of the document) will become the photo border, while the area inside the selection will be where the photo is visible. If you need to reposition the selection as you're drawing it, hold down your spacebar and drag your mouse to move the selection as needed, then release the spacebar and continue drawing the selection. When you're done, you should have a rectangular selection outlining the four edges of the photo border:

Step 4: Fill The Selected Area With Black
We need to fill the selected area with black, and we can use the same Fill command we used earlier when we filled the entire layer with white. Go back up to the Edit menu at the top of the screen and choose Fill once again. This time, when the Fill dialog box appears, choose Black from the list to the right of the word Use:

Click OK to once again exit out of the Fill dialog box. The last time we used the Fill command, Photoshop filled the entire layer with our chosen color. This time, since we have an active selection in our document, only the area inside the selection is filled. Press Ctrl+D (Win) / Command+D (Mac) to deselect the selection and remove the selection outline:

Step 5: Convert "Layer 1" To A Smart Object
If you're using Photoshop CS2 or earlier, or Photoshop Elements, you can skip this step since it only applies to Photoshop CS3 and higher. We're going to be applying a couple of Smart Filters to "Layer 1" which will allow us to go back and change the filter settings any time we want after we've created the initial photo border in order to fine-tune the effect. Before we can use Smart Filters though, we first need to convert our layer into a Smart Object. Applying one of Photoshop's standard filters to a Smart Object automatically converts the filter into a Smart Filter.
To convert the layer into a Smart Object, go up to the Filter menu at the top of the screen and select Convert for Smart Filters. You could also go up to the Layer menu, choose Smart Objects, and then choose Convert to Smart Object. These are just two different ways of saying the same thing. In either case, we're simply converting the layer into a Smart Object:

In fact, to make it more obvious that all we're doing is converting the layer to a Smart Object, if you select "Convert for Smart Filters" from the Filter menu, Photoshop will pop up a dialog box warning that the layer is about to become a Smart Object. Click OK to exit out of it:

Nothing will seem to have changed in the document window, but if we look in the bottom right corner of the preview thumbnail for "Layer 1" in the Layers palette, a small Smart Object icon has appeared, letting us know that the layer is now a Smart Object:

Step 6: Apply The Gaussian Blur Filter
If you skipped the previous step because you're not using Photoshop CS3 or CS4, welcome back! We're now going to create our halftone pattern effect, and these next few steps are the same no matter which version of Photoshop you're using. First, we need to soften the edges of the photo border. Go up to the Filter menu, choose Blur, and then choose Gaussian Blur:

This brings up the Gaussian Blur filter's dialog box. Soften the edges of the photo border by dragging the Radius slider at the bottom of the dialog box. The further you drag the slider towards the right, the more blurring you'll apply to the layer resulting in a wider transition area between the black part in the center and the white photo border around the edges. There's no specific radius value to use since it will depend on the size of the photo you're working on, with larger photos requiring larger radius values, so keep an eye on your image in the document window as you drag the slider to judge the results. Keep in mind that the width of the halftone pattern that we'll be adding in the next step will be determined by the width of the transition area that we set here. This is why Smart Filters make life so much easier, since we can easily go back and try different filter settings any time we want.
I'm going to set my radius value to somewhere around 16 pixels. Again, the value you use may be different:

Click OK when you're done to exit out of the dialog box and applying the blurring to the layer. The edges where the black and white areas of the layer meet are now much softer:

Step 7: Apply The Color Halftone Filter
Go back up to the Filter menu and this time, choose Pixelate, then choose Color Halftone:

This brings up Photoshop's Color Halftone dialog box. The Color Halftone filter was designed to simulate the look of a traditional four color offset printing press, converting the image into a series of overlapping colored dots at various sizes. If that was the effect we were aiming for here (which it isn't), we'd first need to convert our image from the RGB color mode to the CMYK color mode, since the filter requires four color channels (Cyan, Magenta, Yellow and Black) to work properly and the RGB color mode uses only three channels (Red, Green and Blue). However, we're simply using the filter to create a repeating pattern of circles, so there's no need to worry about which color mode we're working in. You're most likely working in the RGB color mode and that's fine for this effect.
First, set each of the four Channels options to 45 degrees. This will give us a clean, even pattern of circles. The Max Radius option at the top of the dialog box sets the size of the largest circles in the pattern. Much like the Gaussian Blur filter that we applied earlier, there's no specific value to use here since it depends entirely on the effect you want to create and the size of the photo you're working with. Again, this is where Smart Filters make things easy since we can go back and try different settings without having to undo any steps. Since I've already applied this effect several times while preparing this tutorial, I know that a value of 12 pixels works well with my image. You'll most likely need to experiment a few times to find the size that works best for your photo:

Click OK when you're done to exit out of the Color Halftone dialog box and apply the filter to the layer (or Smart Object). You should now see a series of repeating circles at various sizes around your photo border. The size of the largest circles in the pattern was set with the Max Radius value a moment ago:

If you're using Photoshop CS3 or CS4 and you're not happy with the size of the dots in the pattern, continue on for now since we'll see how to edit the Smart Filter settings at the end of the tutorial. If you're using an older version of Photoshop and you want to try a different Max Radius value to change the size of the dots, press Ctrl+Z (Win) / Command+Z (Mac) to undo the last step, then repeat Step 7 again using a different value. You can undo the step and retry the filter with a different value as many times as needed.
Step 8: Change The Blend Mode Of "Layer 1" To Screen
Finally, to hide the solid black color on "Layer 1" and allow the photo on the Background layer below it to show through, go up to the Blend Mode option at the top of the Layers palette and change the layer's blend mode from Normal to Screen:

The Screen blend mode, which I cover in much more detail in our Five Essential Blend Modes For Photo Editing tutorial, hides any areas on the layer that are filled with black while areas filled with white remain untouched, and if we look in our document window after changing the blend mode, we can see that our white halftone pattern border remains visible while the black has been completely hidden from view, allowing the image on the Background layer to show through and completing our photo border effect:
Step 9: Change The Smart Filter Settings To Edit The Effect (Optional)
If you're using Photoshop CS3 or CS4 and you're working with Smart Filters, you'll see both filters that you've added to "Layer 1" listed below it in the Layers palette, with the most recently added filter at the top of the list. You can try different filter settings to change the look of the photo border at any time simply by double-clicking directly on the filter's name. For example, I'll bring the Color Halftone dialog box back up by double-clicking on the name of the filter in the Layers palette:

I can now try a different value for the Max Radius option without needing to undo any steps. I'll try a value of 20 pixels this time, which should make the circles in the pattern a bit larger:

Click OK to close out of the dialog box and Photoshop updates the image in the document window with the new settings. As expected, the circles in the halftone pattern are now larger. You can go back and try different settings as often as you like with Smart Filters:

You can also go back and adjust the width of the halftone pattern by changing the Radius value that we used for the Gaussian Blur filter. Simply double-click on the Gaussian Blur filter's name in the Layers palette to bring its dialog box back up. However, when you do, a little warning box will appear:

Unless you select the Don't show again option in the bottom left corner, you'll see this warning box any time you go to re-edit a Smart Filter that has other Smart Filters listed above it (in this case, the Color Halftone filter is listed above it), and you can safely click OK to exit out of it, at which point the filter's dialog box will appear. The warning simply tells us that Photoshop will be unable to show us a preview of how the changes we're making are affecting the other filters above it until we click OK and accept the changes. It's nothing to worry about since we can always go back and change the filter settings again if we don't like the results. I'm not going to bother editing my Gaussian Blur filter settings since I'm happy with the way my photo border looks, but be sure to play around on your own to see how incredibly easy it is to experiment with different filter settings thanks to Photoshop's Smart Filters.