
Folds And Creases Effect In Photoshop
In this Photoshop Effects tutorial, we'll learn how to add folds and creases to a photo as if it had been folded and unfolded like a map! We'll use guides and selections to create the folded sections of the image, some gradients, a layer blend mode and one of Photoshop's filters to add highlights and shadows, and we'll give the fold lines a worn out look to them using a custom brush!
This version of the tutorial is for Photoshop CS5 and earlier. For Photoshop CS6 and CC (Creative Cloud), check out the fully updated version.
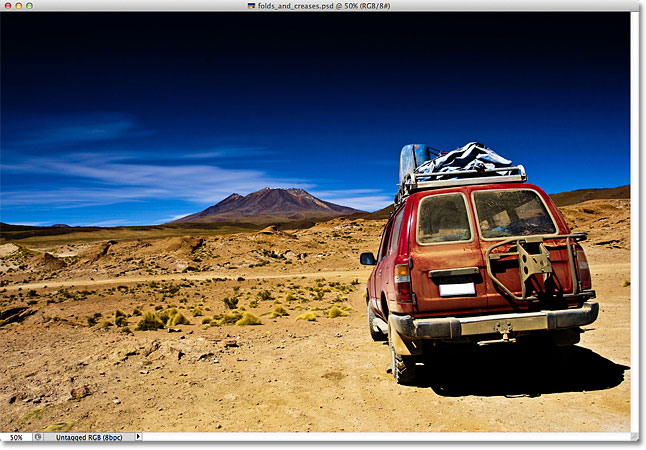
Here's the image I'll be using for this tutorial:
And here's what the final result will look like:
How To Create A Folds And Creases Effect
Step 1: Add A New Blank Layer
Let's begin by adding a new blank layer to our document. Click on the New Layer icon at the bottom of the Layers panel:
Nothing will happen in the document window because our new layer is blank, but if we look in the Layers panel, we see the new layer, which Photoshop has named "Layer 1", sitting above the original image on the Background layer:

Step 2: Turn On The Rulers
We're going to drag out some horizontal and vertical guides to help us out, and to do that, we first need to have Photoshop's rulers turned on. Go up to the View menu in the Menu Bar along the top of the screen and choose Rulers. Or, press Ctrl+R (Win) / Command+R (Mac) on your keyboard to turn the rulers on with the shortcut:

The rulers will appear along the top and left of the document window:

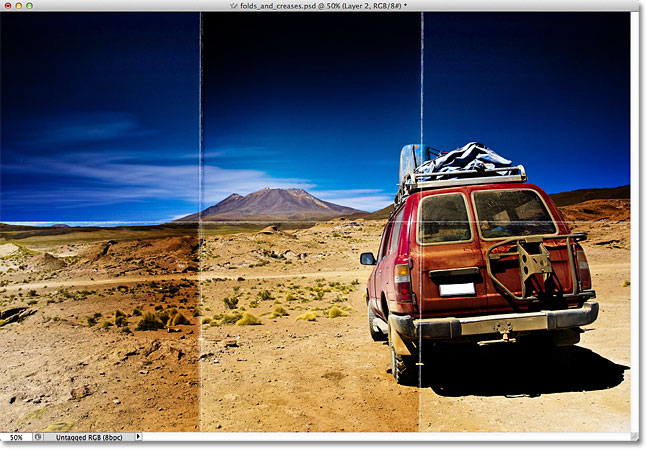
Step 3: Drag Out Two Vertical Guides
Click anywhere inside the ruler on the left, then with your mouse button still held down, begin dragging towards the right. You'll see a vertical guide emerge from the ruler. Drag the guide to roughly a third of the way across the image, then release your mouse button to place the guide. Don't worry about getting the placement exactly right. As long as it's close to being one third of the way across, you're good:

Click again inside the ruler on the left and, again with your mouse button still held down, drag out a second vertical guide, placing this one roughly two thirds of the way across the image:

Finally, click anywhere inside the ruler along the top and, with your mouse button still held down, drag out a horizontal guide, placing this one in the middle of the image. When you're done, you should have two vertical guides and one horizontal guide dividing the image into six roughly equal sections:

Step 4: Select The Rectangular Marquee Tool
Select the Rectangular Marquee Tool from the Tools panel, or press the letter M on your keyboard to quickly grab it with the shortcut:

Step 5: Drag A Selection Outline Around The First Section
With the Rectangular Marquee Tool selected, drag out a selection outline around the first section (the one in the top left of the image):

Step 6: Select The Gradient Tool
Select the Gradient Tool from the Tools panel, or press the letter G on your keyboard to select it with the shortcut (the keyboard shortcuts for the Rectangular Marquee Tool and the Gradient Tool will come in handy in a moment):

Step 7: Select The Black, White Gradient
With the Gradient Tool selected, right-click (Win) / Control-click (Mac) anywhere inside the document window to quickly open Photoshop's Gradient Picker, then select the Black, White gradient by double-clicking on its thumbnail (third thumbnail from the left, top row). Double-clicking on the thumbnail will select the gradient and close you out of the Gradient Picker:

Step 8: Draw A Black To White Gradient Across The Selection
With the Gradient Tool in hand and the Black, White gradient chosen from the Gradient Picker, click and drag out a black to white gradient inside the selection. I'm going to drag mine diagonally from the bottom left corner to the top right corner:

Step 9: Draw A Selection Outline Around The Next Section
Switch back to the Rectangular Marquee Tool by pressing the letter M on your keyboard, then drag out a selection around the next section (the one in the top center):

Step 10: Draw A Black To White Gradient Across The Selection In A Different Direction
Press the letter G on your keyboard to quickly switch to the Gradient Tool, then click and drag out a black to white gradient inside this second selection. Make sure you draw this one in a different direction, though, so both gradients look different. This will add variety to our lighting effect, as we'll see shortly:

Step 11: Repeat Steps 9 And 10 For The Remaining Sections
We need to do the same thing for all six of the sections, but it's just a matter of repeating the same couple of steps for each one. First, press the letter M on your keyboard to switch to the Rectangular Marquee Tool and drag out a selection outline around the section, then press the letter G on your keyboard to switch to the Gradient Tool and draw a black to white gradient inside the selection, drawing each gradient at a different angle to add variety. When you're done, you should have a gradient across each section. Press Ctrl+D (Win) / Command+D (Mac) on your keyboard after you've drawn the final gradient to remove the selection outline around it:

Step 12: Hide The Rulers And Guides
We don't need the rulers or guides anymore, so to hide the rulers, either go back up to the View menu at the top of the screen and reselect Rulers, or press Ctrl+R (Win) / Command+R (Mac) on your keyboard. To hide the guides, go up to the View menu, choose Show, then choose Guides, or press Ctrl+; (Win) / Command+; (Mac) to turn them off from the keyboard:

Step 13: Change The Blend Mode To Soft Light
Go up to the Blend Mode option in the top left corner of the Layers panel and change the blend mode of the gradients layer from Normal (the default setting) to Soft Light:

This turns our gradients into a series of highlights and shadows in the image, and we can start to see our "folds and creases" effect taking shape:

Step 14: Apply The Plastic Wrap Filter
To bring out the fold lines a bit more, we'll use Photoshop's Plastic Wrap filter. Go up to the Filter menu at the top of the screen, choose Artistic, then choose Plastic Wrap:

This opens the large Filter Gallery set to the Plastic Wrap filter. The options for the filter are found at the top of the right column. Set the Highlight Strength to 20 and Smoothness to 15 by dragging both sliders all the way to the right. Then set the Detail option to somewhere between 5 and 10. The higher you set the Detail value, the tighter the effect will appear around the fold lines, so keep an eye on the large preview window on the left as you drag the slider and choose the value you think works best. I'm going to set my Detail value to 10:

Click OK when you're done to close out of the Filter Gallery. The fold lines now appear a bit stronger:

Step 15: Add Another New Blank Layer
Click on the New Layer icon at the bottom of the Layers panel to add another new blank layer, this time above the gradients layer:
Step 16: Select The Brush Tool
To enhance the effect even further, let's add some wear and tear lines to the folds, and we'll do that using a custom brush. Select the Brush Tool from the Tools panel, or press the letter B to select it with the keyboard shortcut:

Step 17: Choose A Spatter Brush From The Brush Picker
With the Brush Tool selected, right-click (Win) / Control-click (Mac) anywhere inside the document window to quickly open the Brush Picker and choose the Spatter 59 pixels brush by double-clicking on its thumbnail, which will select the brush and close you out of the Brush Picker (if you have Tools Tips enabled in Photoshop's Preferences, you'll see the name of the brush appear when you hover your mouse cursor over the thumbnail):

Step 18: Open The Brushes Panel And Select The Brush Tip Shape Options
Once you've chosen the Spatter brush, press the F5 key on your keyboard to quickly open Photoshop's full Brushes panel and click on the words Brush Tip Shape in the upper left corner of the panel. Set the Roundness of the brush to around 10%, then increase the Spacing option to 50%:

Step 19: Select The Shape Dynamics Options
Along the left side of the Brushes panel is a column listing various brush option categories (Shape Dynamics, Scattering, Texture, etc). Before we go any further, make sure none of these categories are selected by unchecking any of them that have a checkmark beside their name.
Then, click directly on the words Shape Dynamics at the top of the left column to view the various Shape Dynamics options in the main part of the Brushes panel. Make sure you click directly on the words "Shape Dynamics". Don't click in the checkbox beside the words, otherwise you'll just turn the category on without gaining access to any of the actual Shape Dynamics options.
Increase the Size Jitter value to 100% by dragging the slider all the way to the right, then set the Angle Control option to Direction. Don't close out of the panel just yet, we still have one more category to select:

Step 20: Select The Dual Brush Options
Click directly on the words Dual Brush in the column along the left to switch over to the Dual Brush options in the main part of the Brushes panel. These options allow us to blend a second brush in with our original one. Select the Spatter 27 pixels brush by clicking on its thumbnail, then change the Mode at the top of the Brushes panel to Multiply. Finally, increase the Size of the brush to around 55 px and the Spacing to around 55%. When you're done, press F5 on your keyboard to close out of the Brushes panel:

Step 21: Set Your Foreground Color To White
We're going to want to paint with white, and Photoshop uses the current Foreground color as the brush color, which means we need to make sure our Foreground color is set to white before we start painting. The easiest way to do that is to first press the letter D on your keyboard, which will reset the Foreground and Background colors to their defaults (making the Foreground color black and the Background color white). Then press the letter X on your keyboard to swap the colors, which makes the Foreground color white. You can see the current Foreground and Background colors in the color swatches near the bottom of the Tools panel:

Step 22: Paint Across The Fold Lines
If you're working inside the floating document window view as I've been doing so far, press the letter F on your keyboard to switch over to the first of Photoshop's fullscreen modes, which will make this next step easier (pressing F a couple more times will cycle you through the fullscreen modes and then back to the floating document window mode). Rather than painting brush strokes manually, click with your brush directly above the first vertical fold line (the one on the left). Don't click and drag, just click:

Then, hold down your Shift key and click directly below the same fold line. Photoshop will automatically draw a brush stroke in a straight line between the two points you clicked on. You'll see a thin white brush stroke running down along the fold line, giving it a worn out appearance:

If the angle or position of your brush stroke looks a little off, simply press Ctrl+Z (Win) / Command+Z (Mac) on your keyboard to undo it, then try again. To increase the intensity of the wear and tear effect, add a few more brush strokes over top of the first one. Changing the size of your brush with each stroke will add more variety. Pressing the left bracket key ( [ ) on your keyboard will make the brush smaller. Pressing the right bracket key ( ] ) will make it larger. Just click above the fold line, then hold down your Shift key and click below the fold line to add each new brush stroke:

Repeat the same steps with the second vertical fold line to paint a few brush strokes across it, then do the same thing with the horizontal fold line, clicking with the brush to the left of the line, then holding Shift and clicking to the right of the line. If it helps, you can turn the guides back on by pressing Ctrl+; (Win) / Command+; (Mac) on your keyboard which may make it easier to line things up. Press the keyboard shortcut again to turn them back off. Here's my image after adding the brush strokes across all three fold lines:

Step 23: Lower The Layer Opacity (Optional)
Finally, if the brush strokes look a little too white and intense, you can fade them more into the image by lowering the layer's opacity. You'll find the Opacity option directly across from the Blend Mode option at the top of the layer's panel. By default, opacity is set to 100%. I'm going to reduce mine to 70%:

And with that, we're done! Here is my final "folds and creases" effect: