
Focus With Light – Photoshop Effect
In this Photoshop Effects tutorial, we'll learn how to add focus to an image with light using Photoshop's Lighting Effects filter. We'll see how easy it is to add multiple light sources to the same photo, rather than limiting ourselves to a single light source, so we can control both where the light is coming from and its reflections.
Here's the image I'll be working with:
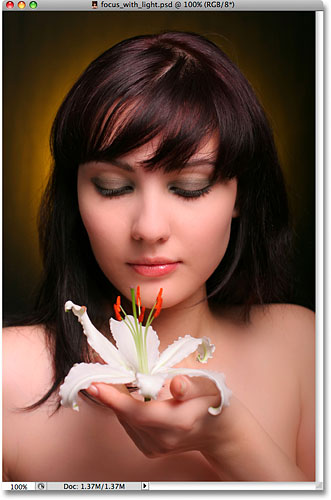
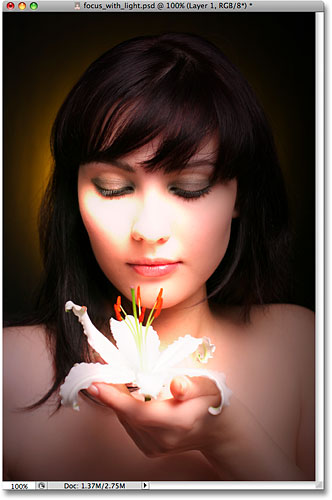
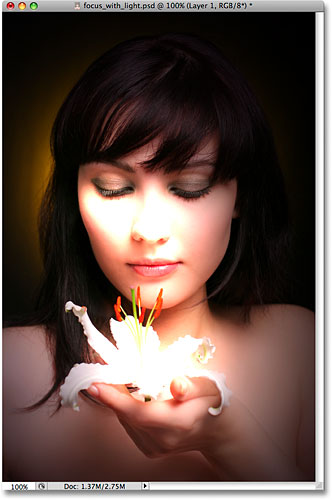
I want to bring more attention to the flower and the woman's face while reducing the importance of the rest of the image. There's lots of different ways to do that with Photoshop, but in this tutorial, we're going to focus attention using light. Even a subtle amount of lighting is often enough to do the trick, as you can see in our Simple Focused Lighting Effect tutorial, but here, I think I'll go for a more intense effect. Here's the result I'm after:
This tutorial is from our Photo Effects series. Let's get started!
Step 1: Duplicate Your Background Layer
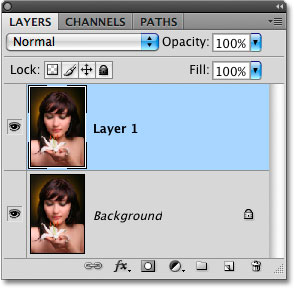
The first thing we need to do is duplicate our Background layer since it contains our original image data and we always want to keep that safe in case we need it. To quickly copy the Background layer, use the keyboard shortcut Ctrl+J (Win) / Command+J (Mac). Nothing will appear different in the document window, but we can see in the Layers palette that we now have a copy of the Background layer sitting above the original. Photoshop automatically named the new layer "Layer 1":
Normally I would rename the layer to something more descriptive than "Layer 1", but since this effect only requires two layers, unless you have nothing better to do, there's no need to rename it.
Step 2: Open The Lighting Effects Filter
With "Layer 1" selected in the Layers palette (selected layers are highlighted in blue), let's bring up Photoshop's Lighting Effects filter. Go up to the Filter menu at the top of the screen, choose Render, and then choose Lighting Effects. This brings up the large Lighting Effects dialog box, with a preview area on the left and various options and settings along the right:
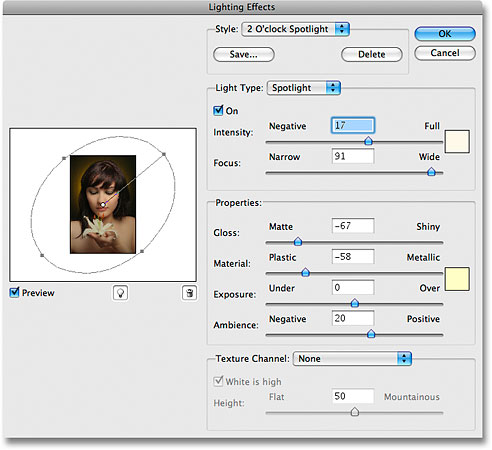
If you've never used the Lighting Effects filter before, you may be looking at its dialog box and thinking "Okay, there's no way I can do this". Don't worry, you can safely ignore most of the options in the dialog box for this effect. There's only a few things we're going to be doing here, and they're very simple.
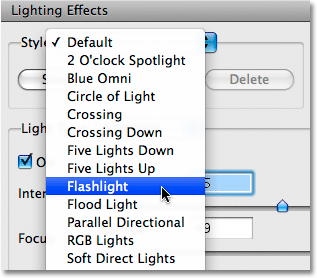
Step 3: Select The "Flashlight" Lighting Style
The first option we're going to change is the one at the very top, the lighting Style. Click on the down-pointing arrow to bring up a list of available styles and choose Flashlight from the list:
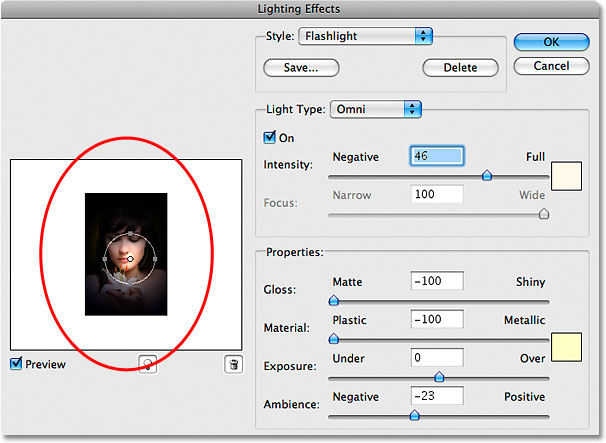
As soon as you select the Flashlight style, the image in the preview area on the left of the Lighting Effects dialog box changes to show the new lighting style. The Flashlight style is pretty much what you'd expect to see if you were to shine a flashlight on your subject. Notice how the rest of the image darkens and only the area lit up by the light source remains visible:
Step 4: Drag The Light Source To Reposition It
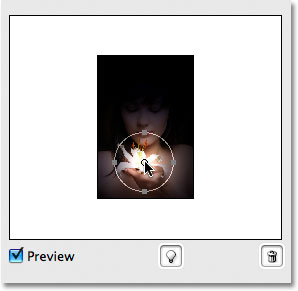
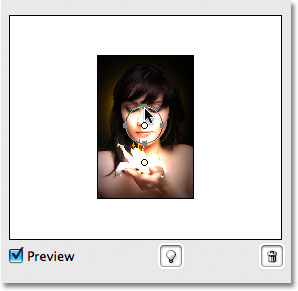
My light source is currently located in the center of the image, which isn't where I want it. I want it to appear to be coming from the flower the woman is holding, so I'll need to reposition it. If you look closely, you'll see that the light source is surrounded by a thin circle with a square handle on the top, bottom, left and right. A small circle in the middle indicates the exact center of the light source. To reposition the light source, all I need to do is click on that small circle in the middle with my mouse and drag the light to a new location. I'll drag it over the flower:
Step 5: Resize The Light Source If Needed
I need to widen the area that's affected by the light source, so I'll increase the size of my light source by clicking on the top handle and dragging it upward, away from the center. With the Flashlight style we're using here, it doesn't matter which handle you drag since the light is in a fixed circular shape. Other lighting styles will give you different results depending on which handle you drag, but it makes no difference with the Flashlight style:

We're going to add more lights to our image next.
Step 6: Add A Second Light Source By Copying The Original One
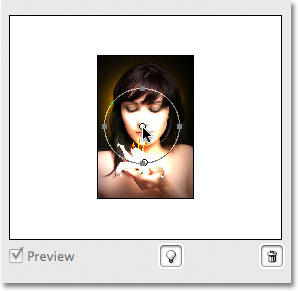
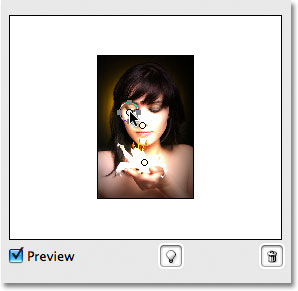
I now have my light source on the flower, and I could stop here if all I wanted to do was focus on the flower. But I want to make it appear as if the light from the flower is shining on the woman's face. For that, I'll need a second light source. I want my second light source to use the "Flashlight" style as well, so the easiest thing to do is create my second light source by copying the original one, then repositioning the second one where I need it, and I can do both of these things at the same time.
To copy the light source, I'll hold down my Alt (Win) / Option (Mac) key, then I'll click on the circle in the center of my light source and drag it to reposition it. By holding down Alt/Option as I drag, rather than moving the original light source, I create a copy of it, one that's already set to the "Flashlight" style, and all I need to do is drag it to where I need it. I'll drag it to the bottom of the woman's nose:
I want to make this second light source smaller, so I'll drag the top handle inward towards the circle in the center to reduce its size:
Step 7: Add More Light Sources As Needed
I think I'll add a third light source to intensify the effect. I'll add one just below the woman's eye on the left of the photo (our left, her right). Again, all I need to do is copy one of my existing light sources. I'll copy the one I just created by once again holding down my Alt (Win) / Option key to create a copy of it as I'm dragging. I'll move the new light source just below her eye. Then I'll decrease the size of this third light source a little by dragging one of its handles inward toward the center:
I think that looks pretty good, so now that I'm done adding my light sources, I'll click OK to exit out of the Lighting Effects filter, at which point Photoshop applies the light sources to my image in the document window:
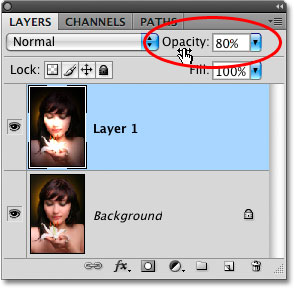
Step 8: Lower The Layer Opacity If Needed
If you find that the lighting effect is too intense, simply lower the opacity of "Layer 1". You'll find the Opacity option at the top of the Layers palette. Lowering the opacity of a layer allows the layer(s) below it to show through. I'm going to lower my opacity down to around 80% just to soften the effect a little:
And with that, we're done! Here, after fine-tuning the intensity of the lighting effect by adjusting the layer's opacity, is my final result:
And there we have it! That's how to add focus to an image with light using the Lighting Effects filter in Photoshop! Check out our Photo Effects section for more Photoshop effects tutorials!