
Film Strip Photo Collage in Photoshop – Part 2
In part one of this two-part Photoshop tutorial, we learned how Photoshop's shape tools made it easy to draw a simple film strip which we can then use as a photo frame, and we saved the film strip as a separate Photoshop document so we can re-use it any time we want without having to redraw it. In this part of the tutorial, we'll use multiple copies of that film strip to create a photo collage!
This part of the tutorial assumes that you've already completed the first part and you have your film strip ready to go, so if you haven't yet done so, be sure to work through the first part of the tutorial before continuing on.
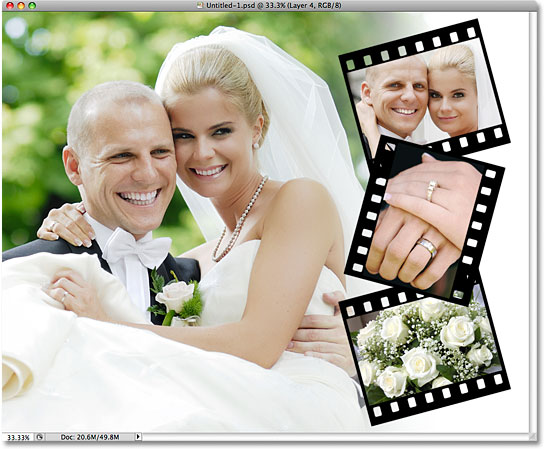
Here's the photo collage design we'll be creating. Depending on the photos you're using and the dimensions of the document you're working with, you may want to position things differently, but once you know how to add multiple copies of the film strip to a document, how to position and rotate them inside the document and how to add photos inside the film strips (all of which is very easy to do), you'll be able to create any layout you need:
How To Create A Film Strip Photo Collage, Part 2
Step 1: Create A New Photoshop Document
Let's begin as we did in part one by creating a new Photoshop document. This will become our main photo collage document. Go up to the File menu at the top of the screen and choose New, or for a faster way, press Ctrl+N (Win) / Command+N (Mac) on your keyboard:
This brings up Photoshop's New Document dialog box. I'm going to go with a standard frame size of 8 x 10 for my photo collage, and I want it to appear in landscape orientation, so I'll enter a value of 10 inches for the Width and 8 inches for the Height (make sure you select inches for the measurement type and not pixels), and since I want to be able to print my final result later and have it appear nice and sharp, I'll enter 300 pixels/inch for the Resolution value. Finally, I'll set the Background Contents option at the bottom to White so my document appears with a solid white background:

Click OK when you're done to exit out of the dialog box. The new document appears on your screen.
Step 2: Open Your Main Photo
Next, open the photo you want to use as the main image in the collage. Here's the photo I'll be using:

You should now have two separate document windows open on your screen. The main photo collage document appears in one, and the photo you just opened appears in the other.
Step 3: Copy And Paste The Image Into The Photo Collage Document
We need to add this photo to our photo collage document that we created in step 1, and we can do that simply by copying and pasting it. First, press Ctrl+A (Win) / Command+A (Mac) on your keyboard to select the entire image. You'll see a selection outline appear around the edges of the image in the document window. With the image selected, press Ctrl+C (Win) / Command+C (Mac) to copy the image temporarily to your computer's memory.
Switch over to your photo collage document by clicking anywhere inside its document window, then press Ctrl+V (Win) / Command+V (Mac) to paste the photo into the document. In my case, my photo is larger than the 8 x 10 document I created, so only part of the photo appears visible inside the document window. We'll fix that in a moment:

If we look in the Layers panel now, we can see that the photo has been added on its own layer (which Photoshop has automatically named "Layer 1") above the white-filled Background layer:

You can close out of the photo's original document window at this point. All we need open is the main photo collage document.
Step 4: Use Free Transform To Resize And Reposition The Photo
Since my photo is currently too big to fit inside my photo collage document, I'll need to resize it. I also need to reposition the image so that the wedding couple appears more on the left side of the document, leaving room for my film strips on the right. I can resize and reposition the image at the same time using Photoshop's Free Transform command. Go up to the Edit menu at the top of the screen and choose Free Transform, or press Ctrl+T (Win) / Command+T (Mac) to select it with the keyboard shortcut:

This brings up the Free Transform box and handles around the image. Unfortunately, since the edges of my photo extend out beyond the visible area of the document, I can't see the Free Transform handles, which makes it a bit difficult to do anything. If you're having the same problem, go up to the View menu at the top of the screen and choose the Fit on Screen command, or press Ctrl+0 (Win) / Command+0 (Mac) for the keyboard shortcut:

This tells Photoshop to expand the size of the document window so that everything fits inside of it. Even though the actual viewable area of the document doesn't change and much of the photo remains hidden from view, we can now easily access the Free Transform handles in the corners of the photo. To resize the image, hold down your Shift key, which will constrain the aspect ratio of the photo as you resize it, then click on a handle (the little square) in one of the corners of the photo and, while still holding down your mouse button, drag it in towards the center of the photo. I'm going to drag the handle in the bottom right corner inward to make my photo smaller:

To move the image if needed, click anywhere inside the photo, keep your mouse button held down, and drag the image around inside the document. I'm going to drag the wedding couple over towards the left side of the document so I'll have room on the right to add my film strips. Leave somewhere between one quarter and one third of the document on the right for the film strips:

Press Enter (Win) / Return (Mac) when you're done to accept the changes and exit out of the Free Transform command. Here's my document after resizing and moving the photo towards the left. Notice how some of the white background is now visible along the right side of the document after moving the image:

Step 5: Add A Layer Mask
Let's blend the right edge of the photo in with the white background, creating a smooth transition between the two. Having an area of white on the right side of the document will make it easier to see the film strips that we'll be adding in a moment. Make sure "Layer 1" is selected in the Layers panel (it should be highlighted in blue), then click on the Layer Mask icon at the bottom of the Layers panel to add a layer mask to the layer:

Nothing will happen yet in the document window itself, but a layer mask thumbnail appears on "Layer 1" in the Layers panel:

Step 6: Select The Gradient Tool
Select the Gradient Tool from the Tools panel, or press the letter G on your keyboard to select it with the shortcut:

Step 7: Choose The Black to White Gradient
With the Gradient Tool selected, right-click (Win) / Control-click (Mac) anywhere inside the document to quickly bring up the Gradient Picker, then click on the Black to White gradient, third icon from the left, top row, to select it:

Click anywhere outside of the Gradient Picker when you're done to close it.
Step 8: Draw A Black to White Gradient To Create A Transition Area
With the Black to White gradient selected, click just inside the right edge of the photo to set a starting point for the gradient, then keep your mouse button held down and drag horizontally towards the left, stopping just short of the center of the document. The area between the points where you started and ended the gradient is where the photo will blend into the white background:

Release your mouse button, at which point Photoshop draws the gradient. Since we drew the gradient on the layer mask, not on the layer itself, we don't actually see the gradient in the document window. Instead, we see the effects of the gradient on the layer mask, which now blends the right side of the photo smoothly into the white area on the far right:

Our main photo is in place and ready for the film strips to be added. We'll do that next!
Step 9: Open The Film Strip Document
Open the film strip document that we created back in part one of the tutorial:

Step 10: Rename The Middle Layer "Photo Area"
In a moment, we're going to be adding a few copies of our film strip to the photo collage document, but before we do, let's make a couple of quick changes to the film strip. First, let's rename the middle layer to something that will be easier to understand later. Double-click directly on the name "Shape 2" and change the layer's name to "photo area", since the rectangular shape on this layer represents the area where the photos will be visible inside the film strip. Press Enter (Win) / Return (Mac) when you're done to accept the change:

Step 11: Group The Two Shape Layers Together
Next, let's take the two shape layers that make up our film strip and group them together, creating what's called, not surprisingly, a layer group. Click on the top layer ("Shape 1") in the Layers panel to select it, then hold down your Shift key and click on the "photo area" layer that we just renamed. This will select both layers at once, and you'll see them both highlighted in blue.

With both layers selected, go up to the Layer menu at the top of the screen, choose New, and then choose Group from Layers:

Photoshop will pop open a small dialog box where we can enter a name for our new layer group. Name the group "film strip":

Click OK when you're done to close out of the dialog box, and if we look again in the Layers panel, we can see that we now have a new layer group named "film strip". Both of the shape layers that make up the film strip are inside the group:

Step 12: Save The Changes
Before we continue, let's save the changes we've made to the film strip so we won't have to make them again the next time we use it. Go up to the File menu at the top of the screen and choose the Save command. Since we've already saved the document once, Photoshop won't bother to ask us what we want to name it or where we want to save it to. It will simply overwrite the previous version of the document:

Step 13: Select The Move Tool
We're ready to add the film strip to the photo collage document. Select the Move Tool from the Tools panel, or press the letter V on your keyboard to select it with the shortcut:

Step 14: Drag The Film Strip Into The Photo Collage Document
Then, with the film strip and the photo collage documents open in separate windows, click with the Move Tool inside the film strip's document window, keep your mouse button held down, and drag the film strip over to the photo collage document window:

Release your mouse button, and the film strip appears inside the photo collage document:

You can close out of the film strip document at this point since we no longer need it. If we look in the Layers panel for the photo collage document, we can see that the film strip layer group has been copied over and now appears above the main photo:

Step 15: Move, Reposition And Rotate The Film Strip With Free Transform
Now that we have our first film strip, let's move it into position. I'm going to move mine into the top right corner of the document. I'm also going to make it a bit smaller and, to add a little more visual interest, I'll rotate it slightly. I can do all three of these things with Photoshop's Free Transform command, so with the layer group selected in the Layers panel, I'll press Ctrl+T (Win) / Command+T (Mac) to quickly bring up the Free Transform box and handles around the film strip, just as we saw earlier when we moved and resized the main photo.
To move the film strip, I'll click inside of it and, with my mouse button held down, I'll drag it up into the top right corner of the document, releasing my mouse button once it's in place:

To resize it and make it a bit smaller, I'll hold down my Shift key, which will constrain the aspect ratio of the film strip as I resize it so I don't accidentally distort its shape, then I'll click on the handle in the bottom left corner (it doesn't matter which corner you choose), keep my mouse button held down, and drag it in towards the center of the film strip, releasing my mouse button when I'm done:

Finally, to rotate the film strip, I'll move my mouse button outside of the Free Transform bounding box, at which point my mouse cursor changes to a small rotate icon, then I'll click, hold my mouse button down, and drag to rotate the film strip. I'm going to rotate my film strip counter-clockwise, releasing my mouse button when I'm done:

When you're finished moving, resizing and rotating your film strip, press Enter (Win) / Return (Mac) to accept the changes and exit out of the Free Transform command.
Step 16: Rename The Layer Group
Back when we created a layer group out of the two shape layers that make up our film strip, we changed the name of the group from the generic name "Group 1" that Photoshop gave it to "film strip". Since we're going to be adding several copies of the film strip to our document, let's be even more descriptive with our group names to make it easy to distinguish between them in the Layers panel. I'm going to double-click directly on the group's name in the Layers panel and add the word "top" to the end of the group's name. Press Enter (Win) / Return (Mac) when you're done to accept the change:

Step 17: Drag Out A Copy Of The Film Strip
Let's add our second film strip. I'm going to place my second one in the bottom right corner of the document, directly below the first one. With the Move Tool selected, I'll hold down Shift+Alt (Win) / Shift+Option (Mac), click on the film strip in the document window and drag it straight down to the bottom right corner. The Alt / Option key tells Photoshop to make a copy of the film strip as I drag, rather than moving the original film strip, and holding the Shift key limits the direction that I can drag in, making it easy to drag straight down:

Step 18: Rename The New Film Strip's Layer Group
If we look in the Layers panel, we can see that we now have two layer groups, each one containing a different film strip. Photoshop automatically named our second group "film strip top copy", so let's double-click on the group's name and change it to "film strip bottom". Press Enter (Win) / Return (Mac) when you're done to accept the name change:

Step 19: Drag Out A Third Film Strip
With the "film strip bottom" layer group selected in the Layers panel and the Move Tool still selected, hold down Shift+Alt (Win) / Shift+Option (Mac), just as we did a moment ago, and drag out a third film strip. This creates a copy of the film strip we just added in the bottom right corner. I'm going to drag straight up to place my third film strip directly between the other two:

Step 20: Rotate The Third Film Strip
Since having all three film strips rotated exactly the same way looks a bit dull, I'll press Ctrl+T (Win) / Command+T (Mac) to bring up the Free Transform box and handles around my third film strip. I'll move my mouse cursor outside of the Free Transform box, which changes the cursor to the rotate icon, then I'll click, hold my mouse button down, and drag to rotate the film strip:

Press Enter (Win) / Return (Mac) when you're done to accept the change and exit out of the Free Transform command.
Step 21: Rename The Third Film Strip's Layer Group
We have our three film strips in place, but before we starting adding photos to them, let's rename the third film strip's layer group in the Layers panel, which is currently named "film strip bottom copy". Double-click on its name and change it to "film strip middle", then press Enter (Win) / Return (Mac) to accept the change:

Step 22: Open The Photo You Want To Add To The First Film Strip
We're ready to add our photos to the film strips. Since the steps are the same for each film strip, we'll look at how to add a photo to the first one ("film strip top"). Then, to add photos to the remaining film strips, simply repeat the same steps.
First, open the photo you want to place inside the film strip. Here's the photo I'll be using:

Step 23: Select And Copy The Photo
We're going to copy and paste the photo into the film strip, just as we copied and pasted the main photo into the photo collage document at the beginning of the tutorial. Press Ctrl+A (Win) / Command+A (Mac) to quickly select the entire image. You'll see a selection outline appear around the edges of the photo in the document window. Then press Ctrl+C (Win) / Command+C (Mac) to copy the photo to your computer's memory.
Step 24: Twirl Open The Layer Group For The Top Film Strip
With the image copied to memory, switch over to the main photo collage document by clicking anywhere inside its document window. We need to access the shape layers that make up the film strip in the top right corner of the document, which means we need to twirl open the film strip's layer group. Click on the small triangle icon on the far left of the "film strip top" group in the Layers panel. This will twirl open the layer group, allowing us to see the two shape layers inside of it:

Step 25: Select The Photo Area Layer
With the layer group open, click on the photo area layer to select it. The shape on this layer represents the area where the photo will appear inside the film strip:

Step 26: Paste The Image Into The Film Strip
With the "photo layer" selected, press Ctrl+V (Win) / Command+V (Mac) to paste the photo into the film strip. If we look in the document window, we can see that the photo now appears in front of the main image, but it doesn't look like it's inside the film strip just yet. We'll fix that in a moment (your photo may appear much larger in the document window than mine, since I'm using smaller images for my film strips):

Even though the photo doesn't yet appear to be inside the film strip, if we look in the Layers panel, we see that sure enough, Photoshop has placed the image inside the "film strip top" layer group, directly above the "photo area" layer, which is exactly where we want it. Photoshop always adds new layers directly above the layer that was selected, which is why we selected the "photo area" layer before pasting in the image:

Step 27: Position The Photo Inside The Film Strip
With the Move Tool still selected, click on the image in the document window and drag it over to the film strip in the top right corner so that it fills the entire gray photo area in the center of the film strip. Don't worry about positioning it exactly right for now:

Step 28: Create A Clipping Mask
Once you have the photo moved into position, go up to the Layer menu at the top of the screen and choose Create Clipping Mask, or press Ctrl+Alt+G (Win) / Command+Option+G (Mac) to select the Create Clipping Mask command with the keyboard shortcut:

This tells Photoshop to "clip" the photo to the shape on the "photo area" layer below it, and now, only the area of the photo that falls within the boundaries of the shape remains visible in the document. The rest of the photo is hidden from view, creating the illusion that the image is inside the film strip:

Step 29: Fine-Tune The Image Inside The Film Strip With Free Transform
Press Ctrl+T (Win) / Command+T (Mac) to once again bring up the Free Transform command and use it to move, resize and/or rotate the image as needed inside the film strip. I'm going to make my photo a bit smaller so more of it fits within the viewable area of the film strip, and I'm also going to rotate it a little. Notice that, even though we can only see the part of the photo that's within the film strip itself, the Free Transform box and handles appear around the actual edges of the image, which is much larger than what's visible in the film strip:

If you can't see the Free Transform handles because your image is too big to fit inside the document window, press Ctrl+0 (Win) / Command+0 (Mac) to select the Fit on Screen command and have Photoshop resize the document window.
When you're happy with how the image looks inside the film strip, press Enter (Win) / Return (Mac) to accept the changes and exit out of the Free Transform command.
Step 30: Add Photos To The Other Film Strips
To add photos to the other film strips in the collage, simply repeat the same steps. First, open the image you want to place inside the film strip. Press Ctrl+A (Win) / Command+A (Mac) to select the entire image, then press Ctrl+C (Win) / Command+C (Mac) to copy it. Switch over to the photo collage document and twirl open the film strip's layer group. Select the photo area layer inside the layer group, then press Ctrl+V (Win) / Command+V (Mac) to paste the photo into the document directly above the "photo area" layer. Use the Move Tool to drag the photo into the gray area in the center of the film strip, then go up to the Layer menu and choose Create Clipping Mask to clip the photo to the shape on the "photo area" layer below it. Finally, press Ctrl+T (Win) / Command+T (Mac) to bring up the Free Transform command and resize, reposition and/or rotate the image inside the film strip as needed. Press Enter (Win) / Return (Mac) when you're done to accept the changes.
Here's my final photo collage after adding photos to the middle and bottom film strips: