Simulate Film Grain In An Image With Photoshop
In this Photoshop tutorial, we'll learn a quick and easy way to simulate film grain in an image. Any version of Photoshop will work, but if you're using Photoshop CS3 or higher (I'll be using Photoshop CS5), we'll also see how to keep the film grain effect fully editable using Smart Filters which were first introduced in CS3. For Photoshop CS2 and earlier users, simply skip over the Smart Filters steps and you'll have no problem completing the effect. It just won't be editable when you're done.
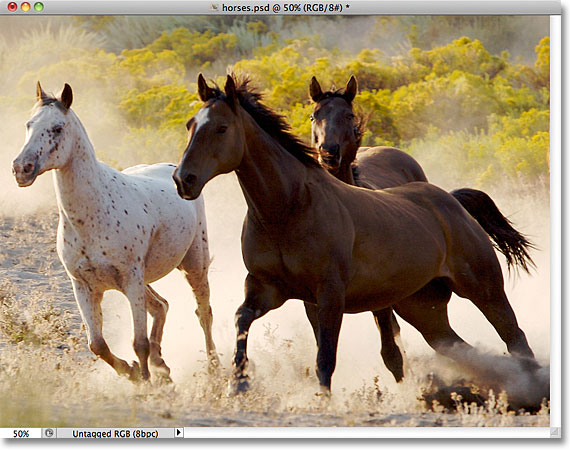
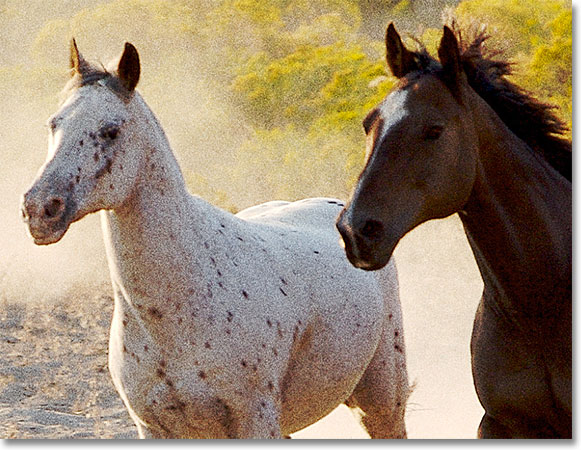
Here's the image I'll be using for this tutorial:
Since film grain is so small, it can be hard to see in a screenshot, but here's at least an idea of what the final result will look like (I've zoomed in to help make things easier to see). The film grain will be more noticeable in your own larger image. We'll learn a few ways to fine-tune the effect at the end of the tutorial:
How To Simulate Film Grain In An Image
Step 1: Add A New Layer Filled With 50% Gray And Set To Overlay
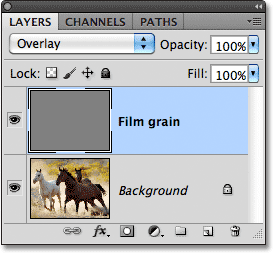
Let's begin by adding a new layer to our Photoshop document to place our film grain on so we're not harming the original image in any way. Normally, to add a new layer, we simply click on the New Layer icon at the bottom of the Layers panel and Photoshop adds a new blank layer for us, but we need to fill our new layer with gray and change its blend mode, so let's do all of these things at once using the New Layer dialog box. Hold down your Alt (Win) / Option (Mac) key and click on the New Layer icon:
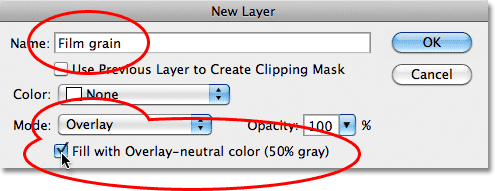
Holding down Alt (Win) / Option (Mac) when clicking on the New Layer icon tells Photoshop to pop open the New Layer dialog box before the layer is added. Name the new layer Film grain at the top of the dialog box, then change the Mode to Overlay and select the Fill with Overlay-neutral color (50% gray) option directly below it by clicking inside the checkbox:
Click OK when you're done to close out of the dialog box. Nothing will appear to happen to the image in the document window, but if we look in the Layers panel, we see that Photoshop has added a new layer named "Film grain" above the Background layer. The layer is set to the Overlay blend mode for us, and we can see in the layer's preview thumbnail to the left of the layer's name that the layer is filled with 50% gray (the shade of gray directly between black and white). The reason we can't see the gray in the document is because the Overlay blend mode makes areas of 50% gray transparent. You don't need to understand that to complete this effect, but check out our Five Essential Blend Modes For Photo Editing tutorial if you want to learn more:
Step 2: Convert The New Layer Into A Smart Object
If you're using Photoshop CS2 or earlier, you can skip this step. For Photoshop CS3 and newer users, click on the small menu icon in the top right corner of the Layers panel:
Select Convert to Smart Object from the menu that appears:
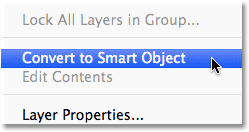
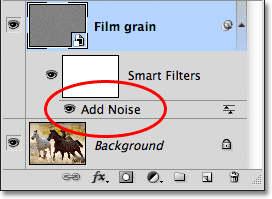
Again, nothing will seem to happen in the document window, but a small icon appears in the lower right corner of the Film grain layer's preview thumbnail letting us know that the layer has been converted into a Smart Object. This means that any filters we apply to the layer will be added as Smart Filters and will remain fully editable even after the effect is complete, as we'll see later:
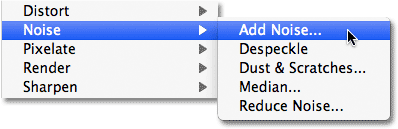
Step 3: Apply The Add Noise Filter
Go up to the Filter menu in the Menu Bar along the top of the screen, choose Noise, then choose Add Noise:
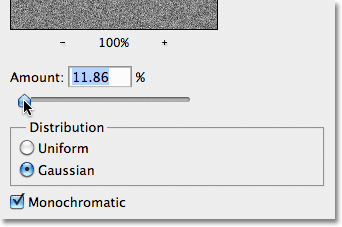
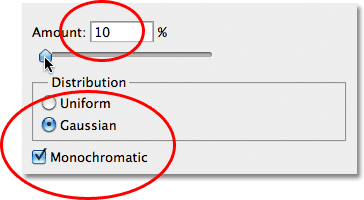
This opens the Add Noise dialog box. The noise we add here will become our film grain. Drag the Amount slider towards the right to increase the amount of noise being applied to the image. An Amount value of around 10% usually works well, but it's always a good idea to keep an eye on your document window as you drag the slider to determine the value that works best for your image. Make sure the Gaussian and Monochromatic options are selected at the bottom of the dialog box:
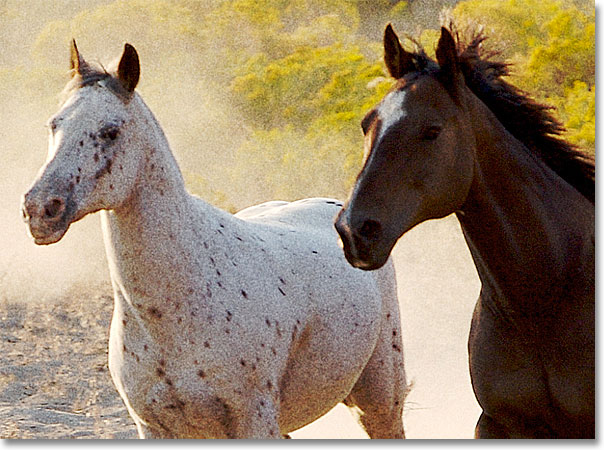
Click OK when you're done to close out of the Add Noise dialog box. Here's a close-up of my image to help make it easier to see the noise that's been added:
If you converted the Film grain layer into a Smart Object back in Step 2, you'll see the Add Noise filter listed as a Smart Filter below the Film grain layer in the Layers panel. We'll come back to it shortly:
Step 4: Apply The Gaussian Blur Filter
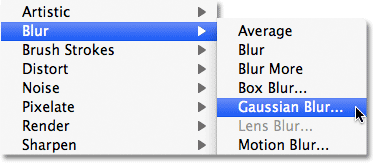
The noise looks a bit too harsh for our film grain effect so let's soften it by blurring it slightly. Go back up to the Filter menu at the top of the screen and this time choose Blur, then choose Gaussian Blur:
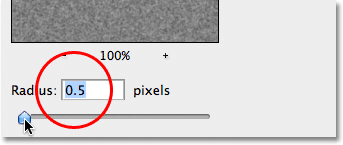
Set the Radius value at the bottom of the dialog box to around 0.5 pixels. That should be enough to soften the noise without making it too blurry:
Click OK to close out of the dialog box, and we're done! We now have our simulated film grain added to the image:
Fine-Tuning The Results
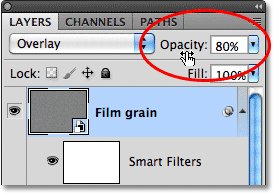
If you find that the film grain is too intense, one way to fine-tune the effect is by lowering the opacity of the Film grain layer. You'll find the Opacity option in the top right corner of the Layers panel. The further you lower the opacity, the more the original image below it will show through:
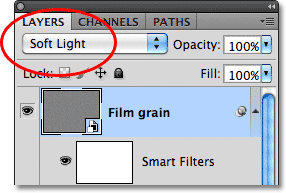
Another way to make the film grain appear more subtle is by changing the blend mode of the Film grain layer from Overlay to Soft Light, which is a lower contrast version of the Overlay blend mode:
Finally, if you're using Photoshop CS3 or newer and you've been adding your filters as Smart Filters as I have, you can re-open the filter dialog boxes at any time and make changes to fine-tune the effect without any loss of image quality. You'll see the names of the filters that we used listed below the Film grain layer in the Layers panel. To re-open either of them, simply double-click on the filter's name. For example, I'll double-click on the Add Noise filter:
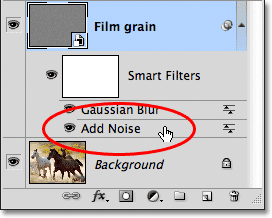
Photoshop re-opens the filter's dialog box for me, allowing me to adjust the Amount value to add more or less noise to the image. When I'm done, I can just click OK to once again close the filter's dialog box. Smart Filters are a great recent addition to Photoshop and one of many reasons to consider upgrading if you're still using CS2 or earlier: