
Dramatic Black & White Effect in Photoshop
In this Photoshop tutorial, we're going to learn how to create more interesting black & white versions of images by using focused, dramatic lighting to bring attention to the main subject.
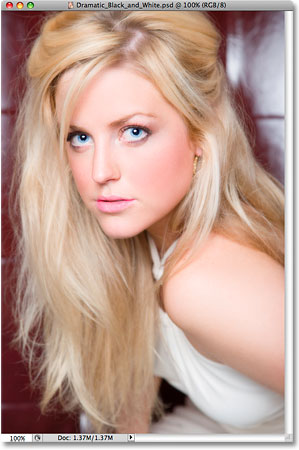
Here's the original photo I'll be using:
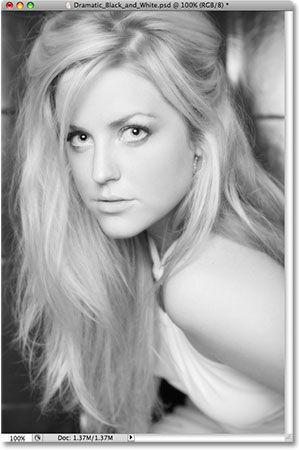
Here's how the black & white version would look if I simply desaturate it. Not really all that interesting:
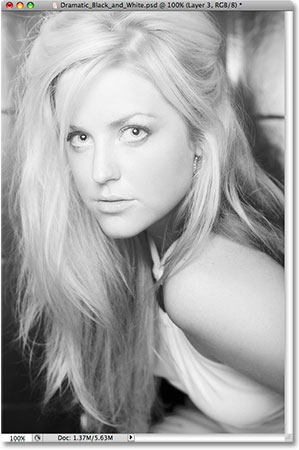
And here's the more "dramatic" black & white version we'll be creating in this tutorial, bringing much more emphasis to her face and hair:
This tutorial is from our Photo Effects series. Let's get started!
Step 1: Find The Channel That Has The Best Tonal Range
The first thing we're going to do is inspect our three Color Channels to see which one contains the highest quality image with the greatest amount of contrast. We're going to use it as our black and white version. To do that, switch to the Channels palette (it's grouped in beside the Layers palette). You'll see three channels named "Red", "Green" and "Blue" (you'll also see a fourth one, "RGB" at the top, but it's just the composite of the Red, Green and Blue channels):

Click on each of the Red, Green and Blue channels to select them individually. When you click on one, you'll turn the others off, and all you'll see in your document window is a black and white version of the image. Each of the three channels will have a different black and white version, so look at all three of them and pick the one that looks best. In my case, the Green channel looks best, so I'm going to use that one.
Once you've chosen the channel to use, press Ctrl+A (Win) / Command+A (Mac) to select it, then press Ctrl+C (Win) / Command+C (Mac) to copy it.
Click on the RGB composite channel to turn all the channels back on. Your image will now appear in full color once again in the Document Window.
Step 2: Paste The Channel As A New Layer
Switch back to your Layers palette and click on the New Layer icon at the bottom:
This will add a new blank layer above your Background layer. With the new layer selected, press Ctrl+V (Win) / Command+V (Mac) to paste the channel onto the new layer:

Step 3: Sharpen The Black & White Layer
With the new layer selected in the Layers palette, go up to the Filter menu at the top of the screen, select Sharpen and then select Smart Sharpen. This will bring up the Smart Sharpen dialog box:

Enter an Amount value of 75% and select the More Accurate option at the bottom, then click OK.
If you're using Photoshop CS or older, you can use the Unsharp Mask filter instead, in which case you would enter 75% for the Amount, set the Radius value to 1 pixel, and set Threshold to 0 levels, then click OK.
Step 4: Add A New Layer Above The Black & White Layer
Click the New Layer icon at the bottom of the Layers palette once again to add another new layer, this time above the black and white layer. You should now have three layers in your Layers palette, with the new one at the top:

Step 5: Choose A Black-To-White Gradient
Select your Gradient tool from the Tools palette, or press G on your keyboard to access it quickly:

Press the letter D on your keyboard to reset your Foreground color to black and your Background color to white if they're not already. Then go up to the Options Bar at the top of the screen and click on the gradient preview area:

This will bring up Photoshop's Gradient Editor. In the "Presets" at the top, click on the Foreground-to-Background gradient in the top left corner. This will set your gradient colors to black and white:

Then click OK to exit out of the Gradient Editor.
Step 6: Drag The Gradient Towards The Top Corner Of The Image
We're going to use the black-to-white gradient to create the illusion of a subtle light source coming from the top left corner, which will highlight her face and darken everything else. To do that, I'm going to start my gradient at the top of her shoulder and then I'll drag it towards the top left corner:

When I release my mouse button, the image is filled entirely with the gradient:

Step 7: Change The Blend Mode And Lower The Opacity Of The Gradient Layer
With the gradient layer selected, go up to the blend mode options in the top left of the Layers palette, click the down-pointing arrow to the right of the word "Normal" and select Overlay from the list. Then, in the Opacity option to the right of the blend mode options, lower the opacity to 60%:

Here's what my image looks like now. Notice how there appears to be a subtle light source shining from the top left which is highlighting her face and darkening the less important areas of the image:

Step 8: Add Another New Layer To The Top Of The Layers Palette
With the gradient layer still selected, click on the New Layer icon to add another new layer at the top of the Layers palette. You should now have four layers:

Step 9: Drag Our A Selection With The Lasso Tool
Grab the Lasso tool from the Tools palette, or press L on your keyboard to select it:

With my Lasso tool selected, I'm going to drag out a selection around the woman's hair and upper shoulders. There's no need to be surgically precise with the selection, so the Lasso tool will work fine:

Step 10: Fill The Selection With A White-to-Transparent Gradient
Grab your Gradient tool once again, then press X on your keyboard to swap your Foreground and Background colors so that white is your Foreground color. Click on the gradient preview area in the Options Bar to again bring up the Gradient Editor.
This time, click on the Foreground-to-Transparent gradient in the list of preset gradients to select it. It's the second one from the left, top row:

Click OK to exit out of the Gradient Editor, then with the new layer selected in the Layers palette, I'm going to drag out a gradient starting in the top left of my selected area and dragging down towards the bottom right:

When I release my mouse button, the selected area becomes white in the top left and gradually fades to transparent in the bottom right. I'm going to deselect my selection using the keyboard shortcut Ctrl+D (Win) / Command+D (Mac), and now here's my image with the new gradient applied:

Step 11: Apply The Gaussian Blur Filter
I'm going to apply the Gaussian Blur filter at this point to smooth out that gradient, so I'll go up to the Filter menu at the top of the screen, then I'll select Blur and then Gaussian Blur. When the Gaussian Blur dialog box comes up, I'm going to set the Radius value to about 8 pixels:

Click OK to exit out of the Gaussian Blur filter.
Step 12: Lower The "Fill" To 0%
Still with the white-to-transparent layer selected, go up to the Fill option in the top right of the Layers palette, directly below the Opacity option, and lower it all the way down to 0%. This will completely hide the gradient from view, but it won't hide any Layer Styles that we're going to apply next:

Step 13: Add A White "Outer Glow" Layer Style
Click on the Layer Styles icon at the bottom of the Layers palette and choose Outer Glow from the list:

Set the color of the Outer Glow to white by clicking on the color swatch:

This will bring up Photoshop's Color Picker. To choose white, enter 255 for the R, G and B options in the bottom right half of the dialog box:

Click OK to exit out of the Color Picker dialog box. With white now selected as the Outer Glow color, lower the Opacity value to around 40% and increase the Size of the glow to about 90 pixels as circled below:

Click OK to exit out of the Layer Style dialog box, and you're done! Here's my final "dramatic black & white" effect:
And there we have it! That's how to create a dramatic black & white effect with Photoshop! Check out our Photo Effects section for more Photoshop effects tutorials!