
Dancing In The Stars Effect With Photoshop
Every month, we receive email from photographers asking for more creative ideas for displaying a client's wedding or engagement photos, similar to our popular Blend Photos Like A Hollywood Movie Poster and Wedding Couple In A Wine Glass tutorials.
The other night, I was sitting outside staring up into space, hoping for a glimpse of the annual Perseid meteor shower, when the thought hit me - what if the wedding couple was up there dancing in the stars? Well, so much for the meteor shower (there's always next year, right?) as I raced back inside to play around in Photoshop and see where the idea would take me.
Not surprisingly, creating this "dancing in the stars" effect (no relation to a certain tv show with a similar name) is very simple. In fact, a few of the steps are borrowed from our previous Create A Starry Night Sky tutorial, so if you've worked through that one, some of this will already be familiar to you.
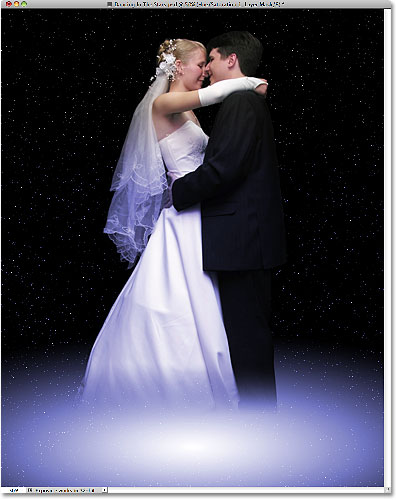
To create this effect, you'll need a photo of two people dancing close together, preferably a bride and groom but it doesn't necessarily have to be. I'll be using Photoshop CS5 throughout the tutorial but any recent version will do. Here's the final result we'll be working towards:
How To Create A Dancing In The Stars Effect
Step 1: Create A New Document
To begin, create a new document for the effect by going up to the File menu in the Menu Bar at the top of the screen and choosing New, or press Ctrl+N (Win) / Command+N (Mac) to access the command with the keyboard shortcut:

This opens Photoshop's New Document dialog box. I'll enter a standard photo frame size of 8 inches for the Width and 10 inches for the Height (the size you need may be different), and since I'll want to print the final result, I'll enter a Resolution value of 240 pixels/inch. At the top of the dialog box is an option for giving the new document a name. Normally, I don't bother naming documents until I go to save them later, but to make things easier for this tutorial, name your document "Dancing In The Stars" (or something similar). Click OK when you're done to exit out of the dialog box. Your new document will appear on the screen:

Step 2: Fill The New Document With Black
Press the letter D on your keyboard to quickly reset Photoshop's Foreground and Background colors to their defaults, if necessary, which sets your Foreground color to black. Then press Alt+Backspace (Win) / Option+Delete (Mac) to fill the new document with the current Foreground color (black):

Step 3: Add Noise
Let's create some stars. Go up to the Filter menu, choose Noise, then choose Add Noise:

When the Add Noise dialog box appears, increase the Amount to around 120% or so by dragging the slider towards the right. Make sure the Gaussian and Monochromatic options are selected at the bottom of the dialog box:

Click OK when you're done to exit out of it. Your document should now be filled with lots of noise:

Step 4: Apply The Gaussian Blur Filter
Go back up to the Filter menu and this time choose Blur, then choose Gaussian Blur:

When the Gaussian Blur dialog box appears, enter a Radius value of about 0.3 pixels, just enough to clump some of the noise together. Click OK when you're done to exit out of the dialog box:

Step 5: Apply A Levels Image Adjustment
Go up to the Image menu, choose Adjustments, and then choose Levels, or press Ctrl+L (Win) / Command+L (Mac) to access Levels with the keyboard shortcut:

Directly below the histogram (the area that looks like a black mountain) in the Levels dialog box are three small sliders - a black one on the far left, a white one on the far right and a gray one in the middle. Click on the black slider and drag it towards the right. As you drag the slider, you'll see more and more of the white noise disappearing in the document. The remaining white specks become our stars. Drag the black slider as far to the right as needed until you're happy with the number of stars in the image:

To brighten the stars, click on the white slider and drag it a short distance towards the left. You may need to go back and forth between the black and white sliders to fine-tune the results:

Click OK when you're done to close out of the Levels dialog box. The stars in your document should now look something like this:

Step 6: Add A New Layer
Add a new blank layer to the document by clicking on the New Layer icon at the bottom of the Layers panel:

Step 7: Select The Gradient Tool
Select Photoshop's Gradient Tool from the Tools panel:

Step 8: Draw A White To Black Radial Gradient
Back in Step 2, we reset Photoshop's Foreground and Background colors to their defaults by pressing the letter D on the keyboard, which made the Foreground color black (and the Background color white). This time, press the letter X on your keyboard to swap the colors, making the Foreground color white and the Background color black. You can see what the colors are currently set to by looking at the Foreground and Background color swatches at the bottom of the Tools panel:

The reason we did this is because we need to choose a white to black gradient and by default, Photoshop selects a gradient based on the current Foreground and Background colors, which means we should now have a white to black gradient already chosen for us. You can see the current gradient colors by looking at the gradient preview bar in the Options Bar:

If a different gradient is currently selected, simply click on the gradient preview bar, which opens Photoshop's Gradient Editor, then click on the Foreground to Background gradient's thumbnail (top left) to select it. Click OK when you're done to exit out of the Gradient Editor:

Finally, click on the Radial gradient icon in the Options Bar:

With a white to black radial gradient now selected, click roughly halfway between the middle and the bottom of the document to set a starting point for the gradient. Then, with your mouse button still held down, drag straight up to the very top:

Release your mouse button at the top of the document and Photoshop draws a large radial gradient, with white in the center (where you initially clicked) and gradually fading to black as it moves towards the outer edges:

Step 9: Resize The Gradient With Free Transform
Go up to the Edit menu at the top of the screen and choose Free Transform, or press Ctrl+T (Win) / Command+T (Mac) to access Free Transform with the keyboard shortcut:

This places the Free Transform box and handles around the gradient. Click on the handle (the little square) in the top center and drag it straight down until the gradient covers only the bottom third or so of the document. Press Enter (Win) / Return (Mac) when you're done to accept the transformation and exit out of Free Transform:

Step 10: Change The Layer Blend Mode To Screen
To blend the gradient in with the stars behind it so it looks like light shining from a distant galaxy, change the blend mode of the gradient's layer from Normal to Screen:

With the blend mode set to Screen, the stars are now visible through the darker outer edges of the gradient:

Step 11: Open The Photo Of The Dancing Couple
We're ready to add our dancing couple into the stars. Open your photo that contains the couple. Here's the photo I'll be using. The photo will open in a separate document window:

Step 12: Select The Couple
Use the Photoshop selection tool of your choice (Lasso Tool, Magnetic Lasso Tool, Pen Tool, etc) to select just the couple in the photo. When you're done, you should see a selection outline around them:

Step 13: Copy The Selection To A New Layer
Press Ctrl+J (Win) / Command+J (Mac) to quickly copy the couple to their own layer in the Layers panel:

Step 14: Move The Layer To The Stars Document
With the couple's layer selected in the Layers panel, go up to the Layer menu and choose Duplicate Layer:

We're going to copy this layer over to our stars document. When the Duplicate Layer dialog box appears, name the layer Couple at the top of the dialog box (where it says Duplicate Layer 1 As). Then choose your "Dancing In The Stars" document as the Destination for the layer. Click OK when you're done to close out of the dialog box:

Switch back over to the stars document (you can close out of the photo's document at this point), where we find the couple now dancing in front of the stars (we'll move them into position in a moment):

If we look in the Layers panel, we see that the couple now sits on their own layer named "Couple" above the other two layers:

Step 15: Move And Resize The Couple With Free Transform
Press Ctrl+T (Win) / Command+T (Mac) to quickly bring up the Free Transform box and handles around the couple so we can resize them if needed and move them into position. To resize the couple, hold down your Shift key and drag any of the four corner handles. Keeping the Shift key held down as you drag constrains the aspect ratio of the couple so you don't distort the overall shape of them. To move them into position, click anywhere inside the Free Transform bounding box and drag them around inside the document with your mouse. Move them so it looks like they're standing directly on the center of the "galaxy". Press Enter (Win) / Return (Mac) when you're done to accept the changes and exit out of Free Transform:

Step 16: Add A Layer Mask
Click on the Layer Mask icon at the bottom of the Layers panel to add a layer mask to the "Couple" layer:

A layer mask thumbnail appears to the right of the main preview thumbnail:
 s
s
Step 17: Draw A Linear Gradient On The Layer Mask
We're going to use the layer mask to blend the lower part of the couple into the gradient, as if they're being engulfed by the light from the galaxy. Select the Gradient Tool once again from the Tools panel. Then, up in the Options Bar, click on the Linear gradient icon:

To blend the couple into the gradient, I'll click somewhere just below their knee level to set a starting point for the gradient, and with my mouse button still held down, I'll drag down to just above the groom's feet. Hold your Shift key as you drag, which will limit the direction you can drag in, making it easier to drag straight down:

Since we drew the gradient on the layer mask, not the layer itself, when you release your mouse button, the couple blends nicely into the "galaxy" below them:

Step 18: Colorize The Image With A Hue/Saturation Adjustment Layer
Let's give the galaxy some color. Click on the New Adjustment Layer icon at the bottom of the Layers panel:
Select Hue/Saturation from the list of adjustment layers that appears:

If you're using Photoshop CS5 as I am here, the options for Hue/Saturation will appear in the Adjustments Panel, new in CS5. In Photoshop CS4 and earlier, the Hue/Saturation dialog box will pop open. I'm going to give my galaxy a nice blue color. First, select the Colorize option by clicking inside its checkbox. With Colorize selected, if you want to use the same color I'm using, set the Hue value to 240 and increase the Saturation to 50% (if you want to try a different color, simply drag the Hue slider left or right):

If you're using Photoshop CS4 or earlier, click OK when you're done to exit out of the dialog box. There's no need to close out of the Adjustments Panel in CS5. The color will look too intense for the moment, but we'll fix that next:

Step 19: Change The Blend Mode To Color And Lower The Opacity
Change the blend mode of the Hue/Saturation adjustment layer from Normal to Color so that only the colors in the image are affected, not the brightness values. Then, to reduce the intensity of the color, lower the Opacity of the Hue/Saturation adjustment layer to around 60%:

The colorizing effect is now much more subtle. Still one last thing left to do:

Step 20: Draw A Linear Gradient On The Hue/Saturation Layer Mask
To finish things off, let's make it look more like the light from the galaxy is reflecting off the couple rather than having the entire image colorized in blue (or whichever color you chose). This will bring back the original skin tone in their faces. With the Gradient Tool still selected, I'll click around the bride's waist to set the starting point for my gradient and, with my mouse button still held down, I'll drag up to her shoulder, holding my Shift key down as well to make it easier to drag straight up:

Once again, since we drew the gradient on a layer mask (the Hue/Saturation adjustment layer's mask, which was already selected for us by Photoshop), we don't actually see the gradient in the document. Instead, the color from the galaxy now extends only up to the bride's waist and then begins to quickly fade away to reveal the photo's original colors, completing our "dancing in the stars" effect: