
How To Create A Diptych With Photoshop CS6
In this photo effects tutorial, we'll learn how to create a diptych using Photoshop CS6. What's a diptych? The way the term is commonly used today, diptych simply means two images displayed together, usually side by side. The images often have something in common, like a general theme or shared subject, so that when viewed as a whole, they convey a larger message or artistic statement.
Really though, a diptych can be any two images of your choice. You may want to display a wedding and engagement photo side by side, or two photos showing the same person at different ages, or maybe two photos from a recent trip or vacation. A full color and black and white version of the same image can look great side by side, or photos of the same subject taken from two different angles or at different times of day. These are just a few suggestions, but ultimately, diptychs offer endless creative possibilities. Even two images that, on their own, may not seem all that interesting can appear striking when viewed together.
As we'll see, the images you choose don't even have to share the same orientation. One can be in portrait, the other landscape. The only real "trick" to displaying them side by side is that we'll need to make sure they both share the same height, in pixels, so that the top and bottom of the images line up. For that, we may need to do some quick image resizing, but the overall process of creating a diptych in Photoshop is really very simple, and of course, I'll cover each and every step along the way.
Here's the first image I'll be using for my diptych (girl in garden photo from Shutterstock). This one is in landscape mode:

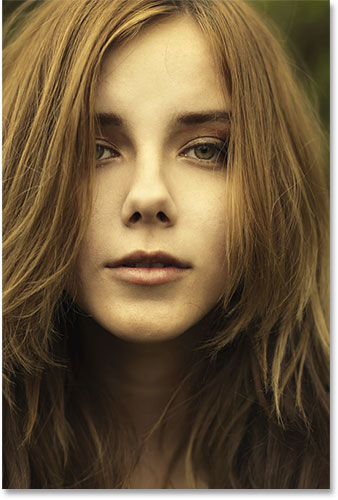
Here's my second image (smiling girl closeup photo from Shutterstock). This one's in portrait mode:
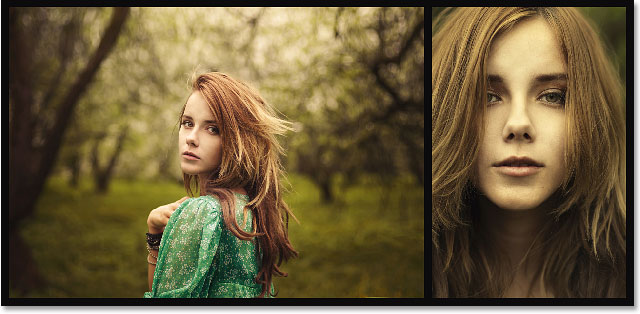
And here's what the final diptych will look like with the images combined into a single larger image and a border added around them. I've used a black border here, but you can just as easily choose white:
There's many different ways to create a diptych in Photoshop, but to get the most from this tutorial and to use the method we'll be learning here, you'll need Photoshop CS6 or CC.
How To Create A Diptych
Step 1: Open Your Two Images In Photoshop
The first thing we need to do is open both of our images into Photoshop. If you already have your images open, you can skip this first step, but I'm going to start off in Adobe Bridge CS6 where I've navigated to a folder on my desktop containing my two images. To select them both, I'll click on the first image thumbnail on the left to highlight it, then I'll hold down the Ctrl (Win) / Command (Mac) key on my keyboard and click on the second thumbnail. This selects and highlights both images at the same time:

To open them in Photoshop, all I need to do is double-click on either of the images. Each photo will open in Photoshop in its own separate document. By default, only one of the images is visible at a time, but we can easily switch between them by clicking on their tabs just below the Options Bar in the upper left of the screen:

Step 2: Resize The Images To The Same Height
Before we combine the images into a diptych, we first need to make sure both photos are sized to the same height so they'll line up nicely when displayed side by side. If they're not, we'll need to resize one of them to match the other. We can check the current dimensions of each image using Photoshop's Image Size dialog box.
First, I'll switch to my photo that's in landscape orientation (the photo of the girl standing in the woods) by clicking on its tab:

To check the photo's height, I'll go up to the Image menu in the Menu Bar along the top of the screen and choose Image Size:

This opens the Image Size dialog box. In the Pixel Dimensions section at the top, it's showing me that the height of this photo is 2380 pixels:

I'll click the Cancel button to close out of the dialog box without making any changes, then I'll switch over to my second photo by clicking on its tab:

With my second photo now active, I'll once again go up to the Image menu at the top of the screen and choose Image Size:
This time, the Image Size dialog box is telling me that my portrait-oriented photo has a height of 3200 pixels, making it the larger (in terms of height) of the two images:

This larger image needs to be resized to match the height of the smaller image, so while still in the Image Size dialog box, I'll make sure the Resample Image option at the bottom is selected (checked) and that the interpolation method at the very bottom is set to Bicubic Automatic, then I'll change the Height value at the top from its original 3200 pixels to 2380 pixels to match the other photo (Photoshop automatically changes the Width value to maintain the photo’s aspect ratio). Click OK to have Photoshop resize the image and close out of the Image Size dialog box (quick note: when we're changing the actual number of pixels in an image, as we are here, it's technically known as resampling an image, not resizing, which is why we need to have the Resample Image option at the bottom of the dialog box selected):

Step 3: Select And Copy The Resized Image
Now that we've resized the image, we need a way to move it into the same document as the other image. For that, we can simply copy and paste it. To first select the image, go up to the Select menu at the top of the screen and choose All. Or, press Ctrl+A (Win) / Command+A (Mac) on your keyboard to access the Select All command with the shortcut. A selection outline will appear around the image:

With the image selected, go up to the Edit menu and choose Copy, or press Ctrl+C (Win) / Command+C (Mac) on your keyboard:

Step 4: Paste The Image Into The Other Photo's Document
Switch back over to the other image by clicking on its tab:
Then go back up to the Edit menu and this time, choose Paste. Or, press Ctrl+V (Win) / Command+V (Mac) on your keyboard:

Photoshop pastes and centers the image in front of the other:

If we look in the Layers panel, we see that each photo now sits on its own layer in the same document:

Step 5: Rename The Background Layer
Next, let's rename the Background layer so Photoshop will let us add another layer below it to use as the background color for our diptych. All we need to do is name it something other than Background, and the quickest and easiest way to do that is to press and hold the Alt (Win) / Option (Mac) key on your keyboard and double-click on the word "Background". Photoshop will automatically rename it Layer 0, good enough for our purposes:

Step 6: Add A Solid Color Fill Layer
We'll use one of Photoshop's Solid Color Fill layers for our background since they make it easy to choose whichever color we want. Click on the New Fill or Adjustment Layer icon at the bottom of the Layers panel:
Choose Solid Color from the top of the list that appears:

Photoshop will pop open the Color Picker where we can choose the color we want to fill the layer with. I'm going to choose black by entering a value of 0 into the R, G and B input boxes. If you'd rather use white for your background color, enter a value of 255 into the R, G and B boxes:

Click OK to accept the color and close out of the Color Picker. Photoshop adds a new Solid Color Fill layer named Color Fill 1 between the two photos, as we can see in the Layers panel:

Step 7: Drag The Solid Color Fill Layer Below Layer 0
Since we're going to use the Solid Color Fill layer as the background for our diptych, we need to move it below the two image layers. To do that, click on the Color Fill 1 layer in the Layers panel, keep your mouse button held down, and drag the layer below Layer 0. A white highlight bar will appear below Layer 0 when you've dragged close enough:

Release your mouse button when the white highlight bar appears to drop the Solid Color Fill layer into place:

Step 8: Select The Top Image Layer
Click on the top layer in the Layers panel to select it:

Step 9: Select The Move Tool
Select the Move Tool from the top of the Tools panel along the left of the screen:

Step 10: Drag The Photo To The Left Or Right Of The Other Photo
With the Move Tool in hand, press and hold the Shift key on your keyboard and drag the photo on the top layer either left or right to move it beside the other photo. Holding the Shift key down makes it easy to drag in a straight line. I'm going to drag my top photo to the right of the other.
But here's the problem we run into (we'll fix it in a moment). To move the photo beside the other, we need to drag it into the gray pasteboard area that surrounds the visible portion (the canvas area) of the document. Why is that a problem? It's because we can't actually see anything that's in the pasteboard area. This means that as we drag the photo further and further off to the side, less and less of it remains visible as more of it is hidden by the pasteboard:

Don't worry about losing sight of the image for now. Simply continue dragging it off to the side until it's directly beside the other photo (and completely out of view). If you're dragging your photo off to the right as I am here, you'll see your photo snap into place once the left side is close enough to the edge of the visible area. If you're dragging to the left, it will snap into place once the right side is close enough. When you're done, you should see only one photo in your document. The other one is still there, it's just hidden for now by the pasteboard:

Step 11: Reveal All
To bring back the hidden photo and view both of them together, go up to the Image menu at the top of the screen and choose Reveal All:

Photoshop instantly extends the canvas area so that both images are now visible:

Important! We're going to add a little space between the two photos in the very next step, but at this point, the edges of the images should be touching with no space in between. They need to be flush up against each other side by side. If you dragged your photo too far and created a gap between them, with the Move Tool still active, hold down your Shift key and drag the photo back towards the other until the edges of the two photos are touching and the gap is closed.
Step 12: Add Space Between The Photos
Now that we've made sure there's currently no space between our two photos, let's add some space! The reason we want to start with no space between them is that we'll need to know exactly how much space we've added, and in Photoshop CS6, we can use the new HUD (Heads-Up Display) feedback for the Move Tool to tell us exactly how far we've dragged the image.
With the Move Tool still active, once again press and hold the Shift key on your keyboard and begin dragging the photo either left or right to add space between the two images. The space will be filled with whichever color you chose for your Solid Color Fill layer back in Step 6. In my case, it's black. As soon as you start dragging, a small HUD box will appear giving you live feedback on exactly how far you've dragged. The reading may be in inches (in) or pixels (px) depending on how you've set up the Rulers in Photoshop's Preferences. In my case, it's showing me inches. Here, the HUD is telling me that I've dragged my photo 0.2 inches to the right (the top number is the horizontal movement, the bottom is vertical), and we can see the black-filled space appearing between them. Make sure you remember the exact distance you've dragged because we'll need that information in a moment:

Step 13: Reveal All Again
Since we've moved the photo a bit off to the side, some of it is hidden again by the pasteboard. Go back up to the Image menu and choose Reveal All to bring the hidden area back into view:
Both photos are now fully visible with a border between them:

Step 14: Add Canvas Space To Create A Border Around The Images
Finally, let's finish off our diptych by adding a border around it. We'll use the information the HUD gave us to create a border exactly the same thickness as the space between the photos. Go up to the Image menu and choose Canvas Size:

This opens the Canvas Size dialog box. First, make sure the Relative option is selected (checked) and that the center box in the Anchor grid is also selected so that the extra canvas space will be added equally around the outside of the photos:

Then, take the amount of space you added between the photos in Step 12 and enter twice that amount into the Width and Height boxes. Make sure you also have the correct measurement type chosen (Inches or Pixels). In my case, the HUD told me that I dragged my image a distance of 0.2 inches, so I'll enter twice that amount (0.4) into the Width and Height boxes and I'll make sure both are set to Inches. The reason we need to enter twice the amount is because half the Width value will be added to the left of the canvas, the other half to the right. Likewise, half the Height value will be added to the top, the other half to the bottom, giving us a border around the diptych that's exactly the same size as the space between the photos:

Click OK when you're ready to accept your settings and close out of the Canvas Size dialog box, at which point Photoshop adds the extra canvas space around the images, giving us our border. Again, the border is the same color as the color we chose for the Solid Color Fill layer back in Step 6:
And there we have it! That's how to resize, combine and display two separate images as a diptych using Photoshop CS6! Visit our Photo Effects section for more Photoshop effects tutorials!