
Create A Burnt Edge Effect In Photoshop
One of the all-time classic effects in Photoshop is the burnt edge, and there's lots of different ways to create it, but in this Adobe Photoshop tutorial, we're going to look at a way that's not only easy, it's also extremely flexible.
We'll be using a Curves adjustment layer to create the initial effect, and then we'll see how easy it is to fine-tune it and create different variations. Finally, we'll see how to easily add the finished effect to other photos without having to redo anything.
Here's the photo I'll be using for this Photoshop tutorial:

This tutorial is from our Photo Effects series. Let's get started!
Step 1: Add A Curves Adjustment Layer
The first thing we're going to do is add a Curves adjustment layer. If you've never used Curves before or you're not very comfortable with it, don't worry, what we'll be doing here is simple. Click on the New Adjustment Layer icon at the bottom of the Layers palette:
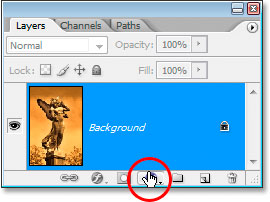
Then select Curves from the list of adjustment layers:

This brings up the Curves dialog box. As I mentioned, if you're not familiar or comfortable with using Curves yet, don't worry. We just need to do one simple thing here. See that little square in the top right corner that I've circled in red:

All we're going to be doing is moving it, and we'll do that next.
Step 2: Drag The White Point Marker Straight Down
With the Curves dialog box open, grab the white point marker in the top right corner (it's the little square I circled on the previous page) and simply drag it straight down, almost to the bottom, until the Output option in the bottom left corner (also circled in red below) reads somewhere between 10 and 20:

This is going to make your image appear to be darkened almost to the point where it becomes black:

Step 3: Create A Border Area With The Rectangular Marquee Tool
Next, grab the Rectangular Marquee Tool from the Tools palette or press M to quickly select it:

With the Rectangular Marquee Tool, drag out a selection inside the image to create a border area around the edges:

Step 4: Fill The Selection With Black On The Curves Layer Mask
Click on the layer mask thumbnail for the Curves adjustment layer in the Layers palette to select it:

Make sure black is your foreground color, then press Alt-Backspace (Win) / Option-Delete (Mac) to fill the selected area with black. This will hide the Curves adjustment layer in the area of the image that was inside the selection, leaving only the border area around it dark:

The layer mask thumbnail in the Layers palette now appears black with a white border around it:

Step 5: Apply The Gaussian Blur Filter To The Layer Mask
We need to soften the border edges, and we're going to use the Gaussian Blur filter for that, which will give us a nice preview of what we're doing. With the Curves layer mask still selected in the Layers palette, go up to the Filter menu at the top of the screen, select Blur, and then select Gaussian Blur. This brings up the Gaussian Blur dialog box. Drag the slider bar at the bottom to increase or decrease the amount of blurring until you've softened the border edges to your liking. Keep an eye on the image for a preview of what you're doing. I've set my Radius value to about 25 pixels here:

And here's how my image looks:

Step 6: Use Free Transform To Resize The Layer Mask If Needed
I mentioned at the beginning of this tutorial that we're creating this effect in a way that's very flexible, and one of the reasons it's so flexible is because we can resize the edges around the image if needed simply by resizing the layer mask using Photoshop's Free Transform command. To do that, with the Curves adjustment layer selected in the Layers palette, simply use the keyboard shortcut Ctrl+T (Win) / Command+T (Mac) to bring up the Free Transform box and handles, and then drag any of the handles in or out to resize the mask, which resizes the edge effect around the image:

Hold down Shift+Alt (Win) / Shift+Option (Mac) while dragging any of the corner handles to resize the mask from the center and maintain the same proportions.
Step 7: Lower The Opacity Of The Curves Adjustment Layer If Needed
Another reason this method is so flexible is that we can reduce the amount of darkening around the edges if we need to simply by lowering the opacity of the Curves adjustment layer. To do that, with the Curves adjustment layer selected, go up to the Opacity option in the top right corner of the Layers palette, hover your mouse directly over the word "Opacity" which turns your mouse cursor into Photoshop's "scrubby sliders" icon, and then drag your mouse to the left. As you drag, you'll be lowering the opacity and lightening the edges. I've lowered mine to 60% here:

This gives me a more subtle edge darkening effect:

We'll look at a couple of other easy variations on the effect next.
Step 8: Change The Layer Blend Mode For Different Variations
You can also change the blend mode of the Curves adjustment layer for different variations on the effect. To do that, simply go up to the blend mode options in the top left corner of the Layers palette, click on the down-pointing arrow to the right of the word "Normal" and select a different blend mode from the list. Here's the effect with the Curves adjustment layer set to Overlay (I've set my Opacity value back to 100%):

Which gives me dark, saturated colors around the edges:

Here's another variation, this time with the blend mode set to Color:

Which, despite the name, actually removes all the color from the edges, leaving them black and white, with the color fading in towards the center of the photo:

Finally, let's see how to now use this Curves adjustment layer to quickly add the exact same effect to a different photo. We'll do that next.
Step 9: Open Another Image You Want To Add The Burnt-In Edge Effect To
Let's look at how easy it is now to add our finished effect to another image without having to redo any of the steps. Before we do, I'm just going to reset my layer blend mode back to "Normal". You don't have to do this if you prefer one of the other blend modes. I just want to set mine back to the original effect:

Now that I've done that, I'm going to open a second image that I want to apply this effect to, so I end up with two document windows on my screen:

Step 10: Drag The Curves Adjustment Layer Over To The Second Image
All we need to do in order to create the same effect in the second image is to copy the Curves adjustment layer from our original image over to the second one. To do that, first click on the original image's Document Window to select it. Then, grab the Move tool either from the Tools palette or by pressing V on your keyboard. With the Curves adjustment layer selected in the Layers palette, click anywhere inside the original image's Document Window and drag your mouse into the second image. You won't be dragging the first image onto the second. Instead, you'll be dragging the Curves adjustment layer onto the second image. Hold down your Shift key just before releasing your mouse to automatically center the adjustment layer onto the second image:

And instantly, the effect is recreated on the second image with no effort at all. You can then change the blend mode, resize the layer mask or lower the opacity to your liking.

And there have it! That's how easy it is to create this classic "burnt-in edge" effect in Photoshop, fine-tune it, create different variations using different layer blend modes, and then add the same effect to another image instantly. Check out our Photo Effects section for more Photoshop effects tutorials!