
Perspective Correction In Photoshop – Repairing Keystoning
Have you ever tried taking a photo of a building only to have the building look like it's leaning backwards? That's a perspective problem known as keystoning, and it's caused by the building and the camera lens being on two different angles.
Usually, unless you're fond of climbing trees or you have a friend at the fire department, standing on the ground and tilting the camera back a bit is the only way to get the top of a tall building into the photo, and since the camera is tilted away from the building when you snap the image, with the top of the lens being further away from it than the bottom of the lens, the building ends up looking like its leaning backwards. This problem actually exists any time you need to tilt the camera back to get something tall into the photo but it's most noticeable with buildings due to their straight parallel sides.
Keystoning can sometimes be a desirable effect since it can add a real sense of drama to the image. However, there are times when you'll wish there was some way to correct this perspective problem, and Photoshop gives us a few different ways to go about it. Up until recently, we had a choice of using either the Crop Tool or the Free Transform command, but in Photoshop CS2, Adobe introduced the powerful Lens Correction filter which quickly replaced those other two methods as the fastest and easiest way to correct keystoning. We'll look at how to use the Lens Correction filter in this tutorial. I'll be using Photoshop CS4 here, but any version of Photoshop from CS2 on up will work.
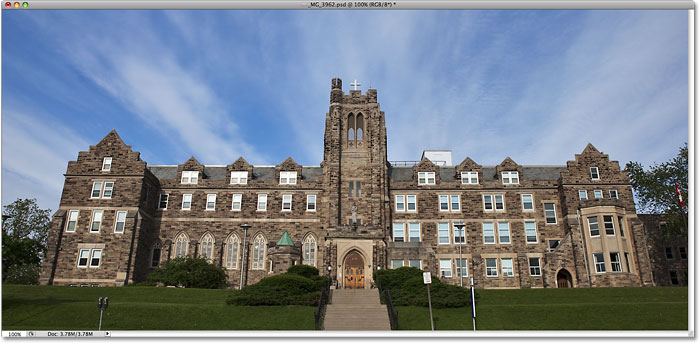
Here's the photo I'll be using. Notice how the building appears to be leaning backwards with the sides tilted inward rather than being parallel to each other as they should be:
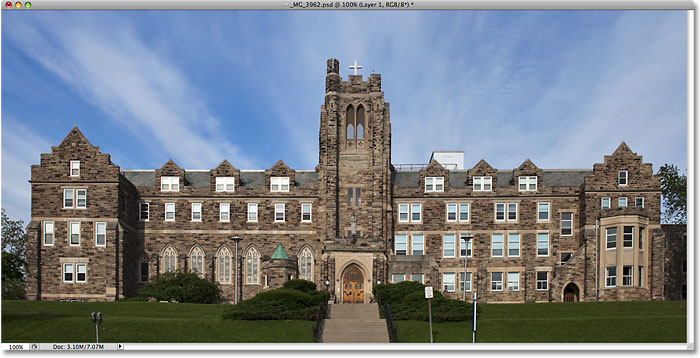
Here's how it will look when we're done:
Let's get started!
Step 1: Duplicate The Background Layer
Before we do anything else, we should first make a copy of the original image which is sitting on the Background layer in the Layers palette. This is to avoid doing any damage to the original in case we need it later. To duplicate the Background layer, go up to the Layer menu at the top of the screen, choose New and then choose Layer via Copy. Or, to save time, simply use the handy keyboard shortcut Ctrl+J (Win) / Command+J (Mac). Either way tells Photoshop to make a copy of the Background layer for us, and if we look in the Layers palette, we can see that we now have two layers. The original Background layer is on the bottom, and a copy of the layer, which Photoshop automatically named "Layer 1", is sitting directly above it:

Step 2: Open The Lens Correction Filter
Now that we're working on a copy of the image, let's bring up the Lens Correction filter by going up to the Filter menu at the top of the screen, choosing Distort and then choosing Lens Correction:

Step 3: Straighten The Image If Needed
Photoshop's large Lens Correction dialog box appears, with a few tools along the left, a large preview area in the middle and several options for correcting lens problems along the right. Before we fix our keystoning problem, we should take care of a couple of other potential problems first which will the make it easier for us to fix the keystoning. To start with, let's make sure the image is straight. We can do that using the Straighten Tool, which is the second tool from the top on the left side of the dialog box. Click on it to select it. Then simply click and drag across something in the image that should be straight, either horizontally or vertically. I'm going to click across the roof on the left side of the building in my photo. When you release your mouse button, Photoshop will rotate the image inside the preview area to straighten it (assuming it was crooked). If you find that the grid is making it difficult to see what you're doing, you can turn it off temporarily by unchecking the Show Grid option at the bottom of the dialog box:

If you need to zoom in on the image, press Ctrl++ (Win) / Command++ (Mac), or to zoom out, press Ctrl+- (Win) / Command+- (Mac). If, while zoomed in, you need to move the image around inside the preview area, simply hold down your spacebar which gives you temporary access to the Hand Tool, then click and drag the image to move it.
Step 4: Fix Any Barrel Or Pincushion Distortion
Sometimes a photo can suffer from what's called barrel distortion where the image appears to bulge out from its center as if it's being wrapped around a sphere, or from pincushion distortion, the exact opposite problem where it appears to be pinched in towards the center. Not all images have one of these problems but if yours does, it's best to correct it before attempting to fix the keystoning. There's a couple of different ways to do this. One is to click on the Remove Distortion Tool, which is the top tool on the left of the dialog box, then simply click and drag inside the image with your mouse. Drag towards the center of the image to correct any barrel distortion, or drag away from the center to correct any pincushioning:

You can accomplish the same thing with the Remove Distortion slider at the top of the column on the right. Drag the slider towards the left to correct pincushioning, or drag it to the right to correct barrelling. Regardless of the method you choose, make sure you don't drag too far otherwise you'll end up causing the opposite problem that you're correcting. You'll probably find the grid helpful when trying to fix these problems, so check the Show Grid option at the bottom of the dialog box to turn it back on if you turned it off in the previous step:

If you've gone too far and need to reset the image, just enter value of 0 into the Remove Distortion input box directly above the slider.
Now that we've made sure the image is straight and we've removed any distortion, let's fix our keystoning problem. We'll do that next!
Step 5: Drag The Vertical Perspective Slider To Correct The Keystoning
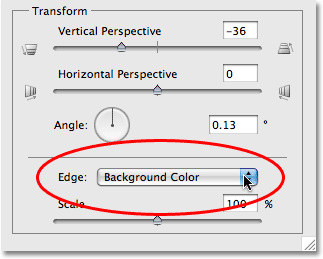
Near the bottom of the column on the right of the Lens Correction dialog box is an option called Vertical Perspective, and all we need to do to correct our keystoning problem is drag the Vertical Perspective slider either left or right. For images where the building looks like it's leaning backwards, you'll want to drag the slider towards the left. As you do, you'll see the image in the preview area appear to tilt forward. The further you drag the slider, the more the image will tilt and as it does, the sides of the building will appear to straighten themselves out. Keep an eye on the sides of the building as you drag the slider and compare them with the vertical lines in the grid. When the grid lines and the building sides appear parallel to each other, you've corrected the keystoning:

If you need to move the grid around to line it up with one of the sides of the building, select the Move Grid Tool directly below the Straighten Tool on the left of the dialog box, then click and drag inside the preview area to move the grid as needed.

Step 6: Set The Edge Option To Either Transparency Or Background Color
By tilting the image forward, we've created a lot of blank space along the bottom of the image. We need to tell Photoshop how we want to deal with that blank space, and we do that using the Edge option at the bottom of the right column, below the Vertical Perspective slider. By default, the Edge option is set to Transparency, which fills the blank area with a grid pattern (which is how Photoshop displays transparency). You can leave it set to Transparency if you like or you can select Background Color, which fills the blank area with your current background color. There's also a third option, Edge Extension, which I highly recommend you don't use. Personally, I prefer to select Background Color because it makes it easier to see where the image needs to be cropped, which we'll be doing in a moment:
Click OK in the top right corner of the dialog box when you're done to exit out of it and Photoshop applies your adjustments to the image. Here's my photo after correcting the keystoning. The sides of the building are now parallel and it no longer looks like its leaning backwards. Notice that the blank area along the bottom has been filled with black which is my current background color. If you set your Edge option to Transparency, you'll see the bottom of the original image on the Background layer showing through:

Step 7: Apply The Free Transform Command If Needed
You may find at this point that the building looks a little short and stubby. In other words, it doesn't seem quite as tall as it should be. If that's the case, press Ctrl+T (Win) / Command+T (Mac) on your keyboard to quickly bring up the Free Transform box and handles around the image. Press the letter F to switch to Full Screen mode if you're currently working in a document window so you can see what you're doing, then click on the bottom handle and drag it down a short ways to stretch the image vertically until the building looks the way it should. Press Enter (Win) / Return (Mac) when you're done to accept the change:

Step 8: Crop The Image
As a final step, we need to crop away all the unwanted areas along the bottom and the sides. For that, we'll use Photoshop's Crop Tool. Select it from the Tools palette or simply press the letter C on your keyboard to select it with the shortcut:

Then, with the Crop Tool selected, click and drag out a cropping border. Everything inside the border will be kept while everything outside of it will be cropped away. Once you have an initial cropping border, use the handles on the top, bottom, sides or corners to fine-tune it until you've selected the area you want to keep:

Before you crop the image, go up to the Options Bar at the top of the screen and select the Hide option. This way, rather than deleting the area that gets cropped away, Photoshop will simply hide it, allowing you to undo the crop later and restore the entire image if you ever need to go back to the PSD file to access the original image on the Background layer (to restore the image after cropping it, go up to the Image menu and choose Reveal All):
Press Enter (Win) / Return (Mac) to crop the image, and you're done! Here's the original photo once again for comparison:
And here, after straightening the photo, repairing any barrel or pincushion distortion and fixing the keystoning problem, all within Photoshop's Lens Correction dialog box, is my final result:
And there we have it! That's how to correct perspective problems in an image using the Lens Correction filter in Photoshop! Check out our Photo Retouching section for more Photoshop image editing tutorials!