
Non-Destructive Dodge and Burn in Photoshop
It may be hard to believe these days, but there was a time not so long ago when cameras were not digital, and photo developing was done in a lab, not on your computer. Digital cameras and Photoshop may have brought the world of photo editing out of the darkroom and into your living room (or wherever your computer happens to be), but many of Photoshop's tools and features have their roots in traditional film development.
Two great examples of this are Photoshop's Dodge and Burn tools, both of which are found in the Tools palette. The terms "dodge" and "burn" refer to techniques that were used to either lighten (dodge) or darken (burn) specific areas of a photo by increasing or limiting the exposure in those areas. The Dodge and Burn tools in Photoshop are the digital versions of these techniques and are often used to either lighten underexposed areas of a photo or darken overexposed areas.
As useful as the Dodge and Burn tools are, however, they both suffer from a serious problem. Both of them cause permanent damage to your image, and this is never a good thing.
The best way to work in Photoshop is to keep your original pixel information intact so you always have the original photo to fall back on. This is often referred to as working "non-destructively" in Photoshop, and it's the way you should be working whenever and wherever possible. Fortunately, Adobe has given us numerous ways to work non-destructively on our images, and in this photo editing tutorial, we're going to look at one of them. We'll look at a great technique for selectively controlling the exposure in a photo by lightening and darkening specific areas, giving us results very similar to what we could achieve with the Dodge and Burn tools but without harming a single pixel in the image.
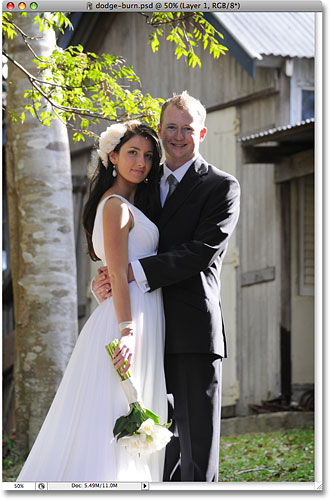
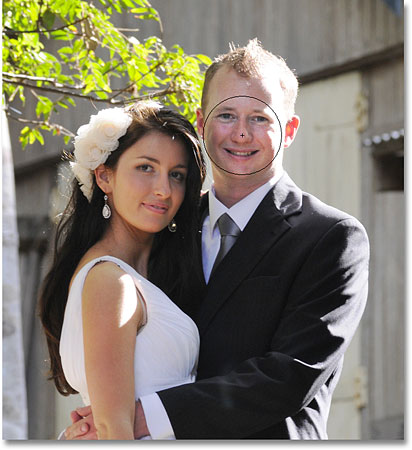
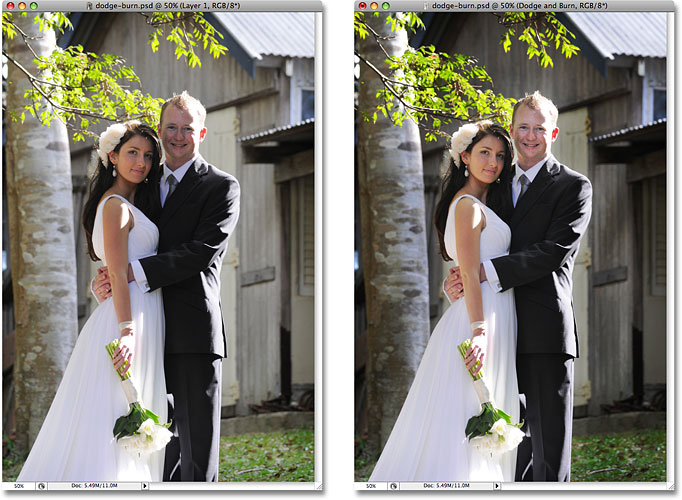
Here we have a photo suffering from a very common problem. The wedding couple should be the main focal point of the image, but thanks to the direction of sunlight and an apparent lack of fill flash, the couple appears too dark in the photo while the background appears too bright:
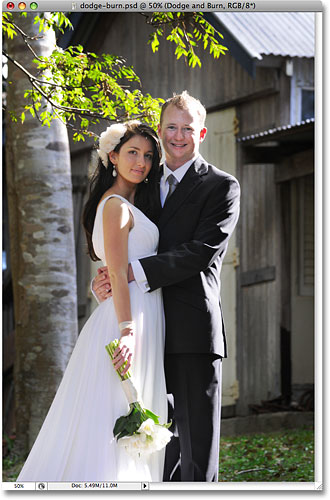
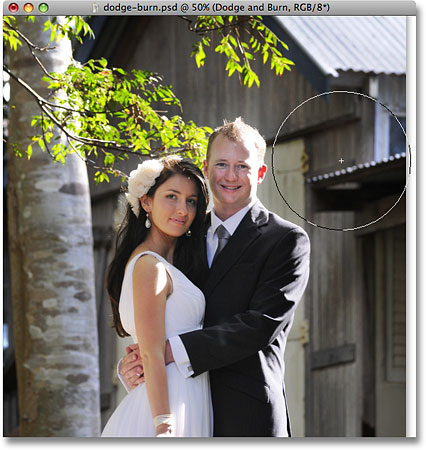
Using nothing more than Photoshop's Brush Tool and a layer blend mode, as we'll see in a moment, we can easily fix things by lightening the couple and darkening the background:
Let's get started!
Step 1: Add A New Layer
Open the image you need to work on in Photoshop, then hold down your Alt (Win) / Option (Mac) key and click on the New Layer icon at the bottom of the Layers palette:
Normally, this adds a new blank layer above the currently selected layer, but by holding down the Alt/Option key as we click on the New Layer icon, we tell Photoshop to pop open the New Layer dialog box for us before the layer is added. This gives us a chance to name the layer, and it also allows us to change a couple of important options. First, since I'll be using this layer to dodge and burn different areas of the photo, I'm going to name the layer "Dodge and Burn". You don't have to name the layer if you don't want to, but naming layers is a very good habit to get into:

The real reason why we brought up the New Layer dialog box is for the option at the very bottom, Mode. "Mode" is short for Layer Blend Mode, and by default, it's set to Normal. Change the blend mode to Overlay:

I cover the Overlay blend mode in much more detail in our Five Essential Blend Modes For Photo Editing tutorial, but briefly, the Overlay blend mode is part of the Contrast group of blend modes and is often used to quickly boost the overall contrast in an image. Any areas on the layer that are lighter than 50% gray (meaning the shade of gray directly between black and white) are used to lighten the image, while areas darker than 50% gray darken the image. Any areas that are exactly 50% gray are completely ignored by Photoshop, and when I say "ignored", I mean they actually become transparent. In fact, we're about to see this is action.
With the blend mode now set to Overlay in the dialog box, you'll see a new option directly below it, Fill with Overlay-neutral color (50% gray). Click inside the checkbox to select this option:

This option tells Photoshop to fill our new layer with 50% gray. Click OK when you're done to exit out of the dialog box. If we look in our Layers palette now, we can see that we have a new layer named "Dodge and Burn" sitting above the photo on the Background layer. The layer is set to the Overlay blend mode for us, and if we look in the layer's preview thumbnail to the left of the layer's name, we can see that it has in fact been filled with gray:

I said a moment ago that when a layer is set to the Overlay blend mode, any areas of the layer that are 50% gray become transparent, and if we look at our image in the document window, even though the "Dodge and Burn" layer is filled with solid gray, which would normally mean that our document window is filled with gray, all we see is our original photo. The gray on the "Dodge and Burn" layer is completely transparent:
Step 2: Select The Brush Tool
We're going to lighten and darken different areas of the image simply by painting over them with either black or white. Areas we paint over with white will be lightened, while areas we paint over with black will be darkened. Again, this is because we'll be painting on a layer that's set to the Overlay blend mode. Before we can paint over anything, though, we need to grab the Brush Tool, so either select the Brush Tool from the Tools palette or press the letter B on your keyboard to access it with the shortcut:
Step 3: Set Your Foreground Color To White
I'm going to begin by lightening the couple, which means I'll need to paint over them with white, which means I need to set my Foreground color to white, since the Brush Tool paints with whatever color the Foreground color is currently set to. If you're following along with your image, press the letter D on your keyboard which resets the Foreground and Background colors to their defaults. This makes black the Foreground color and white the Background color. To swap them so white becomes the Foreground color, press the letter X on your keyboard. If we look at the Foreground and Background color swatches near the bottom of the Tools palette, we can see that white is now the Foreground color (the left swatch):
Step 4: Lower The Opacity Of The Brush To Between 10 - 20%
The best way to work with this technique is to gradually build up the amount of lightening and darkening that's being applied, since even a subtle amount can sometimes be enough. To do that, we'll need to work with a low opacity brush. Make sure you have the Brush Tool selected, then go up to the Options Bar at the top of the screen and lower the Opacity option down to somewhere between 10-20%. I'm going to set mine to 10%. This way, each time I paint over the same area, I'll increase the amount of lightening or darkening in 10% increments, giving me lots of room to work with:

Step 5: Paint Over Areas That Need To Be Lightened
With your Brush Tool selected, white as your Foreground color and the opacity of your brush lowered, simply paint over any areas in your photo that need to be lightened. The effect will be subtle at first due to the low brush opacity, but if you need more lightening in certain areas, just paint over them a few times to build up the effect, making sure to release your mouse button in between paint strokes. You can change the size of your brush by pressing the left bracket key to make the brush smaller or the right bracket key to make it larger. You'll want to use a soft edge brush, and you can make the brush edges softer by holding down the Shift key and pressing the left bracket key a few times. Holding Shift and pressing the right bracket key will make the edges harder.
I want to brighten the couple in my photo, so I'm going to paint over them with a medium size, soft edge brush. Each time I paint over them, I'll increase the brightness by 10%. Painting over them 3 or 4 times should do it. The man's face is especially dark in the photo, so that area may need an extra click or two with the brush:
Step 6: Set Your Foreground Color To Black
When you're done with the areas that needed to be lightened, press the letter X on your keyboard to swap your Foreground and Background colors so black becomes your Foreground color:
Step 7: Paint Over Areas That Need To Be Darkened
With your Foreground color now set to black, paint over any areas in the photo that need to be darkened. Again, each time you paint over the same area, you'll increase the amount of darkening that's applied. In my case, I want to make everything behind the couple darker, so I'm going to use a larger brush and paint around the couple a few times to darken the background:
If we look at the preview thumbnail for the "Dodge and Burn" layer in the Layers palette, we can see all the areas where we painted with white or black:
If you accidentally paint over areas you didn't mean to and want to set those areas back to 50% gray, simply click on the Foreground color swatch in the Tools palette, which will bring up Photoshop's Color Picker. Enter a value of 128 for the R, G and B options in the Color Picker, which gives you the 50% gray color:
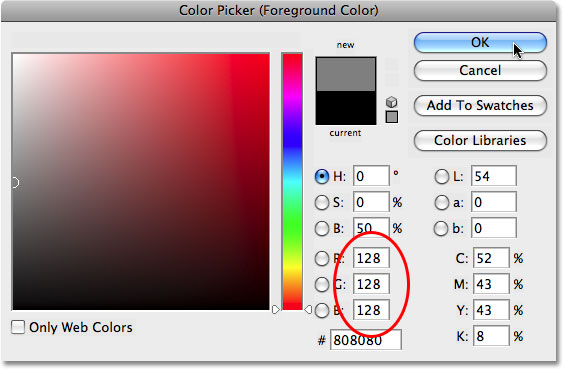
Click OK to exit out of the Color Picker, then simply paint over those areas in the image to set them back to the original 50% gray.
And with that, we're done! We've successfully adjusted the exposure levels in different areas of the photo by manually painting over them with black or white, giving us results very similar to what we could have achieved with Photoshop's Dodge and Burn tools, without touching a single pixel in our original image! To see the difference, here is my original photo on the left and the corrected image on the right:
And there we have it! That's how to dodge and burn images non-destructively using the Overlay blend mode in Photoshop! Check out our Photo Retouching section for more Photoshop image editing tutorials!