
Photoshop CS5 New Features – Content Aware Healing
In a previous photo retouching tutorial, we looked at Photoshop's Spot Healing Brush and how we can use it to quickly remove or repair small problem areas in an image, like acne or other minor skin blemishes, dust, dirt, mold, or small cracks or scratches. First introduced in Photoshop CS2, the Spot Healing Brush may not be the only image retouching tool you'll ever need, but its speed and performance make it perfect for cleaning up small problems before moving on to the larger, more time consuming ones.
Ironically, the Spot Healing Brush's biggest strength, that it does almost everything on its own with little effort or input from us, has also been its biggest weakness. The way it has worked from CS2 until now is that you'd simply click on a small area of damaged or unwanted texture, then watch as Photoshop magically replaced it with randomly-selected good texture from somewhere close to the spot you clicked. As long as the problem area was small enough and there was enough good image data close by, the Spot Healing Brush was usually able to give us acceptable results.
But when there wasn't enough good image data or the problem spot was too big and complex for it to decide on its own how to repair the area, it ran into problems and there was nothing we could do other than switch to a different tool like the standard Healing Brush, the Patch Tool or the Clone Stamp Tool, all of which require more time and effort.
In Photoshop CS5, the general idea hasn't changed. We still just click on a problem spot and let the Spot Healing Brush do the rest with no real ability on our part to control the results. But this time, Adobe has given the tool a major boost in intelligence and greatly increased its chances for success with the brand new Content-Aware Healing feature, which now let's Photoshop make much better decisions on how to remove and repair texture based on the actual content of your image! How does this compare with the "old" way of how the Spot Healing Brush worked? Let's find out!
Since this is just a first look at one of the new features in Photoshop CS5, we won't be covering the Spot Healing Brush in great detail here. For that, be sure to check out our full Spot Healing Brush tutorial.
Here's a photo I snapped one day of some numbers spray painted on a sidewalk near a construction site:

Normally, removing the paint from the sidewalk (in the photo, at least) would be a simple yet somewhat time consuming task for the Clone Stamp Tool, but just for fun, let's see how well we can clean it up using the upgraded Spot Healing Brush in Photoshop CS5. First, I'll add a new blank layer above the Background layer by clicking on the New Layer icon at the bottom of the Layers panel. When the new layer appears, I'll double-click on its default name of "Layer 1" and change it to spot healing, pressing Enter (Win) / Return (Mac) when I'm done to accept the new name. This way, I can do all of my spot healing work on the new layer and avoid touching the original image:

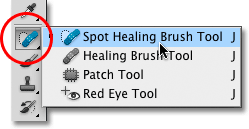
With the new layer added, I'll select the Spot Healing Brush from the Tools panel. It's still found nested in with the other healing tools in Photoshop CS5 (the standard Healing Brush, Patch Tool and the Red Eye Tool), so if it wasn't showing in the Tools panel, I could simply click and hold on whichever of the other tools was showing in its place and select the Spot Healing Brush from the fly-out menu. Nothing new here so far:
The New Content-Aware Option
With the Spot Healing Brush selected, if we look up in the Options Bar, we see the same Proximity Match and Create Texture options that have always been there, but in Photoshop CS5, we now find a brand new, third option - Content-Aware:

Adobe is so sure you're going to want to use the new Content-Aware option from now on that they've selected it for us by default. Before we look at it, though, let's see how well the Spot Healing Brush does using the old default setting, Proximity Match. I'll select it in the Options Bar:

In fairness, the Spot Healing Brush was never meant to be used on such a large area. As its name implies, it was designed to remove or repair small spots, so I won't try to completely remove all the paint from the sidewalk, but let's try it on a small section. I'll zoom in on the number 0 on the left. Then, with the old Proximity Match option selected in the Options Bar, which sets the Spot Healing Brush to how it worked prior to CS5, I'll paint over the top of the number. The area I paint over is temporarily filled with a translucent black so I can see where I've painted:

With Proximity Match selected, Photoshop simply tries to replace the texture I painted over with good texture from the surrounding area. This is how things worked in CS2, CS3 and CS4, and when I release my mouse button, we see the results:

It's not the complete disaster I was expecting, but I still wouldn't call it good. For one thing, where did the blue come from? I don't remember seeing any blue in the original. Also, it looks like Photoshop randomly grabbed an area of the image between the two sidewalk sections and just threw it in there without a care. Did it replace the texture I painted over with something different? Yes. Did it replace it with something I can actually use? No.
Let's try the same thing, but this time, I'll select the Content-Aware option in the Options Bar. I'll again paint over the same general area:

When I'm done, I'll release my mouse button and let Photoshop CS5 give it a shot. When using the Content-Aware option, Photoshop needs more time to analyze the image and figure out the best way to "heal" it, so expect to wait a few more seconds at least for the results:

This time, things worked out much better! Rather than simply grabbing random texture from around the area I painted, Photoshop was able to examine the actual content of the image and figure out what texture would work best in that location. It's still not perfect, and I'd still want to fix up some problem areas with the Clone Stamp Tool, but Photoshop CS5's new Content-Aware Healing was at least able to give me a much better starting point than what we saw with the old version of the Spot Healing Brush.
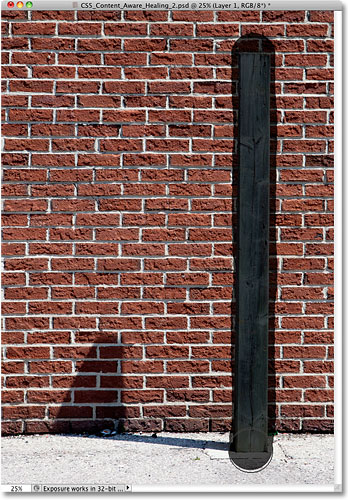
Let's try a different image with Content-Aware Healing and see if we get similar results. Some days, I like to just walk around outside with my camera looking for things I could use as interesting textures for different photo effects. The brick wall in this photo below would work nicely, or at least it would if that darn wooden post wasn't in the way:

Let's see if the Spot Healing Brush is able to remove the wooden post from the photo. Again, this is beyond what the Spot Healing Brush was originally designed for, and if I was using Photoshop CS2, CS3 or CS4, I wouldn't even think of trying this. But can the new Content-Aware Healing feature in Photoshop CS5 actually change the way we use the tool? That's what we're here to find out!
First, I'll select the Proximity Match option in the Options Bar so we're using the old version of the Spot Healing Brush. Then, I'll press the left and right bracket keys on my keyboard to quickly change my brush size so it's just slightly larger than the width of the post and I'll paint along it from top to bottom:
When I reach the bottom, I'll release my mouse button. Remember how I said I wouldn't even think of trying this if I was using an earlier version of Photoshop? Here's why:

I think it's safe to say the Spot Healing Brush failed miserable here. It simply smeared the wooden post into a blurry mess. If I undid my last step by pressing Ctrl+Z (Win) / Command+Z (Mac) and tried again, I might be able to get something a little better, but let's see if the new Content-Aware Healing feature has better luck. I'll select Content-Aware in the Options Bar, then I'll once again paint over the wooden post from top to bottom:

I'll release my mouse button, and after waiting a few moments for Photoshop CS5 to analyze the contents of the image, we get the results:

Not only did the Spot Healing Brush not leave us with a blurry mess this time, it did an amazingly good job, especially when you consider what little effort I put into it. All I did was paint over the post and Photoshop CS5 did everything else own its own! Sure, a few of the bricks need to be aligned better and there's some white smearing that needs to be removed, but all I'm left with now is a quick clean up job with the Clone Stamp Tool rather than having to do it all manually from scratch!
This was just a quick look at the new Content-Aware Healing feature in Photoshop CS5, but as we saw with these examples, the Spot Healing Brush is now much more powerful and intelligent than it ever was in previous versions of Photoshop. No longer limited to selecting random textures from the area close to where you clicked on or painted over, the Content-Aware option now lets Photoshop scan and analyze your entire image as it tries to figure out what that area of the photo would have looked like if the object wasn’t there or the damaged area wasn’t damaged. It’s still not perfect, and you’ll still usually need to fine-tune the results with one of Photoshop’s other retouching tools (the standard Healing Brush, the Patch Tool or the Clone Stamp Tool). But there’s no denying that Content-Aware Healing takes the Spot Healing Brush to a whole new level. Adobe was right to select the new Content-Aware option by default in the Options Bar, because once you’ve seen it in action in Photoshop CS5, you’ll never select the old Proximity Match option again!
And there we have it! That's our look at the new Content-Aware Healing feature in Photoshop CS5! Be sure to check out another new feature in Photoshop CS5 - Content-Aware Fill! Or check out our Photo Retouching section for more Photoshop image editing tutorials!