
Camera Raw vs Photoshop – Which Should I Use?
In a previous tutorial, we looked at the benefits that the raw file format has over JPEG when capturing images with our camera. We learned that our camera's JPEG conversion process acts like a mini photo lab, developing our images according to how it thinks they should look, with no input from us, while at the same time discarding much of the original image information that was captured by our camera's sensor. What we end up with is an already developed image, with permanent changes already made to its pixels, and with a lot of (what would have been) useful image detail missing and gone forever.
A raw file, on the other hand, contains every bit of image detail straight from the camera's sensor with no processing of any kind so we can develop the image ourselves from scratch according to how we, not the camera, think it should look. Not only do we gain complete creative freedom over the process, but the abundance of image information means we can often rescue and restore detail in the highlights and shadows that, as a JPEG, would most likely have been lost.
We also learned that in order to process raw files, we need to use a program like Adobe Camera Raw. Yet Camera Raw can also be used to edit JPEG and TIFF images, leaving many people wondering, "Which should I use for editing my photos - Photoshop or Camera Raw?" In this tutorial, we'll answer that question by taking a quick look at where Camera Raw fits within a standard image editing workflow, as well as some of the advantages Camera Raw has over Photoshop for developing and processing your images.
What Is Camera Raw?
There's no question that Photoshop has become the world's most popular and powerful image editor, but one thing Photoshop can't do on its own is process raw files. If you remember from a previous tutorial, raw files contain nothing more than the raw image data captured by your camera's sensor, with no processing of any kind (which is where the name raw comes from). To work with these files, we need to use special software that knows what to do with the raw data. Adobe came up with two great solutions. One is a completely separate, standalone application known as Adobe Lightroom. The other is a free plug-in for Photoshop itself - Adobe Camera Raw - that ships and installs with Photoshop. Lightroom is a standalone application (it needs to be purchased separately) that includes additional features to help with your overall workflow, like the ability to catalog your photos. Camera Raw is strictly an image editing application. However, both Lightroom and Camera Raw use the exact same image processing engine, which means both are equally capable of giving you fantastic results.
Camera Raw Or Photoshop? Which Is Better?
Camera Raw was initially built for raw image processing, but over time, it has evolved to include the ability to process JPEG and TIFF images as well. So which should you use for editing your images, Camera Raw or Photoshop? The simple answer is - both! Think of Camera Raw as an image developer, while Photoshop is an image editor. First, we open the image in Camera Raw for initial developing, much like we'd process a film negative in a darkroom. Then, once we've processed the image and it's looking good, we can open it in Photoshop for further editing and refinement.
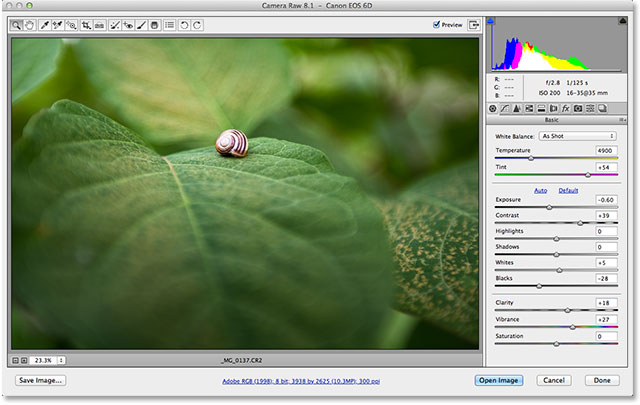
In a Camera Raw/Photoshop workflow, Camera Raw is where we do all of our initial processing work - setting the overall white balance, exposure, contrast, and color saturation, adding some initial sharpening, reducing noise, and more. In general, you can think of our work in Camera Raw as global edits. That is, edits that affect the entire image as a whole. Once we have the overall image looking the way we want, we can then move on to Photoshop for more specific local edits which is where Photoshop excels. As we'll see in other tutorials, it's certainly possible to do some local edits using the tools in Camera Raw, but in general, Camera Raw is all about making the initial overall image look good. Of course, it's also possible to do global edits in Photoshop using features like Levels and Curves. So what makes Camera Raw so special?
Streamlined For Image Editing
Photoshop has become so big and powerful over the years that what started out initially as a program for editing photos is now used not only in the world of photography but also in practically every creative field imaginable, including graphic and multimedia design, video editing, 3D rendering, even medical research! You could almost (almost) argue that Photoshop is now overkill for editing images, not because it can't do everything you need but because, as a photographer, it can also do a whole lot more than you'll ever need. For a photographer who's new to Photoshop, all these extra abilities can be confusing. They make learning the program more difficult and time consuming than it needs to be, and with no clear indication of where to begin once an image is open on the screen, you can easily be left wondering, "Now what? Where the heck do I start?"
Camera Raw solves this problem. Even though it's a plug-in running in Photoshop (or in Adobe Bridge - more on that in another tutorial), it looks like a completely separate program, a program that was built with photographers in mind and streamlined for photo editing. It's organized in a logical format and structure that follows a standard image editing workflow, so there's no guesswork needed on where to begin. Like Photoshop, it uses tools and panels to help you develop and process your images, but they're presented in a simple, intuitive, easy to understand layout. And unlike Photoshop, Camera Raw isn't cluttered with features that as a photographer, you'll never need. So that's advantage #1. For photographers, Camera Raw is just easier to use.

Non-Destructive, Flexible Image Editing
Photoshop itself is what's known as a pixel-based editor. What this means is that as we work on a photo, Photoshop makes changes to its pixels. This is called destructive editing because it alters the original image information. The opposite of pixel-based editing is parametric editing, and Camera Raw is a parametric image editor. Parametric editing is non-destructive because it uses nothing more than a series of instructions (called metadata) to tell the software application how to display the image on the screen. As we process and develop an image in Camera Raw, it records and saves all of our settings as a list of instructions (basically, it takes notes) and what we see on the screen isn't really the edited image. Rather, it's a live preview of how the image looks based on the current instructions. If we move a slider or change an option in one of the panels, or use one of Camera Raw's tools to alter the image in any way, Camera Raw simply updates the instructions as well as the live preview, so we can see how our changes are affecting the image without actually applying the changes to the image!
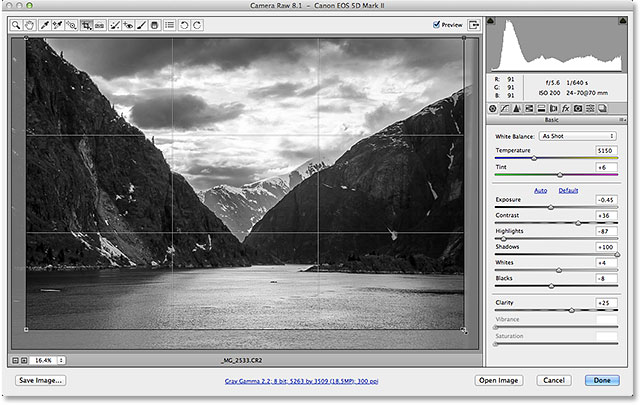
The important thing to understand is that with Camera Raw, the original photo and the instructions on how to process the photo are two completely separate things. No changes are ever made to the original image data. All we're doing is saying to Camera Raw, "Show me what the photo would look like if I increased the exposure, or boosted the color saturation, or converted the image to black and white. How would it look if I cropped the image as an 8x10? What about a 4x6 or a 5x7? Can I get away with a little more sharpening? What if I add a vignette effect?" We give Camera Raw instructions on how to display the image using its tools and panels, and we can change these instructions as many times as we want with absolutely no loss of image quality. In fact, no matter how much processing we've done, we can revert back to the original photo at any time simply by clearing the instructions and starting over!
Of course, there are ways to work in Photoshop that are non-destructive, like duplicating an image, using layers, adjustments layers, Smart Objects, and more. But Camera Raw is non-destructive by nature, so there's no need to worry about it. It's only when we go to open the image in Photoshop for further editing, or we save the image out as a JPEG or other file type, that our Camera Raw instructions are actually applied to the pixels in the image. Until then, Camera Raw's non-destructive editing ability gives us all the freedom and flexibility we need to make our photos look their very best.
Easily Edit Multiple Images At Once
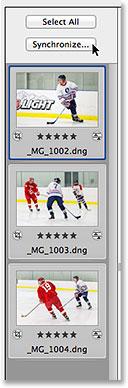
Another big advantage with Camera Raw is that you can easily edit multiple images at once, something that's not possible with Photoshop. If you've taken multiple shots of the same subject, or in the same location, all under similar conditions, you can easily select the images in Adobe Bridge, open them all at once in Camera Raw, then after processing one photo, you can instantly sync all of your settings with the other images, saving you lots of time and effort!
Additionally, you can copy and paste Camera Raw settings from one image to another directly from within Adobe Bridge. You can apply the settings from the previous image to your new image, and you can even save your settings from one image as a preset which can then be applied to other images without having to redo any of the work!
Camera Raw - A Faster Way To Work
When you combine all these advantages together - that Camera Raw is streamlined for photo editing, that it's completely non-destructive, and that you can edit two or more images at the same time - you come up with an undeniable fact. Camera Raw is just plain faster than Photoshop. The intuitive, logical way its tools and panels are presented allow Camera Raw to feel almost second nature, and because it's a parametric editor, using nothing more than instructions to display a live preview of the image, there's no render time! Every change we make with a tool or panel happens instantly for us on the screen. Add in the ability to sync, or copy and paste, settings from one image to another (or many others!), as well as options for saving images as JPEGs or other file types directly from Camera Raw itself, and you have a powerful, highly efficient and easy to use image editing application, whether you're working with raw files, JPEGs or TIFFs - an application that would be worth every penny if it wasn't absolutely free as part of Photoshop!
To quickly sum things up, the question about Camera Raw and Photoshop isn't which one you should use, but rather, which order to use them in. Camera Raw isn't out to compete with Photoshop and doesn't replace it. Both have their strengths and knowing when to use each one is the key to an efficient workflow. Camera Raw should be your starting point, your digital darkroom. It's where all of the initial developing and processing of the image takes place. Then, once we've done everything we can to the image as a whole in Camera Raw, we move it from the darkroom into our main image editor, Photoshop itself.
And there have it! Check out our Photo Retouching section for more Photoshop image editing tutorials!