
Difference Between Image Resizing and Resampling in Photoshop
When changing the size of an image in Photoshop, there's really two ways to go about it. You can either resize the image, or you can resample it. A lot of people use the terms resizing and resampling as if they mean the same thing, but they don't. There's an important difference between the two.
As we'll see in this tutorial, the difference, as important as it is, is controlled by nothing more than a single checkbox option at the bottom of the Image Size dialog box.
As I just mentioned, the choice of resizing or resampling your image is handled by the Image Size dialog box, which can be found under the Image menu at the top of the screen. The difference between resizing and resampling has to do with whether or not you're changing the number of pixels in the image, or as Photoshop calls it, changing the pixel dimensions of the image. If you're keeping the number of pixels in the image the same and simply changing the size at which the image will print, or in Photoshop terminology, changing the document size of the image, that's known as resizing. If, on the other hand, you are physically changing the number of pixels in the image, that's called resampling.
Again, just to make sure we're on the same page so far:
- Image Resizing: Changing the size the image will print without changing the number of pixels in the image.
- Image Resampling: Changing the number of pixels in the image.
See? You already know enough so that the next time someone refers to changing the number of pixels in the image as resizing the image, you can look them proudly in the eyes and say, "I think what you really meant to say there, Bob, is that you're going to be resampling the image, not resizing it." Assuming, of course, that the person's name is Bob. And assuming you don't want Bob to like you much anymore because you think you know it all.
Let's look more closely at the difference between resizing and resampling.
Resizing vs Resizing An Image
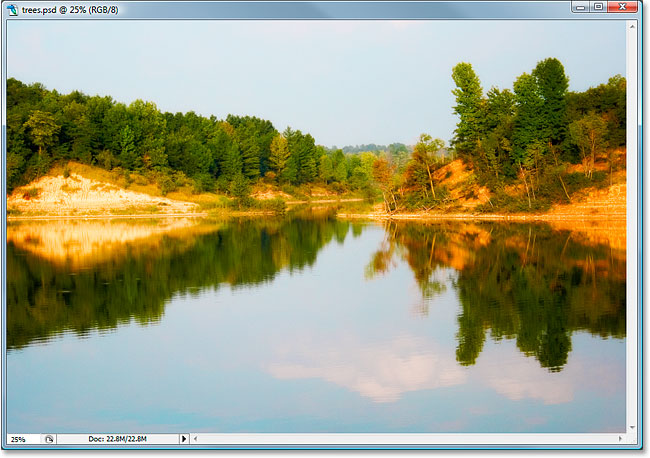
First, we need a photo. This one will work nicely:
Let’s look at what the Image Size dialog box is telling us about this image. To access it, I’ll go up to the Image menu at the top of the screen and choose Image Size:
As mentioned previously in the "Image Resolution" and "Image Resizing" sections, Photoshop's Image Size dialog box is divided up into two main sections - the Pixel Dimensions section on top, and the Document Size section below it. The Pixel Dimensions section tells us the width and height of our image in pixels, and also tells us the file size of our image. The Document Size section tells us how large or small our image is going to print based on the image resolution, which we also set in the Document Size section. You can think of the Pixel Dimensions section as the section you'd want to change if you were working on an image for the web or simply to display on your computer screen, while the Document Size section is used when you need to control how large your image will print.
So, generally speaking:
- Pixel Dimensions = web
- Document Size = print
Let's take a look at the Pixel Dimensions part of the Image Size dialog box to see exactly how large our image is, in pixels.
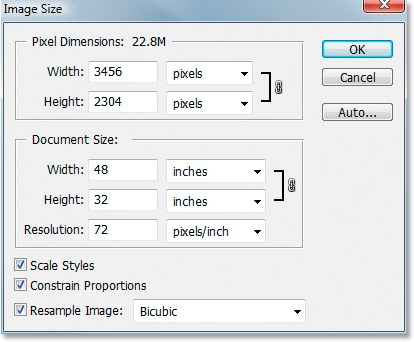
We can see here that the photo is quite large, with a width of 3456 pixels and a height of 2304 pixels. That's a combined total of nearly 8 million pixels (the camera used was an 8MP camera, hence the 8 million pixels in the photo), which gives us lots of image information to work with in Photoshop.
Now let's look at the Document Size section:

The Document Size section is showing us what the current print resolution of the image is, which in this case is 72 pixels per inch, and it's showing us how large the image will print at that resolution, which at 72 pixels per inch will give us an image that's 48 inches wide by 32 inches high. If you've read the section on how print resolution affects image quality, you'll know that even though we'd be getting a very large image when we print the photo, a resolution of only 72 pixels per inch is simply not high enough to give us anywhere near professional image quality with our prints. For that, we'd have to change the resolution to at least 240 pixels per inch, while 300 pixels per inch is considered the professional print standard.
Before we go any further, there's three more options in the Image Size dialog box below the Document Size section:
- Scale Styles
- Constrain Proportions
- Resample Image

The first one, Scale Styles, has to do with Layer Styles and how they're affected by resizing or resampling the image. We'll ignore that option since it has nothing to do with this topic. The second option, Constrain Proportions, which is enabled by default, links the width and height of the image together so that if you make a change to the width of the image, for example, Photoshop will automatically change the height, and vice versa, so that the proportions of the image remain the same and don't get distorted. This is normally what you want, but if for some reason you want to be able to change the width and height independently of each other, simply uncheck the Constrain Proportions checkbox.
The All-Important 'Resample Image' Option
Finally, we come to one of the most important options in the Image Size dialog box, Resample Image. Remember at the beginning of this tutorial when I said that the difference between resizing and resampling an image is controlled by nothing more than a single checkbox option? This is it! This is the option that determines whether we're resizing our image or resampling it. Again, resizing keeps the pixel dimensions (the number of pixels in the image) the same and simply changes the size at which the image will print, while resampling physically changes the number of pixels in the image. By default, the Resample Image option is checked, which means that the Image Size dialog box is now essentially the Image Resample dialog box, even though it still just says "Image Size" at the top.
To better understand the difference between what we'll call the "Image Resize" version and the "Image Resample" version of the Image Size dialog box, here's a screenshot of what the Image Size dialog box looks like with the "Resample Image" option checked, and below it is an screenshot of what Image Size looks like with "Resample Image" unchecked:
First, with the "Resample Image" option checked, as it is by default:

And here it is with "Resample Image" unchecked:

Can you spot the difference? With "Resample Image" unchecked, if you look up at the Pixel Dimensions section of the dialog box, you'll see that while Photoshop is still telling us how many pixels are in the image for the width and height, we're no longer able to change those numbers. They're listed for information only, and all we can do at this point is change how large our image will print using the Document Size section. With "Resample Image" checked though, the pixel dimensions are shown inside white input boxes which we can click inside of and type in new values, effectively changing how many pixels are in our image.
Also notice that the Scale Styles and Constrain Proportions options at the bottom of the Image Size dialog box are grayed out when Resample Image is not checked:

Scale Styles is grayed out because it's only a concern when the number of pixels in an image is being changed. Since we don't have the ability to change the number of pixels in the image with Resample Image unchecked, the Scale Styles option is of no concern to us or to Photoshop.
Constrain Proportions is grayed out when Resample Image is unchecked because we can no longer physically change the number of pixels in the image, therefore the proportions of the image are fixed. If the image is 20 pixels wide and 10 pixels tall, then no matter how large or small we print it, the width will always be twice the size of the height. If you change the width value in the Document Size section, both the height and the resolution values will also change. Change the height value and the width and resolution values will change. Change the resolution value, and you guessed it, the width and height values will change. All we can do now is change how large or small the image will print, either by entering new values for the document size or by changing the resolution. Again, just as with the Scale Styles option, the Constrain Proportions option is of no concern to us or to Photoshop when all we're doing is resizing the print size of the image.
Image Interpolation Options When Resampling Images
Finally, there's one more option that's grayed out with Resample Image unchecked, and that's the drop-down box to the right of the Resample Image option:

This drop down box is where you can select from Photoshop's "interpolation algorithms". That's a fancy phrase for what essentially means how Photoshop handles throwing away pixels when you resample the image to a smaller size, and how it handles adding pixels when you resample the image to a larger size. As of Photoshop CS2, there's three main options to choose from - Bicubic, Bicubic Sharper and Bicubic Smoother, and knowing when to use which option can make a big difference with image quality. We'll look at the differences between them in detail in another tutorial, but for now, here's the general rule:
- Bicubic Sharper: Use this option when resampling your image smaller for best image quality
- Bicubic Smoother: Use this option when resampling your image larger for best image quality
- Bicubic: Not really used much now that Bicubic Sharper and Bicubic Smoother are available
Again, these options are grayed out here because they only apply to images that are being resampled. If all you're doing is changing how large or small the image will print on paper, these options don't apply.
Summary
- Image resizing keeps the number of pixels in your image the same and affects only how large your image will print (the Document Size).
- Image resampling physically changes the number of pixels in your image (the Pixel Dimensions).
- The Resample Image option at the bottom of the Image Size dialog box controls whether you're resizing or resampling an image.
- With Resample Image checked, you're resampling the image. With it unchecked, you're simply resizing the image.
- Resampling images by changing the width and height values in the Pixel Dimensions section of the Image Size dialog box is primarily used when optimizing images for the web.
- Resizing images by changing the width, height and/or resolution values in the Document Size section of the Image Size dialog box is used for print.
And there we have it!