
The New And Improved Image Size Dialog Box In Photoshop CC
In this series of tutorials, we'll learn how to resize images in Photoshop CC (Creative Cloud). We'll start here with a quick overview of Photoshop CC's newly redesigned Image Size dialog box, a welcome improvement over previous versions. Then, in the next tutorials, we'll learn how to both resize and resample images, as well as the important difference between the two.
We'll also look at Photoshop CC's image interpolation options, including a brand new one designed to keep our images looking crisp and sharp when we enlarge them, something previous versions of Photoshop have really struggled with.
Again, this tutorial, as well as the others in this series, are for Photoshop CC which requires a subscription to the Adobe Creative Cloud. If you're using Photoshop CS6 or earlier, you'll want to read our original How To Resize Images In Photoshop tutorial, as well as the other image resizing tutorials found in our Digital Photo Essentials section.
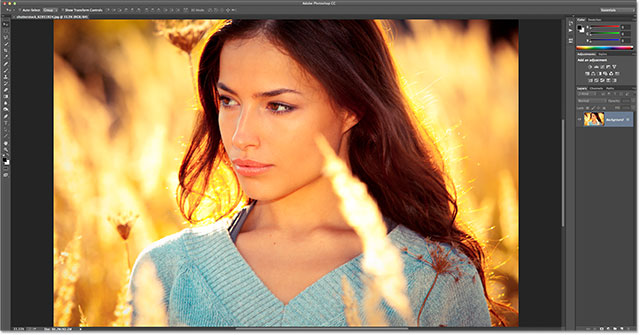
Here's an image I currently have open on my screen (woman in autumn field photo from Shutterstock):
Opening The Image Size Dialog Box
To resize images in Photoshop CC, just like in earlier versions of Photoshop, we use the Image Size dialog box which we can get to by going up to the Image menu in the Menu Bar along the top of the screen and choosing Image Size. We can also access the Image Size dialog box directly from the keyboard by pressing Ctrl+Alt+I (Win) / Command+Option+I (Mac):

The Preview Window
This opens the Image Size dialog box which has been streamlined and improved in Photoshop CC. The biggest change from previous versions is that we now have a preview window on the left where we can see a live preview of what the image will look like based on the settings we've chosen. The settings themselves are located along the right:
Moving The Image Inside The Preview Window
Notice that my preview window is currently centered on an area of the image that isn't very useful as far as previews go. You can move the image around inside the preview window by clicking inside it, keeping your mouse button held down, and dragging the image with your mouse:

We can also jump to a new area of the image in the preview window by clicking on the image itself (in the document window). As you move your mouse over the image, you'll see that your cursor looks like a small square which represents the preview window. Click on the image, and the spot you clicked on becomes centered in the preview window:

Zooming In And Out Of The Preview Window
By default, the preview window shows us the image at the 100% zoom level, but if you move your mouse cursor over the preview window, zoom options will appear in a bar long the bottom. Press the plus icon ( + ) to zoom further into the image or the minus icon ( - ) to zoom out. The current zoom level is displayed in the center of the bar. There's also a handy keyboard shortcut for zooming in and out. Press and hold your Ctrl (Win) / Command (Mac) key and click with your mouse inside the preview window to zoom in, or the Alt (Win) / Option (Mac) key and click to zoom out:

Resizing The Preview Window
Finally, we can make the preview window itself even larger by making the entire Image Size dialog box larger. Move your mouse cursor over any of the four corners of the dialog box, then click and with your mouse button held down, drag the corner outward. The larger you make the dialog box, the larger the preview window becomes. Here, I'm dragging the bottom right corner of the dialog box, allowing me to see much more of the image in the preview window:

The Current File Size And Dimensions
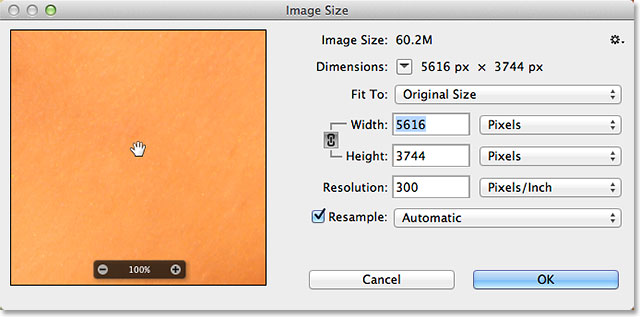
To the right of the preview window is where we find the various controls and options for resizing our images, as well as some general information about the image. At the very top is where we find its current file size and dimensions. Image Size shows us the size of the image in megabytes (which is what the "M" stands for). Dimensions shows us the current dimensions of the image in pixels (px):

By default, the dimensions of the image are displayed in pixels, but if we click on the box with the down-pointing arrow in it:

A menu with additional measurement types appears, like Percent, Inches, and so on. In most cases, you'll want to leave this set to Pixels:

Selecting Preset Image Sizes
Directly below the Image Size and Dimensions information is an option called Fit To, which by default is set to Original Size:

If we click on the words Original Size, a menu appears with various preset image sizes and resolutions we can choose from. Some of the presets are designed for print, others for the web (or on-screen viewing in general). There's also options for saving and loading our own presets. There's some potential problems and pitfalls you can run into when choosing preset image sizes, though, like the fact that some presets have different aspect ratios than others, so we'll look more closely at this option in another tutorial:

The Image Resizing Options
Below the Fit To option, we find three very important options - Width, Height and Resolution - that together make up the main image resizing section of the dialog box:

We can enter new values into the Width and Height boxes. When we change the value in one of them, Photoshop automatically changes the other to preserve the original aspect ratio of the image. By default, the measurement type for both the Width and Height is set to Inches, but if you click on the measurement type selection box for either option, a menu will appear with other measurement types to choose from. Notice that at the moment, the Pixels type is grayed out and unavailable. We'll learn why that is in another tutorial when we look at the difference between resizing and resampling an image:

The Resolution option works the same way. We can enter a new value, and we can click on the measurement type selection box to choose between either Pixels/Inch (the default) or Pixels/Centimeter. Pixels/Inch is the standard measurement type for image resolution and there's usually no reason to change it:

I'll cover everything you need to know about image resizing in the next tutorial, but briefly, the term resizing simply means changing the size at which the image will print, without changing the actual number of pixels in the image. For example, currently the Dimensions section at the top of the dialog box is showing that my image has pixel dimensions of 5616 x 3744. At the current resolution of 300 pixels/inch, this image will print at a width of 18.72 inches and a height of 12.48 inches. That's because we'll be fitting 300 of the image's pixels from top to bottom and 300 pixels from left to right inside every inch of paper:

If I increase the resolution from 300 to, say, 360 pixels/inch, we see that the image still has the same pixel dimensions (5616 x 3744), but because we're now packing more of those pixels (360 as opposed to 300) from top to bottom and from left to right inside every inch of paper, the image will now print at a smaller size (15.6 inches wide by 10.4 inches tall). Again, this is just a brief overview of image resizing. We'll cover it in more detail in the next tutorial:

The Resample Option
Below the Resolution option is the Resample option which can be enabled or disabled by clicking inside its checkbox. Up until now, it's been disabled, so I'll go ahead and enable it:

The Resample option changes the behavior of the Image Size dialog box. The term resampling means changing the actual number of pixels in the image, not just its print size, to make the image itself larger or smaller. With this option enabled, the Width and Height options can now display the width and height of the image in pixels (unlike earlier when the pixels measurement type was unavailable):
We can now change the actual number of pixels in the image by entering new values into the Width and Height boxes. By default, Photoshop again keeps the original aspect ratio the same, so if I enter a new value of, say, 2000 pixels for the width, Photoshop automatically changes the height to 1333 pixels to match the original ratio. If we look up at the top of the dialog box, we see that the Dimensions section is also showing my new image size of 2000 px x 1333 px, and above it, the Image Size section is telling me that the file size, in megabytes, has dropped from its original 60.2M down to just 7.63M:

The Constrain Proportions Option
Also with the Resample option enabled, you'll find a clickable link icon between the Width and Height options. This is the Constrain Proportions option, and it's enabled by default. This is what tells Photoshop to keep the original aspect ratio of the image intact by automatically entering the correct height value when we change the width (or vice versa). In most cases, you'll want to keep this option enabled, but disabling it will allow you to enter separate values for both the width and height at the risk of changing the aspect ratio and distorting the look and shape of the image:

The Image Interpolation Options
Another very important option that only becomes available with the Resample option enabled is Image Interpolation, which refers to the method Photoshop uses for adding or removing pixels in the image. The interpolation method we select can have a dramatic impact on the quality and appearance of your image after it's been downsampled (made smaller) or upsampled (made larger).
The interpolation option is located directly to the right of the Resample option. It doesn't actually say "Image Interpolation" anywhere, but it's the option that, by default, is set to Automatic:

Clicking on the word Automatic will open a list of interpolation methods to choose from, including a brand new one in Photoshop CC, Preserve Details, designed to keep our images looking crisp and sharp when enlarging them. In fact, if we leave the interpolation option set to Automatic, Photoshop will automatically select Preserve Details when it detects that we're enlarging the image. When downsampling (reducing) the size of an image, the Automatic option will choose Bicubic Sharper for the best results. The preview window will update to show you what the image will look like as you select different interpolation methods. We'll look at these options in more detail in the full image resampling tutorial, but for now, leaving this option set to Automatic is a safe choice:

The Scale Styles Option
If you're using any layer effects (styles) in your document, like drop shadows, strokes, bevel and emboss, and so on, you'll most likely want the effects to scale in size along with the image. Click the small gear icon in the top right corner of the Image Size dialog box:
This will display the Scale Styles option which can be clicked on to enable or disable it. A checkmark to the left of the option means it's currently enabled:

OK, Cancel And Reset
When you're ready to resize or resample your image, click the OK button in the bottom right corner to close out of the dialog box, at which point Photoshop goes ahead and resizes, upsamples or downsamples the image. To simply cancel out of the Image Size dialog box without making any changes to the image, click the Cancel button:

To reset the Image Size dialog box back to its original settings, press and hold the Alt (Win) / Option (Mac) key on your keyboard. This will change the Cancel button into the Reset button. Click the Reset button to reset the dialog box:

And there we have it! That's a quick tour of the newly redesigned Image Size dialog box in Photoshop CC (Creative Cloud)!