Photoshop Blend Modes Tips and Tricks
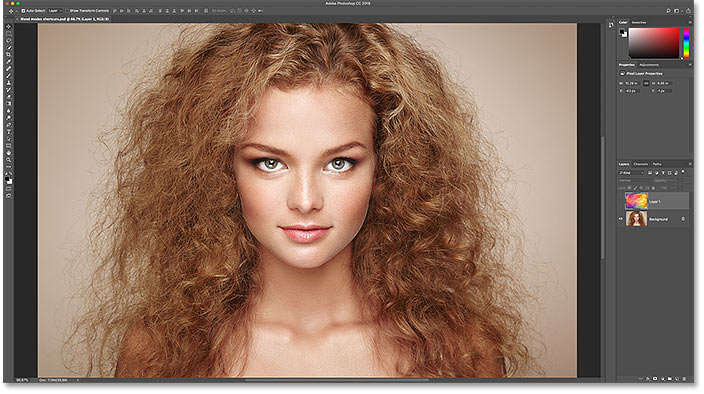
In this tutorial, you'll learn time-saving tips and tricks for working with layer blend modes in Photoshop! I'll show you how to easily scroll through the blend modes to see how each one affects your image, how to instantly jump to the exact blend mode you need, and even how to adjust the intensity of a blend mode, all directly from your keyboard! We'll cover every blend mode shortcut you need to know to speed up your workflow, and I'll even include a tip to make memorizing those shortcuts a whole lot easier.
I'll be using Photoshop CC but any recent version will work. Let's get started!
What we'll be learning
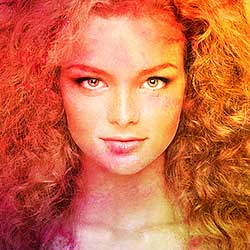
To help us learn the tips and tricks, I'll use Photoshop to blend a texture with an image. Here's the image I'll be using. I downloaded this one from Adobe Stock:
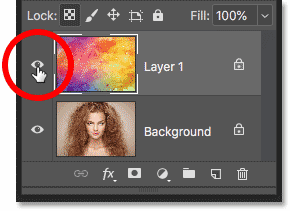
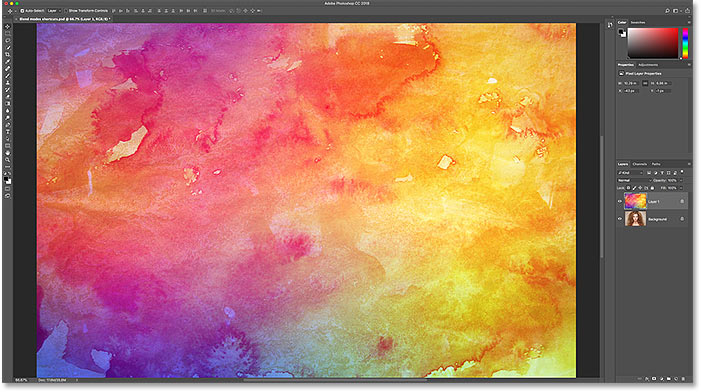
And if we look in my Layers panel, we see that I also have a texture on a layer above it. I cover how to move images into the same document in a separate tutorial, so I'll turn the top layer on by clicking its visibility icon:
And here's my texture, also from Adobe Stock:
Where to find the layer blend modes
Photoshop's blend modes are all found in the upper left of the Layers panel, and the default blend mode is Normal:

If you click on the Blend Mode option, you'll find lots of other blend modes to choose from. As of Photoshop CC, there's 27 blend modes in total:

Layer blend modes vs tool blend modes in Photoshop
Before we go any further, it's important to know the difference between a layer blend mode and a tool blend mode, and I'll tell you why in a moment. Layer blend modes are all found in the Layers panel, and they control how a layer blends with the layers below it. But some of Photoshop's tools also include their own blend modes. Most of the brush tools and the painting tools have their own separate blend modes that affect the tool itself and are completely separate from the layer blend modes in the Layers panel.
If I choose the Brush Tool from the Toolbar:

We see in the Options Bar that it has its own Blend Mode option with its own modes to choose from. They may look the same as the blend modes in the Layers panel, but they're not. These blend modes affect the appearance of your brush strokes. They have no effect on any layers:

And it's not just the Brush Tool that has its own blend modes. Other brush-related tools, like the Spot Healing Brush, the Clone Stamp Tool, and the Eraser Tool, all have their own blend modes. And so does the Gradient Tool and even the Paint Bucket Tool. In fact, most of the brush and painting tools have them:

The reason you need to know this is that if you have one of these tools selected, you may accidentally select the tool's blend mode when you really meant to select a layer blend mode. So to use the shortcuts we're about to learn to switch between layer blend modes, first make sure you have a tool selected that doesn't have its own blend modes. The Move Tool works great, and so do any of Photoshop's selection tools. I'll grab the Move Tool from the Toolbar, which you can also select by pressing the letter V:

How to scroll through layer blend modes
Let's look at how to quickly scroll through the layer blend modes to see the effect that each one has on our image.
To usual (slow) way to try blend modes in Photoshop
The way most people try out blend modes is that they click on the Blend Mode option in the Layers panel:

Then they choose a random blend mode from the list:

And then see what they get:

If they like it, great. If not, they click on the Blend Mode option again and choose a different blend mode:

And see if they like this result better:

Then they do the same thing again, choosing another random blend mode from the list:

And comparing the results:

How to scroll through layer blend modes from your keyboard
While that's one way to work, there's a faster way, and that's by scrolling through the blend modes from your keyboard. I'll set my blend mode back to Normal:

Then, to scroll forward through the blend modes, press and hold the Shift key on your keyboard and tap the plus sign (+) repeatedly. Once you've moved through all 27 blend modes, you'll return to the Normal blend mode. To scroll backwards through the list, keep your Shift key held down and tap the minus key (-) instead.
How to select blend modes from your keyboard
Scrolling through the blend modes is great when you're not sure which blend mode you need and just want to experiment. But if you do know which one you need, you can jump straight to it from your keyboard. Photoshop includes keyboard shortcuts for nearly all of its blend modes.
To select a blend mode from your keyboard, press and hold your Shift key, along with your Alt (Win) / Option (Mac) key, and then press the letter that's associated with the blend mode.
For example, the first blend mode I chose earlier was Multiply. To select the Multiply blend mode from your keyboard, hold Shift+Alt (Win) / Shift+Option (Mac) and press the letter M. The second one I chose was Screen, which you can jump to by holding Shift+Alt (Win) / Shift+Option (Mac) and pressing S. To jump to the Overlay blend mode, hold Shift+Alt (Win) / Shift+Option (Mac) and tap O.
Photoshop's layer blend mode shortcuts - Complete list
Here's the complete list of keyboard shortcuts for Photoshop's layer blend modes. They all share the same two keys at the beginning, either Shift+Alt on a Windows PC or Shift+Option on a Mac. The only difference between them is the specific letter at the end. Some letters are obvious, like "N" for Normal, "M" for Multiply, and "S" for Screen, while others, like "G" for Lighten or "J" for Linear Light, you'll just remember over time:
| Blend Mode | Keyboard Shortcut (Alt = Win, Option = Mac) |
| Normal | Shift + Alt / Option + N |
| Dissolve | Shift + Alt / Option + I |
| Darken | Shift + Alt / Option + K |
| Multiply | Shift + Alt / Option + M |
| Color Burn | Shift + Alt / Option + B |
| Linear Burn | Shift + Alt / Option + A |
| Lighten | Shift + Alt / Option + G |
| Screen | Shift + Alt / Option + S |
| Color Dodge | Shift + Alt / Option + D |
| Linear Dodge | Shift + Alt / Option + W |
| Overlay | Shift + Alt / Option + O |
| Soft Light | Shift + Alt / Option + F |
| Hard Light | Shift + Alt / Option + H |
| Vivid Light | Shift + Alt / Option + V |
| Linear Light | Shift + Alt / Option + J |
| Pin Light | Shift + Alt / Option + Z |
| Hard Mix | Shift + Alt / Option + L |
| Difference | Shift + Alt / Option + E |
| Exclusion | Shift + Alt / Option + X |
| Hue | Shift + Alt / Option + U |
| Saturation | Shift + Alt / Option + T |
| Color | Shift + Alt / Option + C |
| Luminosity | Shift + Alt / Option + Y |
The blend modes that are missing shortcuts
Out of Photoshop's 27 blend modes, only 4 of them are missing shortcuts, and those are Darker Color, Lighter Color, Subtract, and Divide. You'll rarely, if ever, use these ones, but if you do need them, you'll have to select them from the Layers panel:

How to avoid memorizing every blend mode shortcut
Here's a tip to make memorizing the shortcuts easier. Even though there's 23 shortcuts in total, you really only need to memorize a few of them; one from each of the blend mode groups.
The Darken blend modes
For example, let's say you want to use one of Photoshop's darkening blend modes, which include Darken, Multiply, Color Burn, Linear Burn, and Darker Color. To avoid memorizing the shortcut for each one, just memorize the main one, which is Shift+Alt+M (Win) / Shift+Option+M (Mac) for Multiply. Then, use the other shortcut we learned earlier, which is to hold Shift and tap the plus or minus key, to move up or down through the others in the group:

The Lighten blend modes
The same is true for the other groups as well. To try out the different lighten modes (Lighten, Screen, Color Dodge, Linear Dodge (Add), and Lighter Color), just press Shift+Alt+S (Win) / Shift+Option+S (Mac) to jump to the Screen blend mode. Then hold Shift and use the plus or minus key to scroll through the others:

The Contrast blend modes
For the contrast group (Overlay, Soft Light, Hard Light, Vivid Light, Linear Light, Pin Light, and Hard Mix), press Shift+Alt+O (Win) / Shift+Option+O (Mac) to jump to Overlay, and then scroll through the list:

The Color blend modes
And for the color blend modes (Hue, Saturation, Color, and Luminosity), press Shift+Alt+C (Win) / Shift+Option+C (Mac) to jump to the main one, Color, and then scroll to the one you need:

To learn more about Photoshop's five main blend modes (Multiply, Screen, Overlay, Color, and Luminosity), see my Top 5 Blend Modes You Need To Know tutorial.
How to adjust the intensity of a blend mode
Finally, if you like the overall look of a blend mode but the effect is too strong, you can adjust the intensity directly from your keyboard. For example, I'll jump to the Linear Light blend mode by pressing Shift+Alt+J (Win) / Shift+Option+J (Mac):

I like the colors, but the overall effect is a bit too much:

Lowering the layer opacity from your keyboard
To reduce the intensity of a blend mode, all we need to do is lower the opacity of the layer itself. You can do that from the Opacity option in the Layers panel, but you can also adjust it directly from your keyboard.
Just press a number from 1 to 9 to jump the opacity value between 10% and 90%. For example, I can lower the opacity to 50% by pressing 5 on my keyboard. Or, for a more specific value, like 55%, press the two numbers quickly:

And here's the result with the opacity lowered:

I'll switch to a different blend mode, like Screen, by pressing Shift+Alt+S (Win) / Shift+Option+S (Mac). And then, to restore the opacity back to 100%, press 0 on your keyboard:

And there we have it! That's some time-saving tips you can use with layer blend modes in Photoshop! For more about blend modes, learn how to blend images like a movie poster, how to blend text into backgrounds, or even how to merge blend modes in Photoshop! Or visit our Photoshop Basics section for more tutorials!