
Add Realistic Water Drops To A Photo With Photoshop
In this Photoshop Effects tutorial, we're going to learn how to easily add realistic looking water drops to a photo, as if someone splashed water all over the image. We're going to be using a few filters and adjustments to create some random water drop shapes, and then we'll be making them look like water using a few simple layer styles to add shadows and highlights to them.
To finish things off and add an extra bit of realism, we'll be using a displacement map to distort the image underneath the water drops. It may sound complicated but it's all very easy, as we'll see.
Here's the original image I'll be working with:

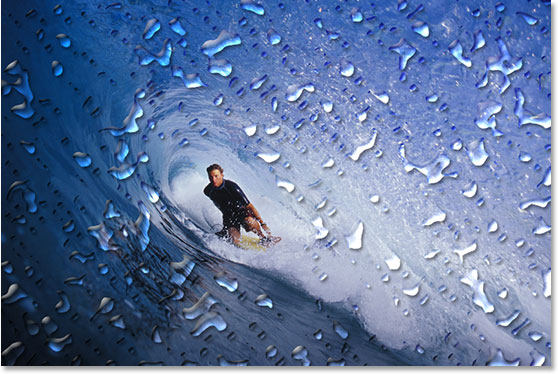
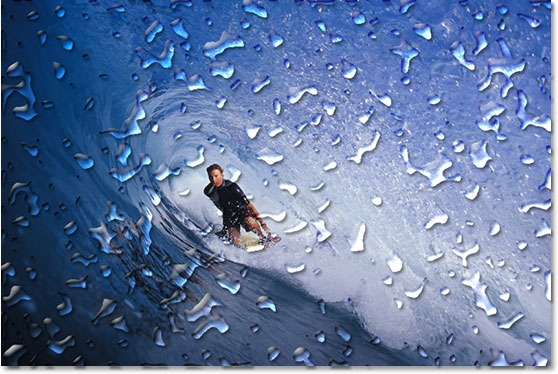
And here's what the image will look like after adding the water drops:
This tutorial is from our Photo Effects series. Let's get started!
Step 1: Duplicate The Background Layer
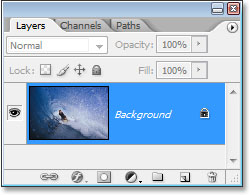
We're going to start off this tutorial in the same way we begin many of our tutorials, by duplicating our Background layer. With the image open in Photoshop, we can see in the Layers palette that we currently have just one layer, the Background layer, which contains the original image:
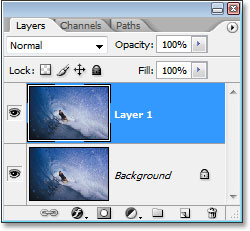
We need to duplicate the Background layer, and to do that, we can use the keyboard shortcut Ctrl+J (Win) / Command+J (Mac). If we look back in the Layers palette, we can see that we now have two copies of the image, with the copy of the Background layer (which Photoshop has named "Layer 1") above the original:
Step 2: Add A New Blank Layer Above The Duplicate Layer
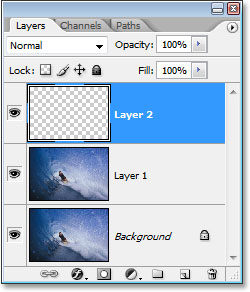
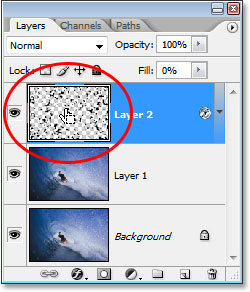
Next, we need to add a new blank layer above our newly-created duplicate layer. Let's use the keyboard shortcut for that as well, which is Shift+Ctrl+Alt+N (Win) / Shift+Command+Option+N (Mac). By adding the Alt/Option key in there, that tells Photoshop not to bother popping up the dialog box asking us to name the layer and to just go ahead and add it, giving it the default name of "Layer 2" instead and placing it at the top of the Layers palette:
Step 3: Fill The New Layer With White
We're going to fill our new layer with white, so press the letter D on your keyboard to quickly reset your Foreground and Background colors if neccessary, so white becomes your Background color. Then, with "Layer 2" selected in the Layers palette (the currently selected layer is the one highlighted), press Ctrl+Backspace (Win) / Command+Delete (Mac) to fill the new layer with the Background color, which in our case is white. Your image will now be completely filled with white:
Step 4: Apply The "Add Noise" Filter
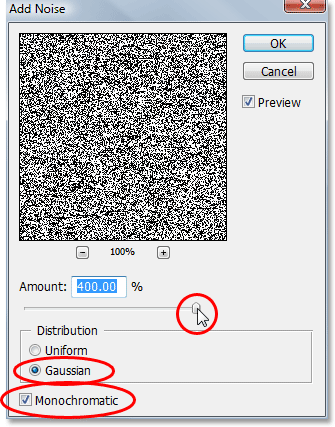
With our layer now filled with white, we need to add some noise to it. Go up to the Filter menu at the top of the screen, select Noise, and then select Add Noise, which brings up Photoshop's "Add Noise" dialog box. Drag the Amount slider all the way to the right, and make sure that both the Gaussian and Monochromatic options at the bottom are selected:
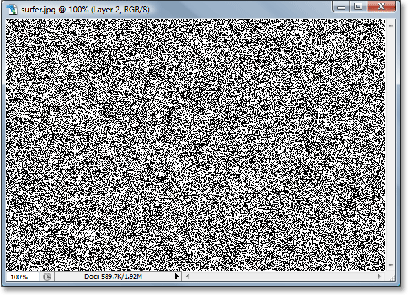
Click OK to exit out of the dialog box. Your image will now be filled with black noise:
Step 5: Apply The "Gaussian Blur" Filter
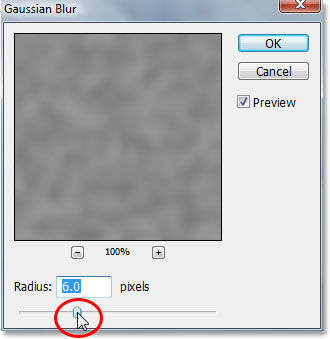
Go back up to the Filter menu and this time choose Blur and then Gaussian Blur, which brings up the "Gaussian Blur" filter dialog box. Drag the Radius slider to the right to increase the amount of blurring that's applied to the noise until all you see is larger clumps of dark and light gray. I'm using a low resolution image for this tutorial, and for me, a value of about 6 pixels seems to work nicely. For high resolution images, you'll need to set your Radius value higher to achieve the same effect:
Here's the effect you're trying to achieve:

Click OK to exit out of the Gaussian Blur dialog box.
Step 6: Apply A "Threshold" Image Adjustment
Go up to the Image menu at the top of the screen, choose Adjustments, and then choose Threshold, which brings up the "Threshold" dialog box. The Threshold adjustment turns everything in the image either black or white, and we're going to use it to create the basic shapes of our water drops. Click on the slider at the bottom of the Threshold dialog box and drag it either left or right to decrease or increase the size and number of black areas in the image. These black areas will become our water drops. Dragging the slider to the right increases the size and number of black areas, and dragging to the left decreases them:
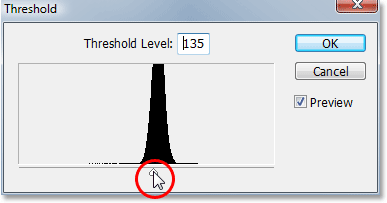
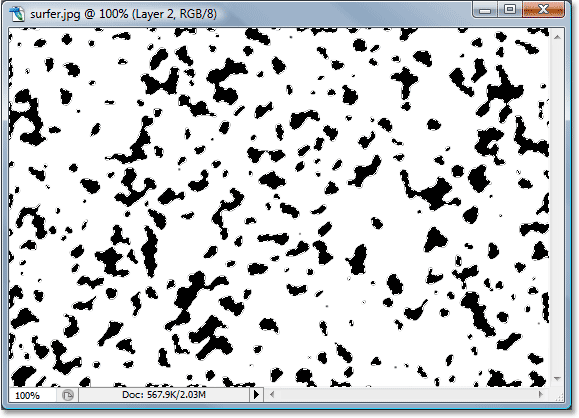
It's completely up to you how many water drops you want in your image. When you're happy with how it looks, click OK to exit out of the dialog box. Here's my image after applying the Threshold adjustment:

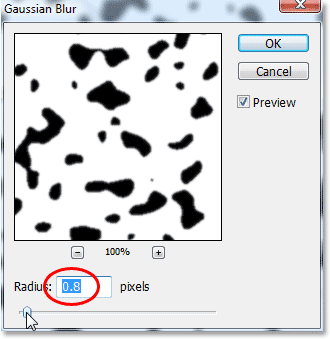
Step 7: Apply A Slight Gaussian Blur To Smooth The Edges Of The Black Areas
The only problem with the Threshold adjustment is that it tends to leave us with very harsh, jagged edges, and of course water doesn't have harsh, jagged edges. It has smooth edges, so we need to fix that, and we can fix it easily by simply re-applying the Gaussian Blur filter. Since Gaussian Blur was the last filter we used, we can access it quickly with the keyboard shortcut Ctrl+Alt+F (Win) / Command+Option+F (Mac), which brings up the filter's dialog box without applying it, giving us a chance to change the settings first. We don't want to use the same amount of blurring as we applied initially since that's way too much. All we want to do here is smooth out any rough edges, and for that, we only need a hint of blurring. I'm going to set my Radius value to only 0.8 pixels this time:
Click OK to exit out of the Gaussian Blur dialog box once again.
Step 8: Select All The Black Areas With The Magic Wand
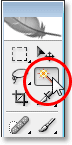
Now that we have the shapes which will become our water drops (the black areas), we can delete all the areas we no longer need (the white areas). First, let's select the black areas. To do that, we'll use the Magic Wand. Select it from the Tools palette, or press W on your keyboard to quickly select it:
Then, with the Magic Wand selected, look up in the Options Bar at the top of the screen and make sure the Contiguous option is not checked. We want to select all the black areas with a single click, and if this option was selected, we'd have to go around clicking on each black area individually to add it to the selection. So with "Contiguous" not checked, simply click on any black area in the image with the Magic Wand and Photoshop will select all of them at once:
Step 9: Invert The Selection And Delete The White Areas
Currently we have all of the black areas selected, but what we really want is to have all the white areas selected so we can delete them. All we need to do is invert our selection, which will select everything that is not currently selected and deselect everything that is selected. In other words, the white areas will become selected and the black areas will be deselected. To do that, use the keyboard shortcut Ctrl+Shift+I (Win) / Command+Shift+I (Mac). All the white areas will now be selected.
Then press Delete on your keyboard to delete all the white areas, leaving only the black shapes. Press Ctrl+D (Win) / Command+D (Mac) to deselect your selection when you're done:
Step 10: Lower The "Fill" Of The Black Shapes Layer To 0%
In the top left corner of the Layers palette, you'll find two options - "Opacity" and "Fill". Both of these options control the visibility of a layer, with one important difference. If you were to lower the "Opacity" of a layer down to 0%, you would hide not only the contents of the layer but also any layer styles that were applied to it. The "Fill" option, on the other hand, would hide only the layer contents. Any layer styles applied to the layer would remain visible, and that's exactly what we want in order to create our water drops effect. We want to hide the actual black shapes themselves, but we want the layer styles, which we'll be applying next, to remain visible. So to do that, go up to the Fill option in the top right corner of the Layers palette and lower it all the way down to 0%:
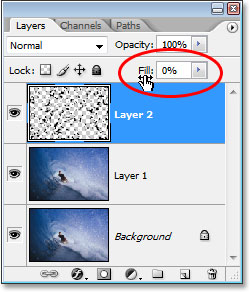
Your black shapes will disappear from view in your image, but don't worry, they're still there, and we're going to be applying our layer styles to them next.
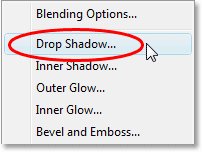
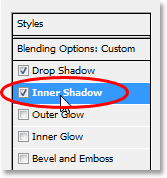
Step 11: Add A Drop Shadow Layer Style
Click on the Layer Styles icon at the bottom of the Layers palette:
Choose Drop Shadow from the list of layer styles that appears:
This brings up the Layer Style dialog box set to the "Drop Shadow" options in the middle column. Lower the Opacity of the drop shadow down to about 40% and set the Angle to about 120°:
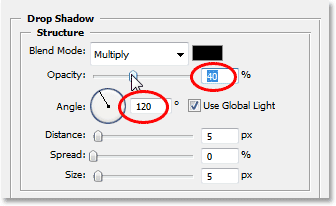
Don't click OK yet. We have a couple more layer styles to add first.
Step 12: Add A "Inner Shadow" Layer Style
Click directly on the words Inner Shadow on the left of the Layer Style dialog box:
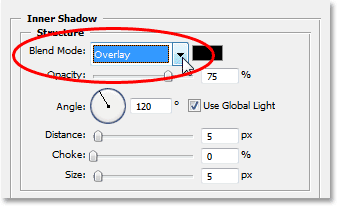
The options for the "Inner Shadow" layer style appear in the middle column. All we want to do here is change the Blend Mode from "Multiply" to Overlay by clicking on the down-pointing arrow to the right of the word "Multiply" and selecting "Overlay" from the list:
Again, don't click OK just yet. We have one more layer style to add.
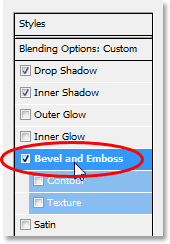
Step 13: Add A "Bevel and Emboss" Layer Style
Finally, click directly on the words Bevel and Emboss on the left of the Layer Style dialog box:
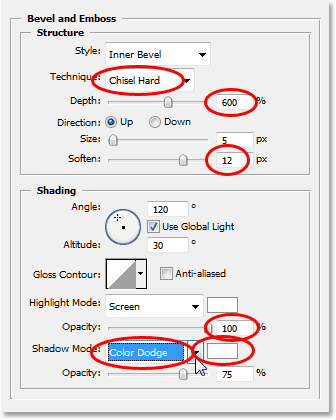
This brings up the "Bevel and Emboss" options in the middle column of the Layer Styles dialog box. Starting from the top and working our way down, change the Technique to Chisel Hard and then raise the Depth to around 600% (if you find that's too high, finish making the rest of the changes here and then go back and adjust the Depth amount, keeping an eye on your image as you drag the slider). Increase the Soften amount to around 12 pixels to give the water a nice smooth look. Then, down near the bottom of the options, increase the Opacity of the Highlight Mode to a full 100%. Change the Shadow Mode to Color Dodge, and finally, change the color of the Shadow Mode from black to white by clicking on the color swatch and selecting white in Photoshop's Color Picker:
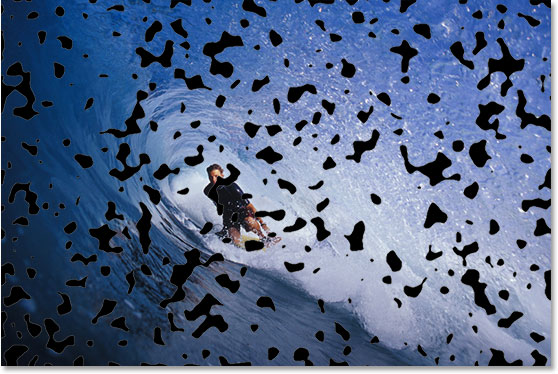
When you're done making the changes to the Bevel and Emboss options, click OK to exit out of the Layer Style dialog box. Your image will now look something like this, with the water drops clearly visible:
Step 14: Erase Any Water Drops You Don't Want
Now that I've created my water drops, I noticed that some of them are blocking the view of the main subject of my image (the guy on the surfboard). I want to remove those water drops, and I can do that easily by erasing them with the Eraser Tool. Grab your Eraser Tool from the Tools palette, or press E to quickly select it:
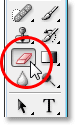
Then, with the Eraser Tool selected, simply click and drag your mouse over any water drops you want to erase. I'm going to erase the ones in front of the surfer:
Step 15: Create A Displacement Map
The basic effect is complete at this point, but we can still make it look a bit more realistic. If this was real water on a real photo, the water would be causing the photo underneath it to look a little distorted, so let's add in that extra bit of realism using a displacement map, which is a scary sounding name for what is really nothing more than a black and white image that we're going to create.
First, select all the water droplets at once by holding down the Ctrl (Win) / Command (Mac) key and clicking on the water drop layer's thumbnail in the Layers palette:
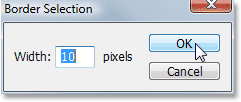
This will place a selection around all of the water drops. Go up to the Select menu at the top of the screen, choose Modify, and then choose Border. When the "Border Selection" dialog box appears, enter a value of about 10 pixels and then click OK:
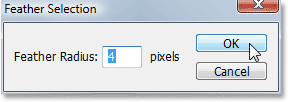
Then go back up to the Select menu and this time, choose Feather. Enter a Feather Radius value of about 4 pixels and click OK:
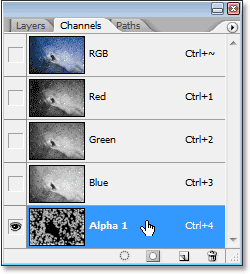
When you're done, go back up to the Select menu once again and choose Save Selection. When the "Save Selection" dialog box appears, just click OK to accept the default options and exit out of it. Also, press Ctrl+D (Win) / Command+D (Mac) to deselect your selection around the water drops.
Now switch over to your Channels palette, which is grouped in beside the Layers palette, and you'll see your saved selection at the very bottom in the channel named "Alpha 1". Click on it to select it:
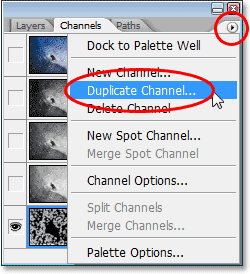
Then click on the small, right-pointing arrow in the top right corner of the Channels palette and select Duplicate Channel from the list of options:
When the "Duplicate Channel" dialog box appears, set the Document option to New, which is going to create a new document out of the channel, and then click OK:

The new document will appear on your screen. This is the document we're going to use for our displacement map. The only thing we have left to do is save it, so go up to the File menu at the top of the screen and select Save As, or use the keyboard shortcut Shift+Ctrl+S (Win) / Shift+Command+S (Mac). Either way brings up the "Save As" dialog box. Name the document whatever you like. I'm going to name mine "water drops", and save the document to your desktop so you can access it easily, since we'll be needing it in a moment.
Once you've saved the new document, you can close out of it. We don't need to have it open anymore.
Step 16: Apply The "Displace" Filter To The Duplicate Background Layer ("Layer 1")
Switch back to your Layers palette now and click on the duplicate Background layer ("Layer 1") to select it. We're going to apply the "Displace" filter to this layer, using the displacement map we just created and saved to the Desktop, which is going to give us our water distortion effect. Go up to the Filter menu, choose Distort, and then choose Displace, which brings up the "Displace" filter dialog box. Lower both the Horizontal Scale and Vertical Scale options down to about 8, then make sure Displacement Map is set to Stretch To Fit and Undefined Areas is set to Repeat Edge Pixels:
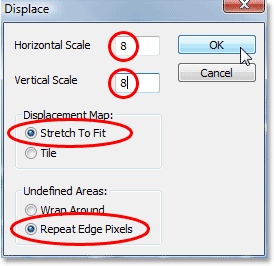
Click OK to exit out of this dialog box, and a second dialog box will appear asking you to select the displacement map you want to use. Choose the file you just saved to your desktop, then click Open, and Photoshop will apply the displacement map to the layer.
Step 17: Delete The Areas On The Layer Which Are Not Under The Water Drops
The only problem is, some of the distortion has been applied to the areas around the outside of the water drops, and we only want the distortion to appear in areas that are directly under the water drops, so we need to trim away the areas we don't want, and we can do that by simply deleting the areas we don't want, just like we did back at the beginning when we deleted all the white areas around the black shapes. With "Layer 1" still selected, hold down your Ctrl (Win) / Command (Mac) key and click once again on the water drops layer's thumbnail to place a selection around all the water drops:
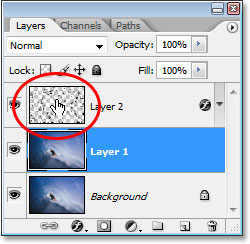
Notice that even though we're clicking on the water drops layer's thumbnail, we still have "Layer 1" selected in the Layers palette, not the water drops layer.
The water drops are now selected:
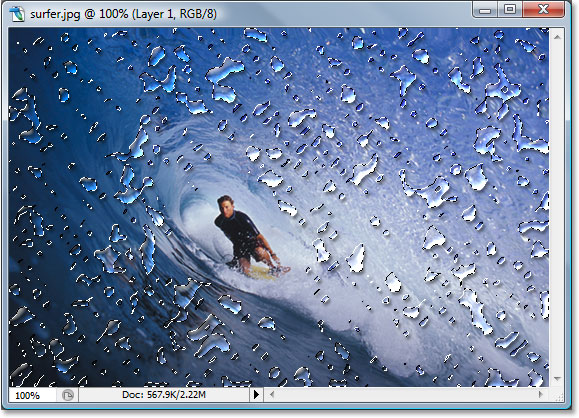
Then, with the water drops selected, press Ctrl+Shift+I (Win) / Command+Shift+I (Mac) to invert the selection, so all the areas around the water drops become selected and the water drops themselves are deselected. Finally, press the Delete key on your keyboard to delete all the unwanted areas on "Layer 1", leaving only the areas under the water drops, creating our water distortion effect, as well as our final result:
And there we have it! That's how to add realistic water drops to an image with Photoshop! Check out our Photo Effects section for more Photoshop effects tutorials!