
Split Toning Black and White Photos With Photoshop
In this Photoshop Effects tutorial, we're going to look at an easy way to give a photo a split toning effect. The term "split toning" means we'll be adding a color tint to the highlights using one color, and then using a different color to tint the shadows. The two colors you use can be similar, giving you a subtle effect, or they can be complete opposites. It's really up to you and the effect you're going for.
Whichever colors you choose, split toning an image can be a great way to add more visual interest to a black and white photo. As with most things in Photoshop, there's several different ways to create a split toning effect, but in this tutorial, we're going to look at one of the easiest ways. We'll be using a couple of Photoshop's adjustment layers, one to convert our full color image into a custom black and white photo, and then another to add our colors to the highlights and shadows. A nice thing about this technique, besides being easy, is that it allows us to create the split toning effect without harming a single pixel in our image!
Here's the photo I'll be using for this tutorial:

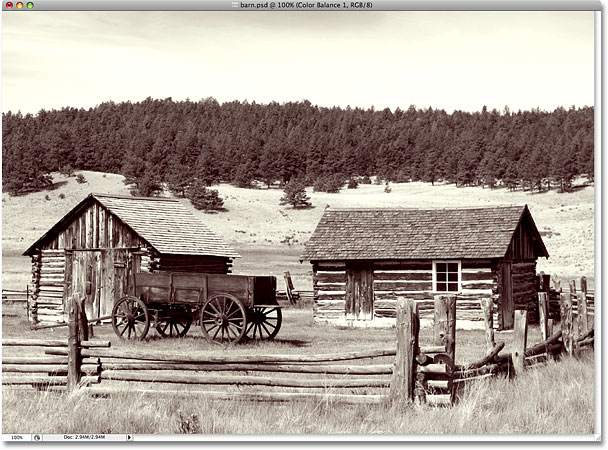
Here's how it will look with our split toning effect:
How To Split Tone A Black And White Photo
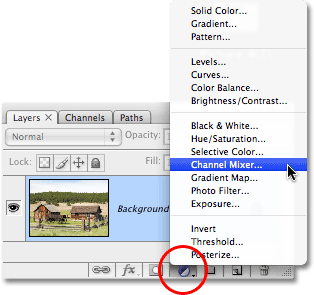
Step 1: Add A Channel Mixer Adjustment Layer
The first thing we need to do with our split toning effect is convert our image into black and white. There's quite a few ways to convert a color photo to black and white in Photoshop, but one of the best ways is by using a Channel Mixer adjustment layer, which will allow us to create our own custom black and white version rather than allowing Photoshop to make all the decisions for us. Since we're using the adjustment layer version of the Channel Mixer, we can safely convert our image to black and white while leaving the original full color image intact. Click on the New Adjustment Layer icon at the bottom of the Layers palette and choose Channel Mixer from the list that appears:
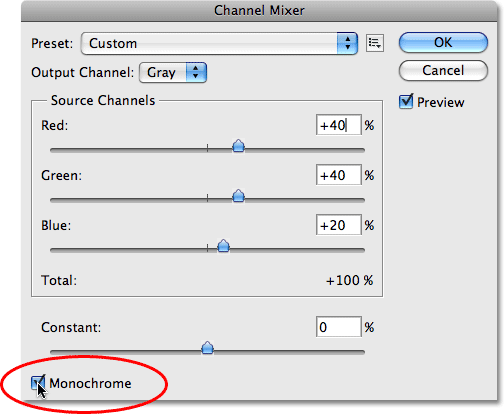
Step 2: Select The "Monochrome" Option
This brings up Photoshop's Channel Mixer dialog box. In the bottom left corner of the dialog box is the Monochrome option. Click inside its checkbox to select this option. As soon as you select it, you'll see your image in the document window convert to black and white:
Step 3: Create A Custom Black And White Version Of The Image
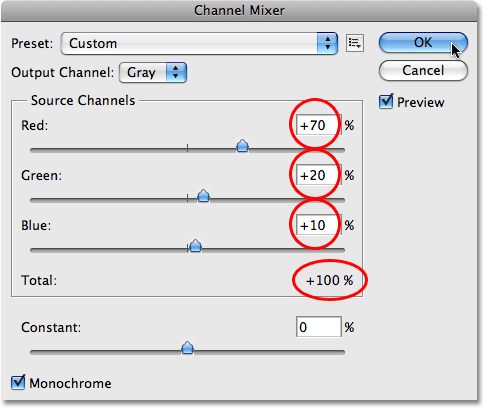
In the center of the Channel Mixer dialog box are three sliders, labeled "Red", "Green" and "Blue" from top to bottom. These sliders represent the red, green and blue color channels in the image. If you want to learn more about color channels in Photoshop, be sure to check out our RGB and Color Channels Explained tutorial in the Digital Photo Essentials section of the website, but basically, these three slider bars allow us to create a custom black and white version of our photo by mixing different amounts of the red, green and blue colors in the image to give us different results. Dragging the red slider towards the right, for example, causes any areas with red in them to appear lighter in the black and white version, while dragging the slider towards the left causes areas with red in them to appear darker. The same goes for the green and blue sliders. There are no "correct" settings for the sliders, since each image is unique and your idea of the "perfect" black and white version of the image will also be unique, so the best thing to do is to simply drag the sliders around while keeping an eye on your photo in the document window until you're happy with the results.
The only rule to be aware of with the sliders is that the total percentage of all three sliders should equal 100% when you're done. You'll see an input box above and to the right of each slider, with a number in the box that changes as you drag the slider. The number you see is the percentage of that color that's currently being applied to the black and white version. When you're done converting your image to black and white, the total of all three boxes should equal 100%. Anything less than 100% causes your image to appear darker than it should be, while going above 100% will lose detail in the highlights. Fortunately, you don't have to worry about doing the math. The Channel Mixer conveniently lists the current percent total directly below the sliders. For my image, I'm going to go with a mixture of 70% red, 20% green and 10% blue to create my black and white version, which gives me a total of 100%. Your values will most likely be different depending on the photo you're working with:
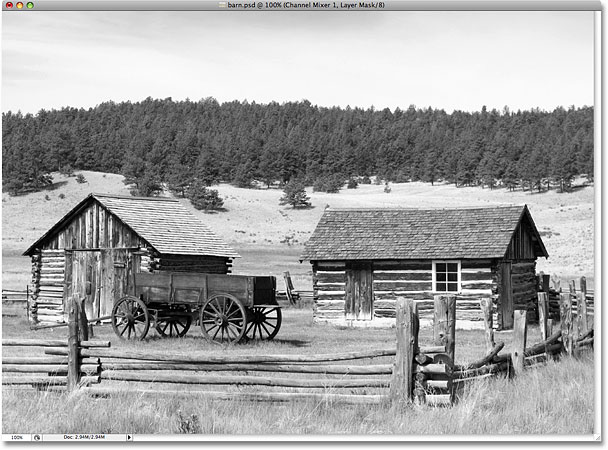
Click OK when you're done to exit out of the Channel Mixer dialog box, and you'll now have your black and white version of the image. Here's what my photo looks like after converting it to black and white:
Keep in mind that we haven't really converted the image to black and white. The original full color photo is still there, sitting safely on the Background layer in the Layers palette. Everything we've done to convert the photo to black and white is being handled by the Channel Mixer adjustment layer sitting above it in the Layers palette. If we were to delete the adjustment layer, our full color image would appear in the document window once again.
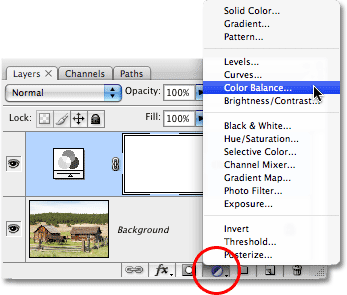
Step 4: Add A "Color Balance" Adjustment Layer
Now that we've converted our photo to black and white, we're ready to add some color to the highlights and shadows. For that, we'll use another of Photoshop's adjustment layers. Click once again on the New Adjustment Layer icon at the bottom of the Layers palette and this time, choose Color Balance from the list:
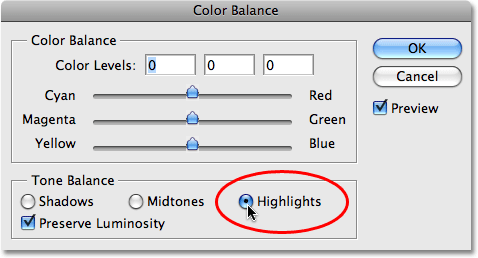
Step 5: Select "Highlights" And Choose A Tint Color
This brings up Photoshop's Color Balance dialog box. The Color Balance adjustment works great for our split toning effect because it allows us to easily switch between the shadows and highlights in the image simply by choosing either the Shadows or Highlights option at the bottom of the dialog box. Once we've chosen the shadows or highlights, we can use the color sliders to select the color we want to use and it will be applied only to the shadows or highlights. Let's start with the highlights in the photo. Select Highlights at the bottom of the dialog box:
With the highlights now selected, use the color sliders to dial in the color you want to tint the highlights with. The top slider will add red or cyan to the image depending on which direction you drag the slider. The further you drag the slider, the more intense the color will appear in the image. The middle slider will add green or magenta, again depending on which way you drag the slider. The bottom slider will add blue or yellow. It helps to know a little Color Theory 101 here if you need to mix colors together to create the one you want, but I'm going to keep things simple. I'm going to add a bit of yellow to my highlights by dragging the bottom slider towards the left until the third Color Levels input box at the top of the dialog box shows a value of -15:
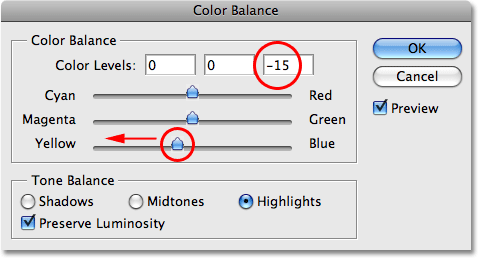
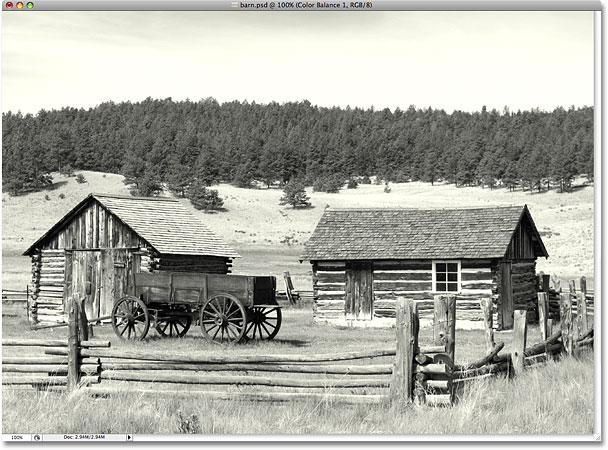
If I look at my photo in the document window now, I can see that the highlights have been tinted with a small amount of yellow:
Step 6: Select "Shadows" And Choose A Tint Color
We've added a color to the highlights. Now let's add a different color to the shadows. Select the Shadows option at the bottom of the dialog box:

With the shadows now selected, we can dial in a different color to complete our split toning effect. Again, I'm going to keep things simple by adding some red to my shadows. I'll drag the top slider towards the right until the first Color Levels input box at the top of the dialog box shows a value of +35:
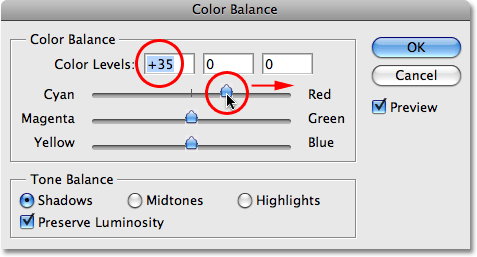
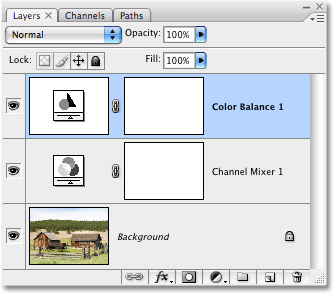
Of course, the colors you choose for your shadows and highlights may be completely different from the ones I've chosen here. I just happen to like this particular effect, with yellow in the highlights and red in the shadows. Click OK when you're done to exit out of the Color Balance dialog box. If we look in our Layers palette, we can see that we now have three layers. The original, full color image is on the Background layer on the bottom, the Channel Mixer adjustment layer directly above it is what's giving us our black and white effect, and finally, the Color Balance adjustment layer at the top is adding our tints to the shadows and highlights:
And with that, we're done! Here, after adding some red to my shadows, is my final split toning effect: