
Fast, Easy Pop Art With Lab Color In Photoshop
In this Photoshop Effects tutorial, we're going to learn how to quickly and easily create a pop art effect using the Lab color mode. The entire effect takes only a few steps and a couple of minutes from start to finish.
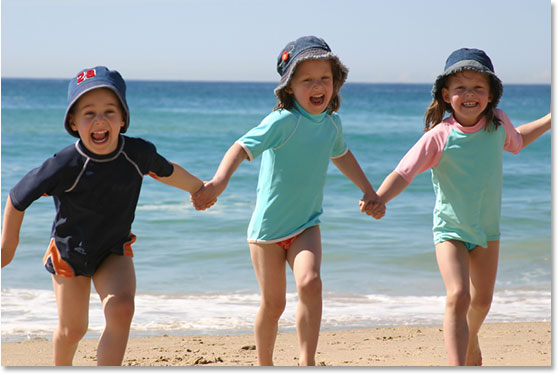
Here's the photo I'll be using for this tutorial:
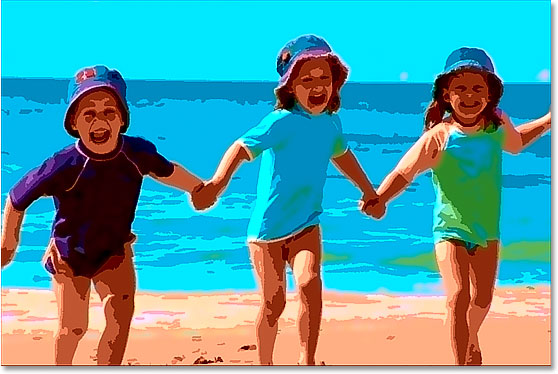
And here's the finished effect:
This tutorial is from our Photo Effects series. Let's get started!
Step 1: Convert The Image To Lab Color
The first thing we need to do is convert our image to the Lab color mode, which is going to separate the colors in the image from the luminosity (lightness) values. To do that, go up to the Image menu at the top of the screen, select Mode, and then select Lab Color:

Nothing will appear to have happened to the image in the Document Window, but switch over to your Channels palette, which is grouped in beside the Layers palette, and you'll see that your image is now made up of three channels - a Lightness channel, which contains the luminosity information, and two color channels, a and b:

The "a" channel represents all the colors in the image from green to magenta, and the "b" channel represents all the colors from blue to yellow. We're going to use these two color channels to quickly create the colors for our pop art-style effect. And in case you're wondering, the "Lab" channel at the top isn't really a channel at all. It's just the composite of the three other channels.
Step 2: Apply The "Posterize" Adjustment To The "a" Channel
Click on the "a" channel in the Channels palette to select it. Your image in the Document Window will turn gray and look rather strange, but that's okay. Go up to the Image menu again at the top of the screen, select Adjustments, and then select Posterize down near the bottom of the list. This will bring up the Posterize dialog box:

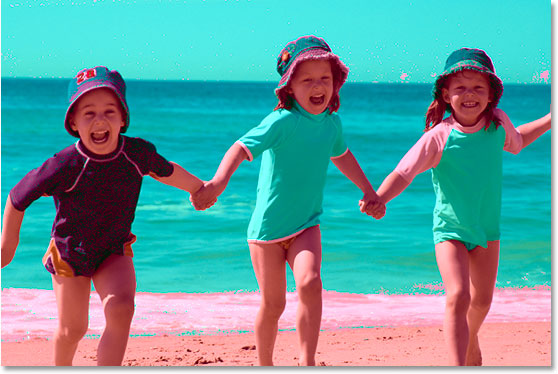
Enter a value of 4 for the Levels option, and then click OK. Click on the "Lab" channel at the top of the Channels palette to bring back your full color image in the Document Window, and your image will now look something like this:
Step 3: Apply The "Gaussian Blur" Filter To The "a" Channel
Click back on the "a" channel once again to select it. We're going to smooth out the colors using the Gaussian Blur filter. To do that, with the "a" channel selected, go up to the Filter menu at the top of the screen, select Blur, and then select Gaussian Blur. This brings up the Gaussian Blur dialog box:

Enter a Radius value of 4 pixels, then click OK. Again, click back on the "Lab" channel at the top of the Channels palette to see your image after applying the Gaussian Blur filter. The color now looks much smoother across the image:

Step 4: Apply The "Posterize" Adjustment To The "b" Channel
Click on the "b" channel in the Channels palette to select it. Again your image will turn gray in the Document Window. Just as we did with the "a" channel, go up to the Image menu, select Adjustments, and then select Posterize. Once again enter 4 for the Levels option:
Click OK, then click back on the "Lab" channel in the Channels palette to view your image after applying Posterize to the "b" channel:

Step 5: Apply The "Gaussian Blur" Filter To The "b" Channel
Click on the "b" channel again to select it. We're going to smooth out the colors in the "b" channel just as we did with the "a" channel, so go back up to the Filter menu, select Blur, and then select Gaussian Blur. Enter a Radius value of 4 pixels once again and click OK:

Click back on the "Lab" channel to view your image after applying Gaussian Blur to the "b" channel. Once again, the colors are now much smoother across the image:

We now have the colors for our effect. We're going to adjust the lightness values next.
Step 6: Apply The "Cutout" Filter To The "Lightness" Channel
Click on the "Lightness" channel in the Channels palette to select it. Your image will turn gray again in the Document Window, but at least this time it will look like a normal black and white version of the image. Go up to the Filter menu, select Artistic, and then select Cutout. This will bring up the massive Filter Gallery set to the Cutout filter options:

The Filter Gallery may be huge, but the preview area takes up a third of it on the left, and the actual options for the Cutout filter are on the right, and there's only three of them, as circled in red above. Set the Edge Simplicity option to 0 and the Edge Fidelity option to 1. The Number of Levels option at the top determines how many tonal levels you'll have in your image. The lowest value you can enter is 2, and that will make everything in your image either black or white, with no shades of gray in between. The highest value you can enter is 8, which will give you black, white, and 6 shades of gray in between. Each additional shade of gray gives you a bit more detail in the image.
The value you enter for "Number of Levels" will depend entirely on your image and on what you feel is the right amount of detail for the effect. The easiest way to determine that is to click your mouse inside the "Number of Levels" value box and then use the up and down arrow keys on your keyboard to raise and lower the value, keeping an eye on the preview area on the left as you do so. You can scroll around inside the preview area as needed by simply clicking and dragging your mouse inside of it. Raise and lower the value between 2 and 8 while watching the preview area until you've found the value that works best. I've settled on a value of 7 for my image. Once you've found the value that works best, click OK to exit out of the Filter Gallery.
Click back on the "Lab" channel to view your full color image after applying the Cutout filter to the "Lightness" channel. Here's my result:

Step 7: Apply The "Smart Sharpen" Filter To The "Lightness" Channel
The effect is now pretty much complete, but it's looking a little soft and could use some sharpening. To do that, click back on the "Lightness" channel in the Channels palette to select it. Then go up to the Filter menu, select Sharpen, and then select Smart Sharpen. This brings up the Smart Sharpen dialog box:

Enter an Amount value of 75% and a Radius value of 1 pixel. Leave Remove set to Gaussian Blur and check the More Accurate option at the bottom to select it.
Click OK to exit out of the Smart Sharpen dialog box, then click on the "Lab" channel in the Channels palette to bring back your full color image.
Step 8: Convert The Image Back To The "RGB" Color Mode
At this point, the effect is done. All that's left to do is convert the image out of Lab color and back to the RGB color mode. To do that, go back up to the Image menu, select Mode, and then select RGB Color:

Once the image is back in the RGB color mode, you're done! Here's the final result after sharpening the "Lightness" channel:
And there we have it! That's how to create a quick and easy pop art effect with Lab color in Photoshop! Check out our Photo Effects section for more Photoshop effects tutorials!