
Photo Within A Photo In Photoshop CS6
In this Photoshop tutorial, we'll learn a simple way to bring more attention to the main subject of an image by creating the illusion that there's a smaller, cropped version of the photo inside the full size original, and we'll add to the effect by converting the remaining area outside the smaller version to black and white. This tutorial is fully compatible with Photoshop CS6 and includes a look at the new Fill and Stroke options for vector shapes in CS6. If you're using an earlier version of Photoshop, be sure to check out our previous Photo Within A Photo tutorial.
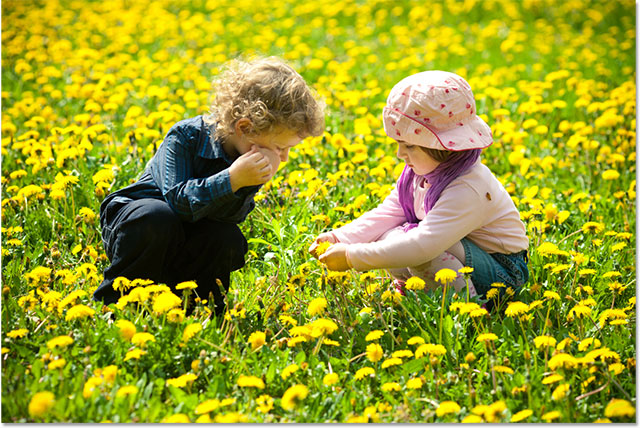
Here's the image I'll be starting with (boy and girl in flowers photo from Shutterstock):
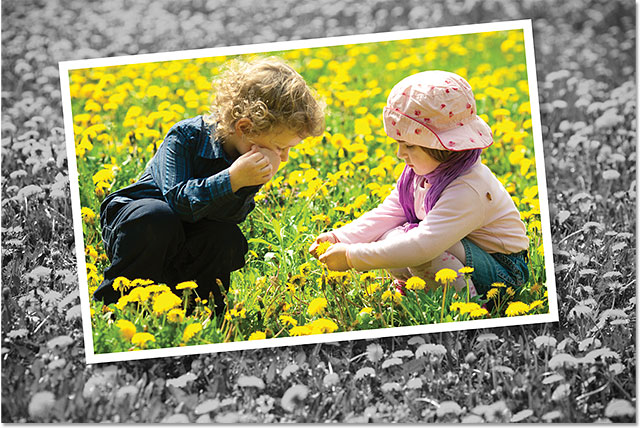
And here's what the final "photo within a photo" effect will look like:
How To Place A Photo Within A Photo
Step 1: Duplicate The Background Layer
Our first step is to make a copy of our Background layer. If we look in the Layers panel, we can see our newly opened image sitting on the Background layer which at the moment is the only layer we have:

To make a copy of the layer, go up to the Layer menu in the Menu Bar along the top of the screen, choose New, and then choose Layer Via Copy. Or, for a faster way to access the same command, simply press Ctrl+J (Win) / Command+J (Mac) on your keyboard. Either way works fine:

Nothing will appear to happen to the image in the document window, but if we look again in the Layers panel, we see that Photoshop has made a copy of the layer, named the copy Layer 1, and placed it directly above the original Background layer:

Step 2: Select The Rectangle Tool
Select the Rectangle Tool from the Tools panel over on the left side of the screen. Make sure you don't confuse it with the Rectangular Marquee Tool located at the top of the Tools panel. We want the Rectangle Tool - one of Photoshop's basic Shape tools - and it's found closer to the bottom of the Tools panel:

Step 3: Draw The Shape Of The Smaller Photo
With our Rectangle Tool selected, we're going to draw a rectangular shape around the main subject of the photo, and this shape will soon become the smaller, cropped version of the image. But before we start drawing, we need to set a few options for the Rectangle Tool up in the Options Bar along the top of the screen. First, set the Tool Mode option (also known as the Drawing Mode option) on the far left of the Options Bar to Shape if it's not set to that already, since we want to draw a vector shape (as opposed to a path or a pixel-based shape):

Next, we need to choose the colors for the fill and stroke of our shape. Let's choose the fill color first. Click on the Fill option in the Options Bar, which is new in Photoshop CS6:

This opens a panel that let's us choose what type of fill we want (a solid color, a gradient, a pattern, or nothing at all). Click on the Solid Color option at the top of the panel (second thumbnail from the left), then choose black as the fill color by clicking on the black color swatch. Technically, we can choose any color we want for the fill since we won't see it in the final result anyway, but to keep us both on the same page, we'll just choose black. Press Enter (Win) / Return (Mac) on your keyboard when you're done to close the panel:

Now we'll choose a color for the stroke that will appear around the shape and serve as a photo border. Click on the Stroke option in the Options Bar, also new in Photoshop CS6:

This opens a similar panel to the one we just looked at, except here we're choosing the type of stroke we want to apply. Again, we can choose a solid color for the stroke, a gradient, a pattern, or nothing at all. Once again click on the Solid Color option at the top of the panel (second thumbnail from the left), and then this time, choose white as the stroke color by clicking on the white color swatch. Press Enter (Win) / Return (Mac) when you're done to close the panel:

One last thing we need to do before drawing the shape is to set an initial size for the stroke. There's no need to worry about choosing the correct size at this stage because Photoshop CS6 lets us easily go back after we've drawn the shape and change the stroke size. I'm using a large, high resolution image here, so for now, I'll enter an initial size of 20 pt into the Size box in the Options Bar. You'll want to start with a lower value if you're working with a small image, but again, we can easily change it later. Press Enter (Win) / Return (Mac) when you're done to accept the initial size:

With all of the options set, I'll click inside my image with the Rectangle Tool and, with my mouse button still held down, I'll drag diagonally across my main subjects to draw a rectangle shape around them. As we're drawing the shape, only an initial path outline is visible:

It's not until we release the mouse button that Photoshop actually draws the shape, filling it with black and surrounding it with the white stroke:

If we look in the Layers panel, we see that Photoshop has placed the rectangle shape on its own Shape layer directly above Layer 1:

Step 4: Resize The Stroke If Needed
There's a good chance at this point that the white stroke around the shape looks either too thick or too thin for a photo border, so if you need to resize it, make sure the Rectangle Tool is still selected in the Tools panel and the Shape layer (Rectangle 1) is selected (highlighted in blue) in the Layers panel, then click on the small arrow directly to the right of the current stroke size in the Options Bar. This will open a little slider you can drag either left or right to increase or decrease the stroke width. Keep an eye on the stroke as you drag the slider for a live preview of the results. I'm going to decrease my stroke size to something closer to 14 pt, but again I'm working on a high resolution image. Low resolution images will most likely need a lower value:

Press Enter (Win) / Return (Mac) when you're done to close the slider. Here's my image after resizing the stroke. In my case, it's just a little bit thinner than it was before:

Step 5: Drag The Shape Layer Below Layer 1
At the moment, the shape is completely blocking the photo below it from view. To fix that, we need to move our Shape layer down between the Background layer and Layer 1. To do that, click on the Shape layer in the Layers panel and with your mouse button still held down, begin dragging the layer downward until you see a highlight bar appear between Layer 1 and the Background layer:

When you see the highlight bar, release your mouse button and Photoshop will drop the Shape layer into place between the other two layers:

With Layer 1 now sitting above the Shape layer, we can again see our entire photo in the document window, but it may seem like we've solved one problem by creating another since our rectangle shape has now disappeared. We'll fix that in a moment:
Step 6: Select Layer 1
Click on Layer 1 in the Layers panel to select it:

Step 7: Create A Clipping Mask
With Layer 1 active, click on the menu icon in the top right corner of the Layers panel:
Choose Create Clipping Mask from the menu that appears:

This will "clip" the photo on Layer 1 to the rectangle shape below it. If you're not familiar with how clipping masks in Photoshop work, it can be a little hard to tell just by looking at the image exactly what's going on at this point (that's because Layer 1 and the Background layer both contain the exact same photo), but we can tell something has happened because the white stroke around the rectangle shape has returned, giving us the first part of our "photo within a photo" illusion:

If we take a quick look in the Layers panel, we see that Layer 1 is now indented to the right with a small arrow to the left of its preview thumbnail pointing down at the Shape layer below it, which is how Photoshop tells us that Layer 1 is now clipped to the Shape layer:

Step 8: Select The Shape Layer
Click on the Shape layer in the Layers panel to select it:

Step 9: Add A Drop Shadow
Let's help the smaller photo in the center stand out more by giving it a drop shadow. With the Shape layer selected, click on the Layer Styles icon (the "fx") at the bottom of the Layers panel:
Choose Drop Shadow from the bottom of the list of layer styles that appears:

This opens Photoshop's Layer Style dialog box set to the Drop Shadow options in the middle column. First, I'm going to change the Angle of the shadow to around 135° so that the light source appears to be from the top left. We control how far the shadow extends out from behind the object using the Distance slider. For my high resolution image, a Distance value of around 80 px works well, but lower resolution images will require a much lower value so you may need to experiment a bit. Fortunately, Photoshop gives us a live preview of the results in the document window as we drag the slider left or right to try different values so experimenting is easy.
To soften the shadow edges, we use the Size option. The higher the value, the softer the edges, but again, the value you'll need depends a lot on the size of your image. For me, a Size value of 30 px softens the edges nicely, but a smaller value will work better with smaller images. Finally, I'm going to lower the Opacity of my shadow all the way down to 30% so it's nice and subtle. We don't want the shadow to be the main focus of the effect:

Click OK when you're done to close out of the Layer Style dialog box. Here's what the effect looks like with the drop shadow applied to the smaller version of the photo:

Step 10: Resize And Rotate The Smaller Photo With Free Transform
To add a bit more interest to the effect, let's rotate the smaller photo a little and resize it if needed at the same time. We can do both of these things with Photoshop's Free Transform command. Make sure the Shape layer is still selected in the Layers panel, then go up to the Edit menu at the top of the screen and choose Free Transform:

This places the Free Transform box and handles (little squares) around the smaller image. To resize it, simply click and drag any of the handles. You'll find one in each corner, as well as at the top, bottom, left and right. To rotate it, move your mouse cursor anywhere outside the Free Transform box, then click and drag left or right. You can also move the smaller image by clicking anywhere inside the Free Transform box and dragging. You'll notice that it's not actually the image itself being resized, rotated or moved. It's only the white border around the image (as well as the drop shadow) that's affected. When you're done, press Enter (Win) / Return (Mac) on your keyboard to accept the change and exit out of Free Transform:

Step 11: Select The Background Layer
To complete the effect, let's quickly convert the rest of the image - that is, the area surrounding the smaller version of the photo - to black and white. Click on the Background layer in the Layers panel to select it:

Step 12: Add A Black & White Adjustment Layer
With the Background layer selected, click on the New Adjustment Layer icon at the bottom of the Layers panel:
Choose Black & White from the list of adjustment layers that appears:

This adds a Black & White adjustment layer (named Black & White 1) to the document directly above the Background layer, as we can see in the Layers panel, which means only the image on the Background layer below it will be affected. The smaller version of the photo on Layer 1, which is higher up in the layer stack, will remain in full color:

The controls and options for the Black & White adjustment layer appear in the Properties panel. The Black & White image adjustment was first introduced in Photoshop CS3 and instantly became the best way to convert color photos to black and white. However, since all we're doing here is converting the unimportant areas of the photo to black and white, we don't need anything fancy, so I'm simply going to click on the Auto button to let Photoshop do a quick "best guess" conversion for me:

And with that, we're done! The smaller photo remains in full color while the area surrounding it has been easily converted to black and white, creating our final effect: