
How To Add Lens Flare To An Image With Photoshop
In this tutorial, you'll learn how to add a lens flare effect to an image in Photoshop without making any permanent changes to the original photo by using layers and layer blend modes!
We'll start by learning how to add lens flare, and position it exactly where we need it, using Photoshop's Lens Flare filter. Then, to keep things non-destructive, we'll undo the effect, add a new layer, and then instantly re-apply the Lens Flare filter using a handy shortcut!
Finally, we’ll use the power of layer blend modes to easily blend the lens flare into the image, and finish off by adjusting its colors to better match the colors in the photo. We’ll also apply some blurring to soften the lens flare and help it look more realistic.
For best results, you'll want to apply the lens flare effect to an image that has the light source actually visible in the photo, whether it's the sun, a studio light, or whatever the case may be. Here's the image I'll be working with (family on beach at sunset photo from Shutterstock):

Here's how it will look after adding the lens flare. The important thing to note is that the lens flare and the photo are completely separate from each other, so if I change my mind later and decide I don't like it, I can easy remove the lens flare and revert back to the original image:

Let's get started!
How To Add Lens Flare In Photoshop
I'm using Photoshop CC here but this tutorial is also fully compatible with Photoshop CS6. For earlier versions of Photoshop, check out my original Non-Destructive Lens Flare Effect tutorial.
Step 1: Apply The Lens Flare Filter
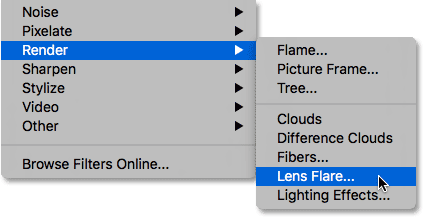
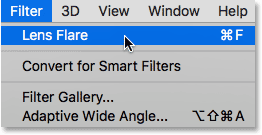
The first thing we need to do is add a lens flare the way we normally would if we were applying it directly to the image itself. Even though we're going to be undoing the effect, this gives us a chance to position the lens flare exactly where we want it. To add the lens flare, we'll use Photoshop's Lens Flare filter. Go up to the Filter menu in the Menu Bar along the top of the screen, choose Render, and then choose Lens Flare:
Watch the video and share your thoughts on our YouTube channel!
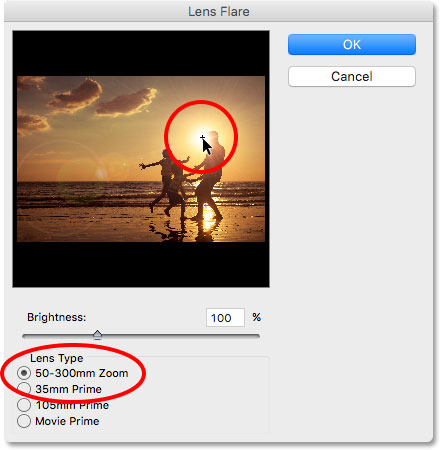
This opens the Lens Flare dialog box. Photoshop's Lens Flare filter adds a simulated lens flare effect to the image, and we can choose from one of four different types of lenses (50-300 mm Zoom, 35mm Prime, 105mm Prime, and Movie Prime) in the Lens Type section in the lower left. Each one will give the effect a different look. You can try them out by selecting them and seeing what each one looks like in the image preview area. I'm going to stick with the default 50-300mm Zoom lens. You can also adjust the brightness of the lens flare by dragging the Brightness slider left or right, but again, I'll stick with the default 100%.
To position the lens flare where you want it, simply click inside the preview area. The spot you click on becomes the center of the flare, indicated by the little target symbol. You can also click and drag to move the flare around. To keep the effect looking as realistic as possible, you'll want to place the target symbol over the light source in your image, which in my case is the setting sun:
When you're happy with how things look, click OK to close out of the dialog box. Photoshop will then apply the effect to your image. Here's what my initial lens flare looks like:

The only problem is that we've applied the lens flare directly to the image itself, and that makes it a destructive edit because we've made permanent changes to the original photo. It's much better to work non-destructively whenever possible, keeping the image and the effect separate from each other. Let's see how we can apply the lens flare non-destructively by taking advantage of Photoshop's layer blend modes.
Step 2: Undo The Lens Flare
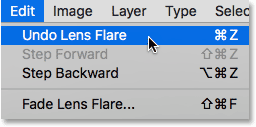
Now that we know exactly where we want the lens flare to appear, let's undo the effect by going up to the Edit menu at the top of the screen and choosing Undo Lens Flare. Or, use the handy keyboard shortcut Ctrl+Z (Win) / Command+Z (Mac). Either way works:
Step 3: Add A New Blank Layer
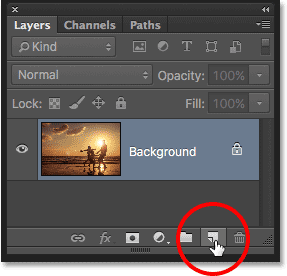
We're going to re-apply the Lens Flare filter, but this time, we'll apply it on its own separate layer. First, let's add the layer. Press and hold your Alt (Win) / Option (Mac) key on your keyboard and click the New Layer icon at the bottom of the Layers panel:
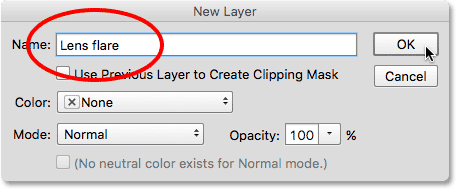
This opens the New Layer dialog box where we can name the new layer before it's added. Name the layer "Lens flare" (no need to get creative), then click OK:
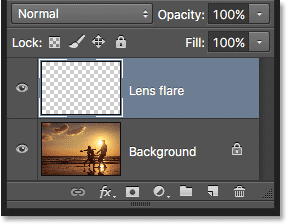
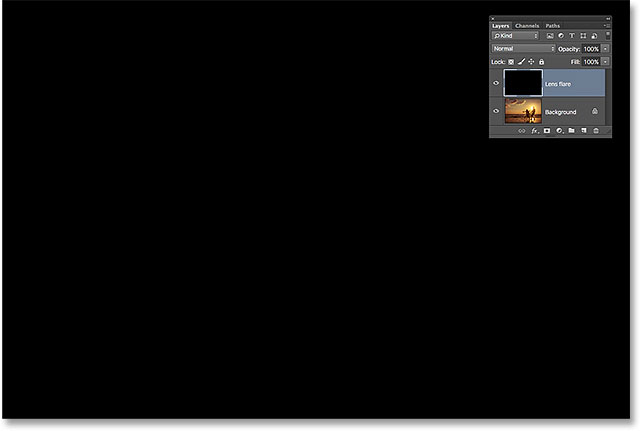
Photoshop adds a new blank layer named "Lens flare" above the original photo that's sitting on the Background layer:
Step 4: Fill The New Layer With Black
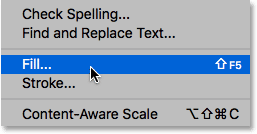
Photoshop won't allow us to apply the Lens Flare filter to a blank layer, so we need to fill the layer with a color. To do that, we'll use Photoshop's Fill command. Go back up to the Edit menu at the top of the screen and this time, choose Fill:
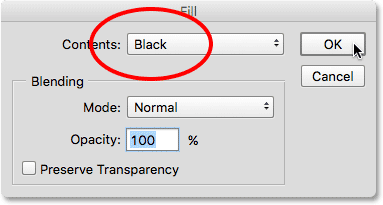
This opens the Fill dialog box. Set the Contents option at the top to Black (*in Photoshop CS6 and earlier, the Contents option is named Use). Filling the layer with black will make it easy for us to blend the lens flare in with the photo, as we'll see in a moment:
Click OK to close out of the dialog box, at which point Photoshop fills the "Lens flare" layer with solid black, temporarily blocking the original photo from view:
Step 5: Re-Apply The Lens Flare Filter
Now that the layer is no longer blank, we can re-apply our Lens Flare filter. Photoshop remembers all of the settings we used for the filter the last time we applied it, including the flare's position, so all we need to do is re-apply it using those exact same settings, and Photoshop gives us a couple of shortcuts we can use to do that.
First, the last filter we applied will always appear as the first option at the top of the Filter menu. To quickly re-apply the lens flare, just go up to the Filter menu and you'll find Lens Flare at the very top of the list. Click on it to re-apply it with the same settings as before. Or, an even faster way to re-apply the last filter you used is to simply press Ctrl+F (Win) / Command+F (Mac) on your keyboard:
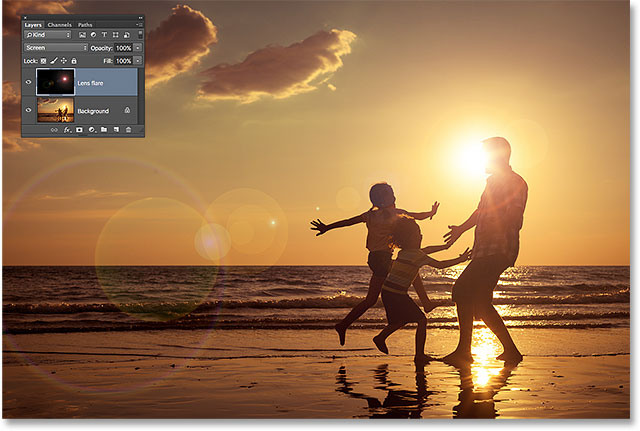
The same lens flare appears in the same position as before, but this time on the "Lens flare" layer rather than on the image itself:

Step 6: Change The Layer Blend Mode To Screen
All we need to do now is hide all of that solid black on the layer and blend the lens flare into the image below it, and we can do that easily by changing the "Lens flare" layer's blend mode from Normal to Screen. You'll find the blend mode option in the upper left of the Layers panel:

With the blend mode set to Screen, all of the black on the layer disappears, leaving only the lens flare itself:
Since the lens flare is now on a separate layer above the image, we can turn it on and off by clicking the layer's visibility icon (the eyeball). Click it once to turn the lens flare off. Click it again to turn it back on:
Step 7: Adjust The Color Of The Lens Flare
You can adjust the colors in your lens flare so they better match the colors of your image. First make sure you still have the "Lens flare" layer selected in the Layers panel. Then go up to the Image menu at the top of the screen, choose Adjustments, then choose Hue/Saturation:
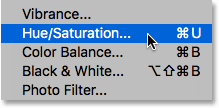
This opens the Hue/Saturation dialog box. Dragging the Hue slider left or right will shift the colors in your lens flare as if you're rotating them around a color wheel. Choose colors that are a good match for your photo. In my case, the lens flare already contains some nice reds and oranges that work well, but I'll drag the Hue slider a bit to the right to shift the colors more towards yellow:
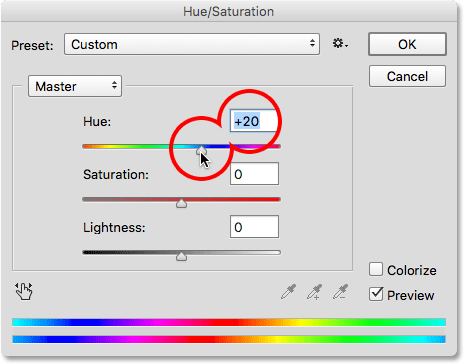
Click OK when you're done to close out of the dialog box. Here's my result after adjusting the colors. In this case, the difference is fairly subtle:

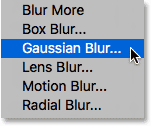
Step 8: Apply The Gaussian Blur Filter
The only problem remaining is that the edges of the lens flare look too sharp, so let’s soften them by applying some blurring. We’ll use Photoshop’s Gaussian Blur filter. Go up to the Filter menu at the top of the screen, choose Blur, then choose Gaussian Blur:
Drag the Radius slider along the bottom of the Gaussian Blur dialog box towards the right. The further you drag the slider, the more blurring you'll apply to the lens flare and the softer it will appear. Keep an eye on your image as you drag the slider to judge the results since the amount you need will depend on the size of your image. In my case, a Radius value of around 12 pixels works well:
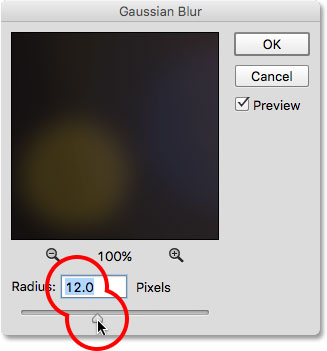
Click OK when you're done to close out of the Gaussian Blur dialog box. Here's my result:

Step 9: Adjust The Intensity Of The Lens Flare (Optional)
Finally, there's a couple of ways that we can adjust the intensity of the lens flare depending on whether you need to increase or decrease its brightness. If you're already happy with the way things look, you can skip this last step, but if you find that your lens flare is too bright, you can reduce its intensity by lowering the opacity of the "Lens flare" layer. You'll find the Opacity option in the upper right of the Layers panel, directly across from the blend mode option. The more you lower the opacity value from its default 100%, the more the lens flare will fade into the image:
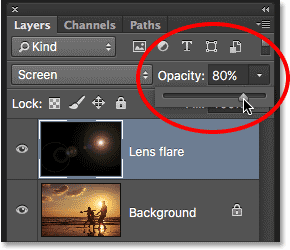
Here's the result after lowering the opacity to around 80%. The lens flare is now less visible:

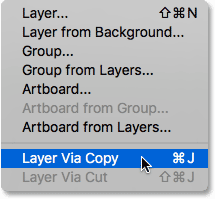
Or, if you find that your lens flare isn't bright enough, there's an easy way to make it brighter, and that's by duplicating the "Lens flare" layer. I'll set my Opacity value back to 100%:

To duplicate the layer, go up the Layer menu at the top of the screen, choose New, then choose Layer Via Copy. You can also press Ctrl+J (Win) / Command+J (Mac) on your keyboard to duplicate the layer with the faster shortcut:
Photoshop adds a copy of the "Lens flare" layer above the original:
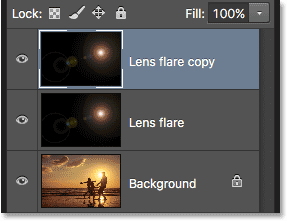
With two lens flare layers now in the document, both set to the Screen blend mode, the effect becomes much brighter. In fact, it's now too bright:

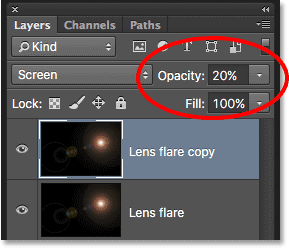
I really only needed it to be a little brighter, not a lot brighter, so to reduce its intensity, I'll lower the opacity of the "Lens flare copy" layer all the way down to around 20%:
And with that, we're done! Here, after lowering the opacity, is my final lens flare effect:
And there we have it! That’s how to easily add lens flare to an image without harming the original photo using a combination of the Lens Flare filter and the non-destructive power of layers and layer blend modes in Photoshop! Check out our Photo Effects section for more Photoshop effects tutorials!