
Get Better Color Halftone Effects in Photoshop 2026
Learn how to create true color halftone dot patterns using Photoshop's Color Halftone filter and this one simple trick. A step-by-step tutorial for Photoshop 2026.
Download the PDF: Get Better Color Halftone Effects in Photoshop
Color halftone patterns are one of the most popular retro effects in Photoshop. Based on how a traditional printing press works, the effect uses cyan, magenta, yellow, and black dots of varying sizes to create the illusion of a continuous-tone image. It’s perfect for giving your photos a vintage newsprint, comic book, or pop art look.
Photoshop even includes a built-in Color Halftone filter, which sounds like the perfect tool for the job. But if you’ve ever applied the Color Halftone filter to your photo, the result was probably not what you expected. Instead of a cool retro effect, you got a bunch of dots just sitting on top of your image.
In this tutorial, I’ll explain exactly why that happens, and how to get the color halftone effect you really want using a simple trick.
Which Photoshop version do I need?
I'm using Photoshop 2026. Use the Creative Cloud Desktop app to make sure Photoshop is up to date.
Let's get started!
The document setup
For this tutorial, I’ll use this retro photo from Adobe Stock

Watch my step-by-step video tutorial on Patreon!
Where to find the Color Halftone filter in Photoshop
Go to Filter > Pixelate > Color Halftone.

How the Color Halftone filter in Photoshop works
In the Color Halftone dialog box, the Max Radius value sets the maximum size of the dots in pixels.
Each Channel option sets the angle for a specific color’s dot pattern (1 is cyan, 2 is magenta, 3 is yellow, and 4 is black). Where the dots overlap, the colors mix together to create new colors. At least, that’s the idea.
I generally leave the Channels set to their defaults; the only value I change is the dot size (Max Radius).

The standard Color Halftone filter result
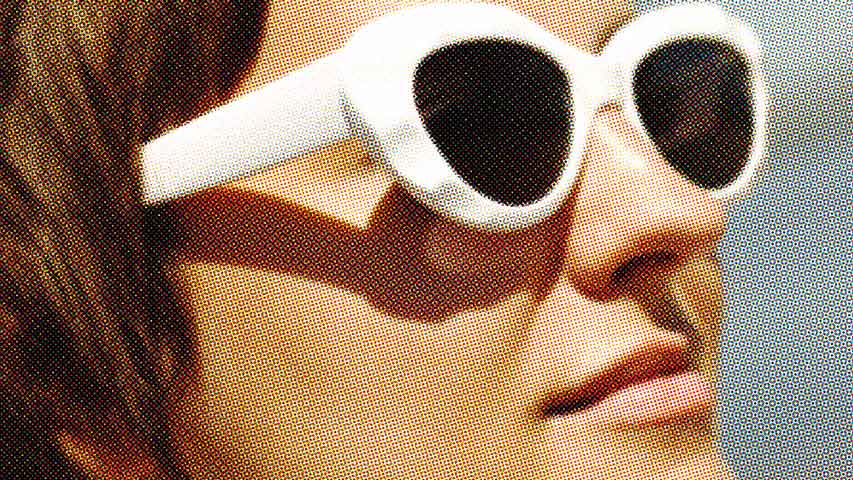
The default Max Radius is 8 pixels. Since I’m working with a large image (5000 px by 3333 px) and want the effect to be visible in the screenshots, I’ll increase my radius to 20.
Once you’ve entered a value for your image, click OK to apply the filter.

But as you can see, this is not what a true halftone pattern should look like.
Instead of the cyan, magenta, yellow, and black dots blending together to recreate the photo’s original colors, they’re just sitting on top of the image.

Zoom in to 100% for a closer look, and the problem becomes obvious: the dots are not blending with the original colors at all.

The problem with Photoshop’s Color Halftone filter
So why is the Color Halftone filter so bad at creating halftone effects? Actually, it’s not. The real issue is that our image is in the wrong color mode.
Go to Image > Mode. You’ll see that your image is most likely in RGB Color. This means all the colors in your image are made from different combinations of red, green and blue.

But the Color Halftone filter doesn’t want to be in RGB Color. It wants CMYK Color.
CMYK stands for cyan, magenta, yellow, and black—the same colors as the halftone dots (and the exact same colors a printing press uses). So, to get better results, we first need to switch color modes.
Go to Edit > Undo Color Halftone (or press Ctrl+Z / Cmd+Z).

This brings back your original photo.
How to get better Color Halftone filter results
To use the Color Halftone filter properly, we need to convert the image from RGB to CMYK. But to avoid making permanent changes to your original photo, we’ll apply the effect in a duplicate document, and then move the final halftone pattern back over when we’re done.
Related tutorial: 5 ways to move images between documents
Step 1: Duplicate the image into a new document
In the Layers panel, make sure your Background layer is selected.
Go to Layer > Duplicate Layer.

In the Duplicate Layer dialog box, change the Document destination to New and click OK.

A copy of your image will open in a separate document. You can confirm this by looking at the new document tab at the top of your workspace.

Step 2: Convert the image to CMYK color
Go to Edit > Convert to Profile.

In the Convert to Profile dialog box, make sure the Destination Space is set to Working CMYK.
Your specific profile might not say U.S. Web Coated (SWOP) v2
depending on your location, but Working CMYK is the important part.
Click OK to close the dialog box.

Go back to Image > Mode. You’ll see that the image is now in CMYK Color.
We’re ready to apply the Color Halftone filter.

Step 3: Apply the Color Halftone filter
Go to Filter > Pixelate > Color Halftone, just like before.
Enter a Max Radius value to set the maximum size of the halftone dots in pixels. I’ll use 20 again just to keep the dots large enough to see in the screenshots. We can change the value later if needed.
Leave the four Channel options at their default values (I covered them earlier in the tutorial if you missed it).
Click OK to apply the filter.
With the image in CMYK Color, the Color Halftone filter creates a much more believable effect.
The cyan, magenta, yellow, and black halftone dots are now blending with the photo’s original colors, giving it a true vintage look.

For comparison, here again is the original color halftone effect using RGB color.
Step 4: Change the halftone dot size (Optional)
To try a different dot size:
- Press Ctrl+Z / Cmd+Z to undo the Color Halftone filter.
- Go back to Filter > Pixelate > Color Halftone.
Enter a different Max Radius value depending on the size of your image and the look you want to achieve. The default size is 8 and the minimum size is 4.
I’ll lower my value to 12.
Click OK to apply the filter.

The smaller halftone dots look better, at least with this image.

Step 5: Copy and paste the halftone effect into the original document
To move the halftone effect over to the original image, go to Select > All.

Go to Edit > Copy.

Click the x in the tab to close the halftone pattern document, but leave the original image open.

Choose No (Don’t Save on a Mac) when Photoshop asks if you want to save your changes before closing.

Back in the original document, go to Edit > Paste.

Your color halftone effect is pasted on top of the original image.

Check the Layers panel and you’ll see your halftone effect sitting safely on its own layer above the original photo (on the Background layer).

And there we have it. That’s how to create true vintage halftone effects using the Color Halftone filter in Photoshop.
Don't forget, all of my Photoshop tutorials are available to download as PDFs!
Related tutorials:
- Create a black and white halftone pattern in Photoshop
- Turn a photo to a color dot pattern
- Create a Pointillism painting effect