
Blend Photos Like A Hollywood Movie Poster With Photoshop CS6
In this Photo Effects tutorial, we'll learn how to blend two photos together like a movie poster! This is a completely re-written update to the original version of the tutorial and is now fully compatible with Photoshop CS6. If you're using Photoshop CS5 or earlier, you'll want to follow the original Blend Photos Like A Hollywood Movie Poster tutorial.
Photoshop makes it easy to blend photos together using layer masks, but a common problem is that the colors of the photos don't match, so instead of a seamless blend, we end up with something that still looks like two distinctly separate photos. If that's the effect you want, great, but for a movie poster-type of effect, we usually want the colors to match. Finding two photos with similar colors isn't always easy or even possible, but with the technique we'll learn here, we don't need to worry about it because we'll be removing the original color from both images and then colorizing the final composite with whatever color we choose!
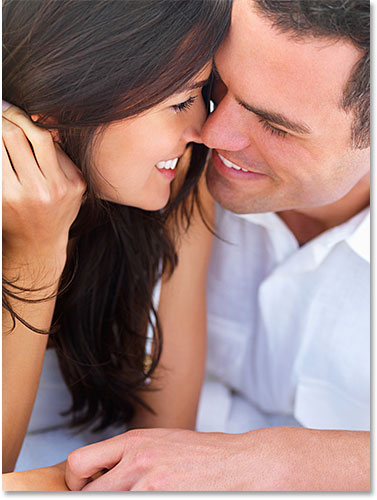
Here's the photo I'll be using for the top half of my "poster" (smiling couple photo from Shutterstock):
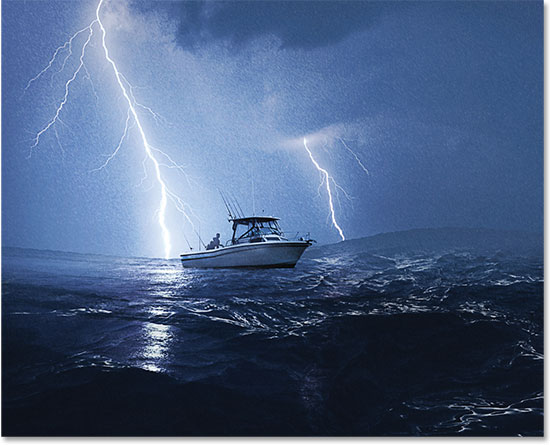
To add a little drama, I'll blend this "stormy seas" photo into the bottom half (boat in storm photo from Shutterstock):
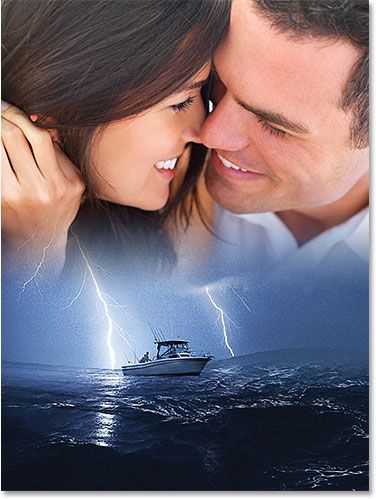
And here's what the final movie poster effect will look like:
Just a quick reminder that this version of the tutorial is specifically for Photoshop CS6 users. If you're using an earlier version of Photoshop, or just want to see a different example of the effect, be sure to check out the original tutorial.
How To Blend Photos Like A Movie Poster In Photoshop CS6
Step 1: Move Both Images Into The Same Document
Open both of the images you want to blend together. They'll each appear in their own separate documents, so the first thing we need to do is move both images into the same document. By default, only one image is visible on the screen at a time, but we can switch between them by clicking on their name tabs along the top of the screen. I'll switch to my storm photo by clicking on its name tab:

Then, to move this image into the same document as my other image, I'll select the Move Tool from the top of the Tools panel along the left of the screen:

With the Move Tool selected, I'll click anywhere inside my storm photo and, with my mouse button held down, I'll drag it up onto the other document's tab. Keep holding your mouse button down over the tab until you see Photoshop switch to your other image on the screen:

Then, still with your mouse button held down, drag down into this other document: A white highlight border will appear around the edges of the document:

Before you release your mouse button, press and hold the Shift key on your keyboard, then release your mouse button. Adding the Shift key tells Photoshop to center the image inside the document, and now we can see my storm photo centered in front of the other photo:

If we look in my Layers panel, we see that Photoshop placed my storm photo on its own layer named Layer 1 above the photo of the couple:

Step 2: Resize And Reposition The Photos As Needed
Since my storm photo is going to be used as the bottom half of my "movie poster", I need to move it down to the bottom of the document. I also need to resize it, and we can do both of these things using Photoshop's Free Transform command. I'll make sure I have Layer 1 selected (highlighted in blue) in the Layers panel since it's the layer that holds my storm photo, then I'll go up to the Edit menu in the Menu Bar along the top of the screen and I'll choose Free Transform. I could also just press Ctrl+T (Win) / Command+T (Mac) on my keyboard to select it with the shortcut:

This places the Free Transform box and handles (the little squares) around the image. They'll appear around the actual dimensions of the image, not just the viewable area of the document, so since my image is larger than the viewable area, the Free Transform box and handles appear in the gray pasteboard area surrounding the photos (if your image is so big that the Free Transform handles extend right off your screen, go up to the View menu in the Menu Bar and choose the Fit on Screen view mode).
To resize the image, click and drag any of the corner handles, keeping your mouse button held down as you drag. To constrain the proportions of your image as you're resizing it (so you don't distort the shape of the photo), press and hold the Shift key as you're dragging the handles. When you're happy with the size of the image, release your mouse button first, then release the Shift key. Here, I'm dragging the top left corner handle in towards the center of the image to make it smaller:

I also need to move the image down to the bottom. To move it, with Free Transform still active, all I need to do is click on the image and drag it downward, again keeping my mouse button held down as I drag. When you're done moving and resizing your image, press Enter (Win) / Return (Mac) on your keyboard to accept the transformation and exit out of the Free Transform command:

Renaming The Background Layer
If you need to resize or reposition the other photo as well, you'll find that by default, you can't, and that's because it's sitting on a special layer known as the Background layer:

If you select the Background layer in the Layers panel, you'll find that the Free Transform command under the Edit menu is grayed out and unavailable. Even if you just try moving the image with the Move Tool, Photoshop will toss up a warning message saying you can't move it because the layer is locked:

To get around this problem, simply hold down your Alt (Win) / Option (Mac) key and double-click directly on the name Background in the Layers panel. This will automatically rename the layer Layer 0, and now you'll be able to resize and/or reposition it as needed:

Step 3: Add A Layer Mask
Let's blend our two images together using a layer mask. Select Layer 1 in the Layers panel if it's not still selected, then click on the Add Layer Mask icon at the bottom of the Layers panel:

Nothing will happen to the images in the document window, but we now see a white-filled layer mask thumbnail on Layer 1, letting us know that we've added our mask. We also see a white highlight border around the thumbnail which tells us that the mask, not the photo on the layer, is selected:

Step 4: Select The Gradient Tool
Select Photoshop's Gradient Tool from the Tools panel:

Step 5: Choose The Black To White Gradient
With the Gradient Tool selected, click on the gradient preview bar on the far left of the Options Bar along the top of the screen:

This opens the Gradient Editor, and at the top is a collection of small thumbnails, each representing a different preset gradient. Click on the Black, White gradient's thumbnail to select it (top row, third from the left), then click OK to close out of the Gradient Editor:

Step 6: Drag Out A Black To White Gradient On The Layer Mask
With the Gradient Tool and the Black, White gradient selected, and my layer mask thumbnail selected on Layer 1, I'll click near the top of my storm photo to set the starting point for my gradient. Then, with my mouse button still held down, I'll hold down my Shift key on my keyboard and drag down a short distance towards the boat. Holding the Shift key down as I drag limits the angle at which I can move, making it easy to drag straight down:

I'll release my mouse button, and the spot where I release it becomes the end point for my gradient. Photoshop draws my gradient, and because it was drawn on the layer mask, not on the photo itself, we don't actually see it in the document window. Instead, we see the two photos now blended together, with the area between the start and end points of the gradient becoming the transition area from one photo to the other:
Related tutorial: 3 Ways To Blend Images Together In Photoshop
If you want to see the actual gradient itself on the layer mask, press and hold your Alt (Win) / Option (Mac) key on your keyboard and click on the layer mask thumbnail in the Layers panel:

The black to white gradient appears in the document window. What we're seeing here is the layer mask itself, not the contents of the layers (the photos). To switch back to the photos (the layer contents), once again press and hold Alt (Win) / Option (Mac) and click on the layer mask thumbnail:

Step 7: Merge Both Layers Onto A New Layer
Next, we need to merge our two existing layers onto a new layer above them. The easiest way to do that is with a handy keyboard shortcut. Press Shift+Ctrl+Alt+E (Win) / Shift+Command+Option+E (Mac). Photoshop merges both layers onto a new layer named Layer 2 above the original two layers:

Step 8: Add Noise
Let’s add a little noise to the image to help the two photos blend more seamlessly together. Go up to the Filter menu at the top of the screen, choose Noise, and then choose Add Noise:

This opens the Add Noise dialog box. First, set the Distribution option to Gaussian and make sure the Monochromatic option at the bottom of the dialog box is checked. Then, set the Amount value by dragging the slider a little towards the right. A value of between 2-6% usually works best, and it will depend on the size of your image. Don't add too much noise or you'll make the image look overly grainy. We need just enough noise to add a little bit of uniform texture. When you're done, click OK to close out of the dialog box:

Step 9: Add A Black & White Adjustment Layer
Next, we'll remove the original colors from the images and create a custom black and white version of the composite using a Black & White adjustment layer. Click on the Black & White icon (third icon from the left, middle row) in the Adjustments panel:

This adds a Black & White adjustment layer above Layer 2, which we can see in the Layers panel:

It will also create an instant black and white version of the image in the document window. The controls for the Black & White adjustment layer are found in the Properties panel. Here, we find a series of sliders, each labeled with a different color (Reds, Yellows, Greens, and so on). Drag the sliders left or right to adjust the brightness of different areas in the black and white version based on their original colors. For example, dragging the Reds slider towards the right will lighten any areas that originally had red in them, while dragging the slider towards the left will darken those areas. Each slider works the same way, allowing you to increase or decrease the brightness of any areas that originally contained that color. You can experiment with the sliders as much as you want until you're happy with the results, or you can simply click the Auto button above the sliders to have Photoshop take a guess at what the black and white conversion should look like:

Here's my image after converting it to black and white:

Step 10: Add A Hue/Saturation Adjustment Layer
We'll colorize the image using a Hue/Saturation adjustment layer. Click on the Hue/Saturation icon in the Adjustments panel (first icon on the left, middle row):

The Hue/Saturation adjustment layer appears above the Black & White layer in the Layers panel:

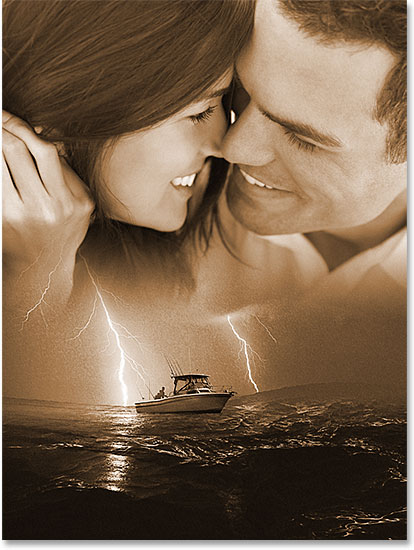
Once again, the controls for the adjustment layer appear in the Properties panel. First, select the Colorize option by clicking inside its checkbox. Then, drag the Hue slider left or right to choose a color for your image. A live preview of the color appears in the document window as you drag the slider. I'll choose an eerie orange color for my image by setting the Hue value to around 30. I'll also increase the saturation of the color a little by dragging the Saturation slider to a value of 35. Of course, the color you choose for your image may be completely different:

Step 11: Change The Blend Mode To Color
Finally, back in the Layers panel, change the blend mode of the Hue/Saturation adjustment layer from Normal to Color. You'll find the Blend Mode option in the top left corner of the Layers panel. The Color blend mode lets us add color without affecting the brightness values of the image (which we've already set using the Black & White adjustment layer):

Here, after colorizing my image and changing the blend mode to Color, is my final "movie poster" result: