
CS6 Camera Raw – Interface Essentials
In this tutorial for Photoshop CS6 users, we'll take a tour of the Camera Raw interface and learn where all of the various tools, panels and other features are located, so you can begin processing your raw, JPEG or even TIFF images in Adobe Camera Raw with all of the simplicity, freedom and flexibility it offers. Once we're familiar with Camera Raw's interface, we can then begin looking in much more detail at how to process, correct and retouch our images as we'll do in the next tutorials.
Updating Photoshop CS6 To Camera Raw 8
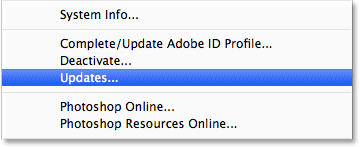
One important note before we begin. Photoshop CS6 originally shipped with Camera Raw 7, but Adobe has released a free update for CS6 users to the new Camera Raw 8 (or more specifically, 8.1 at the time I'm writing this). If you're using Photoshop CS6 and haven't yet updated to Camera Raw 8, you can do so by going up to the Help menu (in Photoshop) in the Menu Bar along the top of the screen and choosing Updates from the list. This will open the Adobe Application Manager where you can view, select and download all the updates currently available, including updates for Camera Raw:
However (and this is a big "however"), there's a catch. The version of Camera Raw 8 that Adobe has made available to Photoshop CS6 users is mainly to fix various bugs from Camera Raw 7 and make Camera Raw compatible with both high resolution displays and the latest digital cameras and lenses. While that's great, the CS6 version of Camera Raw 8 is missing the new features available exclusively to Photoshop CC (Creative Cloud) subscribers, like the new Radial Filter, the improved Spot Healing brush, and the new Upright options for easy perspective correction. Also, Photoshop CS6 itself is missing the new Camera Raw filter that's been added to Photoshop CC. So, that's just something to keep in mind. If you want the brand new features in Camera Raw 8, you'll need to upgrade to Photoshop CC by subscribing to the Adobe Creative Cloud. I'll be covering these new features in separate tutorials but for this tutorial, we're going to look specifically at the version of Camera Raw 8 that's available with Photoshop CS6.
Opening Camera Raw
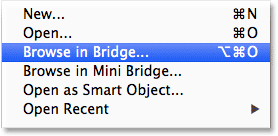
To open Camera Raw, we first need to select an image, either a raw file, JPEG or TIFF, and the best way to do that is with Adobe Bridge. I already have Photoshop CS6 open on my screen, so to access Adobe Bridge, I'll go up to the File menu in Photoshop's Menu Bar and choose Browse in Bridge:
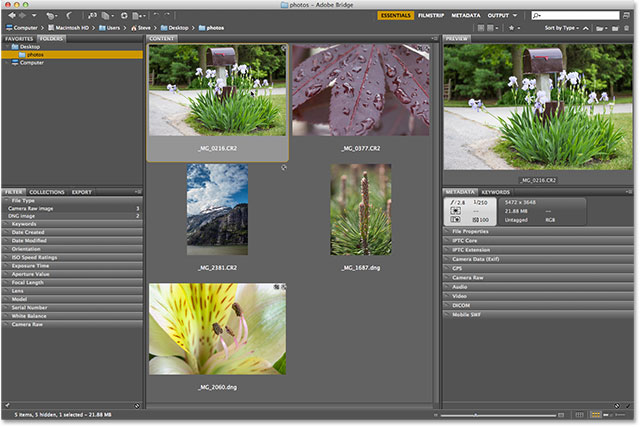
This will open Adobe Bridge if it isn't open already. Click on the Folders tab in the upper left corner to open the Folders panel and navigate to wherever the folder is on your computer that holds the image you want to open. Here, I've navigated to a folder on my desktop containing a few photos captured as raw files. Click once (don't double-click, just single-click) on the image to select the one you want to open in Camera Raw:
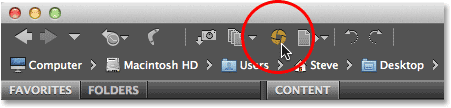
With the photo selected, click the Open in Camera Raw icon at the top of the screen:
This opens the image in Camera Raw and presents us with the Camera Raw dialog box, with the photo visible in the main preview area in the center:

Toggle Fullscreen Mode On And Off
The first thing you'll most likely want to do when the Camera Raw dialog box appears is click the Fullscreen icon at the top (just to the left of the histogram in the top right corner). This will expand the Camera Raw dialog box to fullscreen, giving you a much larger preview area and more room to work. If you want to switch back to the more compact mode, simply click the Fullscreen icon again. You can also toggle Fullscreen mode on and off by pressing the letter F on your keyboard:
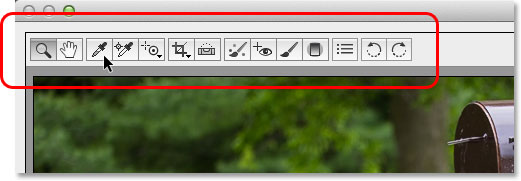
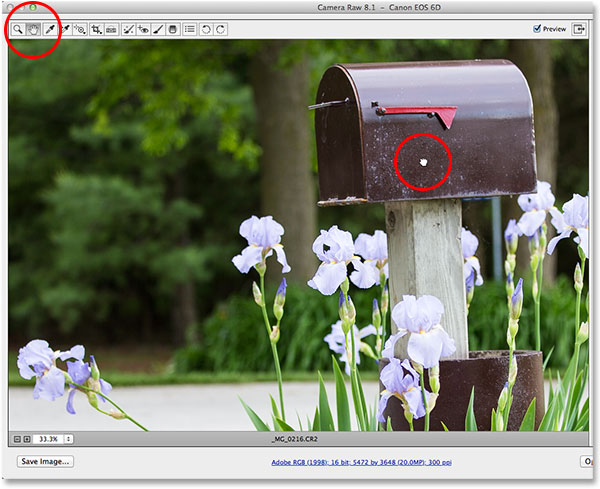
The Toolbar
Along the top of the dialog box is the Toolbar where we find Camera Raw's various editing tools, many of which are the same as, or at least similar to, tools and commands we'd find in Photoshop itself, like the Zoom and Hand Tools for navigating around the image, the Crop Tool, the Spot Removal Tool, and options at the far right of the Toolbar for rotating the image clockwise or counterclockwise. The name of a tool will appear if you hover your mouse cursor over its icon:
The Camera Raw Preferences
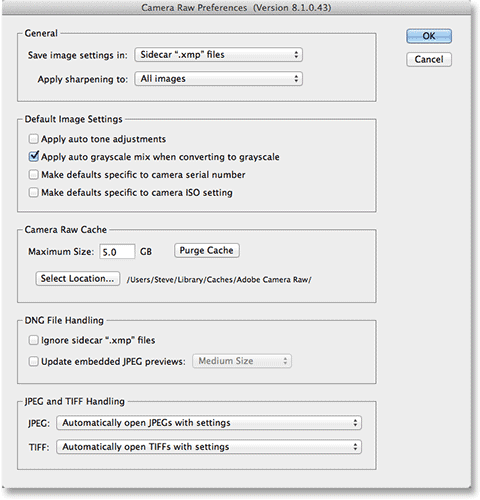
While most of the icons in the Toolbar represent actual editing tools, one of them is different. It opens the Camera Raw Preferences. It's the third icon from the right:
Clicking on it opens the Camera Raw Preferences dialog box where we can set various options for how Camera Raw works. For the most part, the default Preferences work fine so once you've looked them over, go ahead and click OK to close out of the dialog box. We'll cover the Preferences in more detail in another tutorial:
Navigating Around The Image In The Preview Area
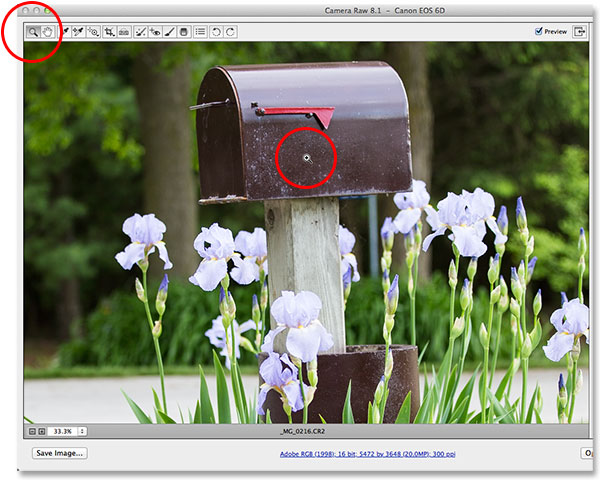
The first tool on the far left of the Toolbar is the Zoom Tool, and just like Photoshop's Zoom Tool, it can be used to zoom in and out of the image. Click on its icon to select it, then click on an area of the photo you want to zoom in on, clicking repeatedly to zoom in further. To zoom back out, hold down your Alt (Win) / Option (Mac) key on your keyboard while clicking. To instantly zoom the image in to the 100% zoom level (known as the "Actual Pixels" view), double-click on the Zoom Tool's icon in the Toolbar (to instantly zoom back out to fit the entire image into the preview area, double-click the Hand Tool directly to the right of the Zoom Tool):
We can also zoom in and out using the zoom options in the lower left corner of the dialog box (just below the preview area). Click the small "+" and "-" icons to zoom in or out, or click directly on the box showing the current zoom level to pop open a list of preset zoom levels to choose from:

We can zoom in and out of the preview area from the keyboard as well. Press Ctrl+plus sign (+) (Win) / Command+plus sign (+) (Mac) to zoom in, or Ctrl+minus sign (-) (Win) / Command+minus sign (-) (Mac) to zoom out. Pressing Ctrl+0 (Win) / Command+0 (Mac) will instantly fit the image to the preview area, while Ctrl+Alt+0 (Win) / Command+Option+0 (Mac) will jump to the 100% zoom level.
To move the image around inside the preview area when you're zoomed in, select the Hand Tool by clicking on its icon in the Toolbar (second icon from the left), then click and drag the image. You can also select the Hand Tool temporarily by pressing and holding the spacebar on your keyboard, just like you can in Photoshop:
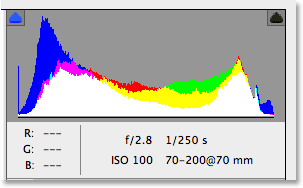
The Histogram
In the top right corner of the Camera Raw dialog box is the Histogram, which lets us keep a constant eye on the overall tonal range of the image as we're working. It represents the range of possible brightness values beginning with pure black on the far left and gradually increasing in brightness to pure white on the far right. The higher the "mountain", as many people call it, appears over a certain brightness level, the more pixels we have in the image at that same level. The most important use for the Histogram is making sure we're not clipping any of our shadows to pure black, or our highlights to pure white, and we'll learn more about how that works in another tutorial:
The Panels
Directly below the Histogram on the right hand side of the Camera Raw dialog box is where we find the various panels. Just as Photoshop itself uses panels to perform different tasks, Camera Raw also uses panels. The difference here, and one of the nice advantages with Camera Raw, is that Camera Raw doesn't have anywhere near as many panels as Photoshop does. That's because Camera Raw has been streamlined specifically for image editing, while Photoshop does image editing plus a whole lot more. This means there's a lot less to learn with Camera Raw, and Camera Raw's panels are conveniently nested together in one spot, making it easy to switch from one panel to another simply by clicking on the various tabs along the top:
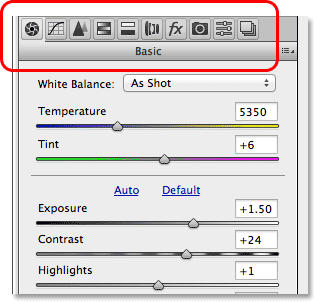
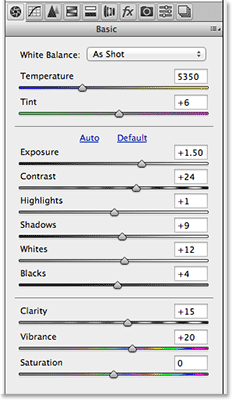
The Basic Panel
The panels are arranged in a logical order based on a standard image editing workflow (another nice feature of Camera Raw), and the Basic panel is the one that opens by default since it's usually the first panel we'll want to use. In fact, with this one panel alone, you can accomplish most of your editing work. At the top are controls for setting the white balance and color temperature, followed by a group of sliders for adjusting the overall exposure and contrast, highlights and shadows, and setting the main white and black points. At the bottom of the Basic panel, we can increase or decrease contrast in the midtones with the Clarity slider (which can dramatically sharpen or soften an image), and finally, we can control color saturation with the Vibrance and Saturation sliders. If there's one panel in Camera Raw you'll use more than any others, it's this one:
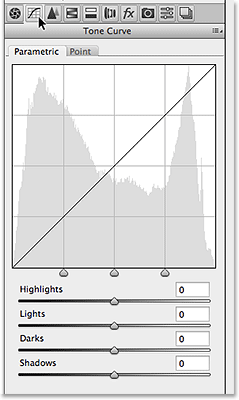
The Tone Curve Panel
If we click on the second tab from the left, we open the Tone Curve panel. Once we've made the image look as good as possible with the sliders in the initial Basic panel, we can use the Tone Curve panel to make more fine-tuned adjustments to the brightness and contrast using curves. It's similar to the Curves adjustment in Photoshop, but Camera Raw's Tone Curve panel offers easier, more intuitive controls (like its simple Highlights, Lights, Darks, and Shadows sliders) that can be less intimidating for beginners. As with all the panels in Camera Raw, I'll be covering the Tone Curve panel in more detail in another tutorial:
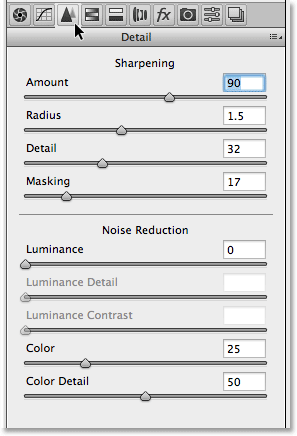
The Detail Panel
The third panel from the left is the Detail panel. The top half is where we do all of our image sharpening, while the bottom half lets us reduce any luminance or color noise. These first three panels (Basic, Tone Curve and Detail) are the ones you'll use with nearly all your images:
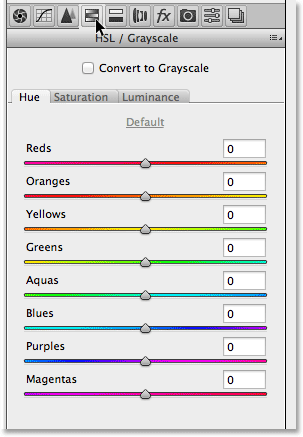
The HSL / Grayscale Panel
Next up as we move through the panels from left to right is the HSL / Grayscale panel. From here, we can make adjustments to the hue, saturation and/or luminance (brightness) of individual colors in the image using the eight color sliders (click on the Hue, Saturation or Luminance tabs above the sliders to change what it is the sliders are affecting). Also, if we select the Convert to Grayscale option at the top, we can use the same color sliders to create highly customized black and white versions of our color images, just like we can using Photoshop's Black & White adjustment. Dragging a color slider to the left will darken any areas that originally contained that color, while dragging the slider to the right will lighten those same areas. To switch back to the full color version of your image, simply uncheck the Convert to Grayscale option. Nothing we do while in Camera Raw is permanent, so we can make as many changes as we want to our image with no loss of image quality:
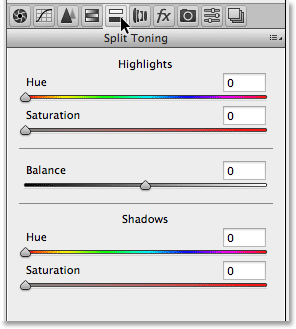
The Split Toning Panel
Next, we have the Split Toning panel, an easy way to add a custom split toning effect to any image, whether it's a color photo or black and white. There's separate Hue and Saturation controls for the highlights and shadows, as well as a Balance slider to adjust the brightness level where the transition between the two colors occurs:
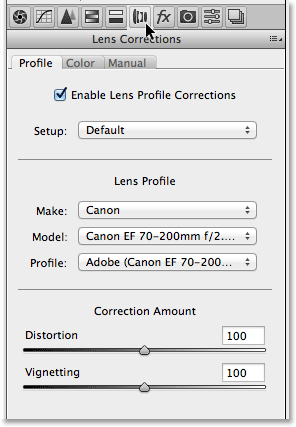
The Lens Correction Panel
Camera Raw's Lens Correction panel is where we can fix lens distortion problems in the image (in other words, distortion caused by the camera lens itself) as well as perspective distortion created by the angle at which we snapped the photo (looking up at a tall building, for example, causes it to appear to be leaning backwards). The Profile tab lets Camera Raw automatically choose a lens correction profile specifically for the make and model of your lens (information it gathers from the Exif data embedded in your image). The Color tab is used to correct chromatic aberration and other color distortion problems, while the Manual tab is for correcting perspective distortion, as well as lens vignetting. Again, we'll cover more about this panel (and all the others) later:
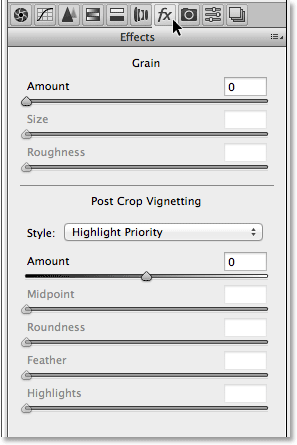
The Effects Panel
To the right of the Lens Correction panel is the Effects panel. Now, if you're thinking "Yes! This is where we create awesome photo effects!", well, sadly, no. While there's no limit to the amazing photo effects you can create with Photoshop itself, Camera Raw is a much more refined image editing environment, and there's really only two types of effects we can add with the Effects panel - film grain and vignetting. For me, I use vignetting often to darken the edges around my photos, and Camera Raw's Post Crop Vignetting options make adding a vignette quick and easy:
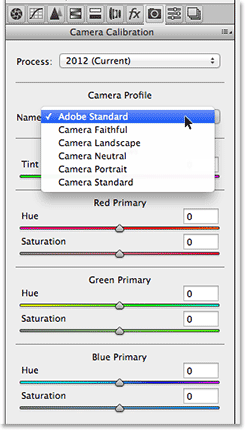
The Camera Calibration Panel
Most people will never have a use for the main purpose of the Camera Calibration panel, which is to give us a way to compensate for problems in the way our camera captures color. We have separate Hue and Saturation sliders for each of the three primary colors of light (red, green and blue) as well as a Tint slider for adjusting shadows. However, if you've been noticing a color cast problem with your camera, you'd be much better off running some tests and repairing or replacing the camera if needed, rather than trying to compensate for the issue here.
There's also a Process option at the top of the panel which allows us to switch from Camera Raw's most recent image processing engine (2012 in this case) to the older 2010 or 2003 engines. Other than for the sake of comparison, you probably won't find much use for this option, either.
However, one option that can actually be useful is Camera Profile. Many digital cameras offer various Picture Styles to choose from that may give better results depending on your subject (with common styles being Portrait, Landscape, Faithful, Neutral, and Standard). If you're capturing your images as raw files, though, these in-camera Picture Styles make no difference because they only apply to images captured as JPEGs, but we can select these same styles from the Camera Profile option to simulate the effect with our raw images:
The Presets And Snapshots Panels
The final two panels in Camera Raw are the Presets and Snapshots panels. The Presets panel allows us to save the settings we've used with one image as a preset that we can instantly apply to other images simply by choosing the preset from the list. It's a bit like creating actions in Photoshop but much, much simpler. The Snapshots panel is similar to the snapshot feature in Photoshop's History panel. At any time while we're working on an image in Camera Raw, we can save a snapshot of our work, which will save all of our settings up to that point. We can then instantly revert back to that point at any time if we need to just by choosing the snapshot. Both of these panels are empty by default (until we actually save a preset or snapshot) so I won't bother with screenshots, but you can easily switch to them yourself to check them out by clicking on their tabs (Presets is the second panel from the right, Snapshots is the very last panel on the right).
Switching Panels From The Keyboard
Every panel in Camera Raw, with the exception of the Snapshots panel on the far right, can be easily selected from the keyboard. Simply hold down your Ctrl+Alt (Win) / Command+Option (Mac) keys and press a number key. Press 1 for the Basic panel, 2 for Tone Curve, 3 for Detail, 4 for HSL / Grayscale, 5 for Split Toning, 6 for Lens Correction, 7 for FX, and 8 for the Presets panel.
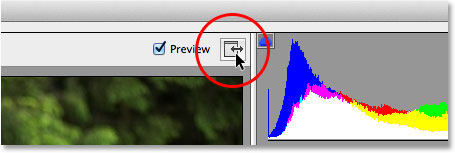
The Preview Option
As you're working on an image, it often helps to see a "before and after" comparison, and Camera Raw's Preview option, found just to the left of the Fullscreen icon at the top, allows us to toggle the preview on and off so we can switch between what the image looked like originally and how it looks after our changes. You can check and uncheck the option by clicking inside its checkbox, but a faster and easier way to toggle the preview on and off is by simply pressing the letter P on your keyboard:

Note, though, that the Preview option is panel-specific, meaning it only affects the currently active panel. For example, if you make changes in the Basic panel, then switch to the Tone Curve panel and toggle the preview off, nothing will happen because all of your changes were made in the Basic panel, not the Tone Curve panel. You would need to switch back to the Basic panel to see the "before and after" comparison of those changes. To toggle the preview on and off for all the panels at once, first switch to either the Presets or Snapshots panels, then press the letter P on your keyboard.
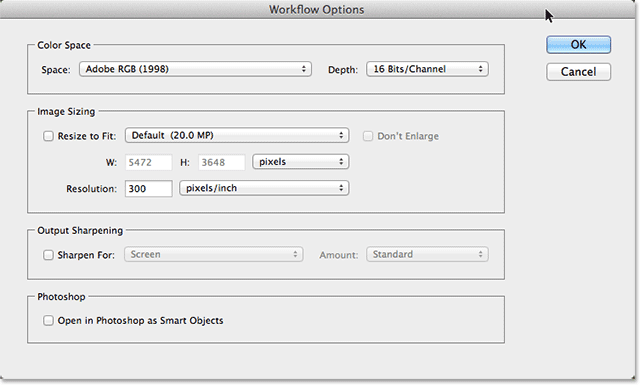
The Workflow Options
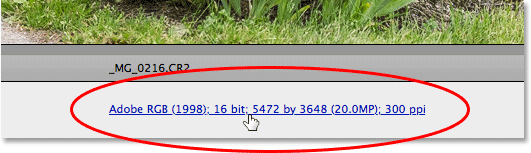
In the bottom center of the dialog box is what looks like a link you'd see on a website. This link actually takes you to the Camera Raw Workflow Options. The link itself displays your current workflow settings, including the color space, the bit depth, the pixel dimensions of the image, and the current print resolution:
Clicking the link opens the Workflow Options dialog box where we can make changes to the color space and bit depth, resize the image if needed, set some basic sharpening options, and choose whether or not the image should open as a Smart Object if / when we open it in Photoshop. Like everything else we've looked at, these options need their own tutorial to cover them properly, but for now, at least we know where to find them:
Saving The Image Directly From Camera Raw
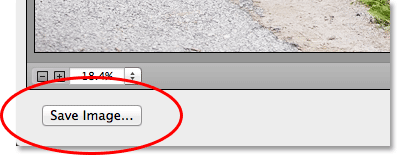
Because Camera Raw is such a complete image editing environment, you'll often find that you can do everything you need to do to an image directly in Camera Raw itself, without ever having to open it in Photoshop. That's why Adobe gave Camera Raw the ability to save out the final image as a JPEG or other file type. You'll find the Save Image button in the bottom left corner of the dialog box. Clicking this button will open the Save Options dialog box where we can choose the file format for the saved image, rename the image if needed, choose a location to save it to, and more:
Opening The Image In Photoshop
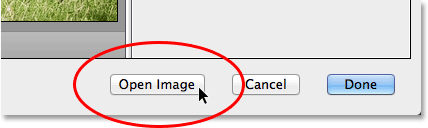
Of course, there will also be times when, after you've done everything you can in Camera Raw, the image will still need to be opened in Photoshop for further editing. When you're ready to send the image to Photoshop, click the Open Image button in the lower right corner of the dialog box:
Closing Out Of Camera Raw
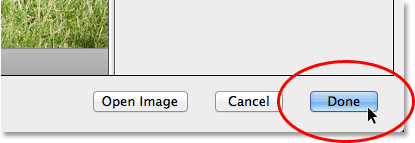
If you're done working on your image, or just need a break, and don't need to save out the image to some other file format or open it in Photoshop, you can save your work and close out of Camera Raw by clicking the Done button in the lower right corner. The next time you open the image in Camera Raw, it will open with all of your settings applied:
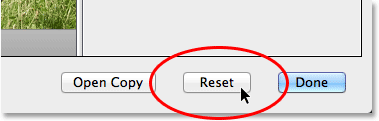
Cancel And Reset
If you want to close out of Camera Raw without saving your work, click the Cancel button:

To reset the panels back to the way they were when you opened Camera Raw, clearing away any work you've done to the image since then but leaving the image and Camera Raw open on your screen, press and hold the Alt (Win) / Option (Mac) key on your keyboard. This will change the Cancel button to Reset. Then, click the Reset button.
And there we have it! That's our whirlwind tour of the Camera Raw interface, and specifically the new Camera Raw 8 interface, in Photoshop CS6! Check out our Photo Retouching section for more Photoshop image editing tutorials!