
The Hidden Photographic Toning Presets In Photoshop CS6
Photoshop CS6 is packed with great new features, but not all of them are as immediately obvious, or as easy to find, as others. Some are practically hidden, like the new Photographic Toning presets for the Gradient Map image adjustment which let us choose from a collection of professional quality tinting and split-toning effects for our photos, all based on real-world chemical processes. These new presets aren't even loaded into Photoshop CS6 by default, so in this tutorial, we'll learn where to find them, how to load them, and how to use them to add great looking toning effects to our images quickly and easily.
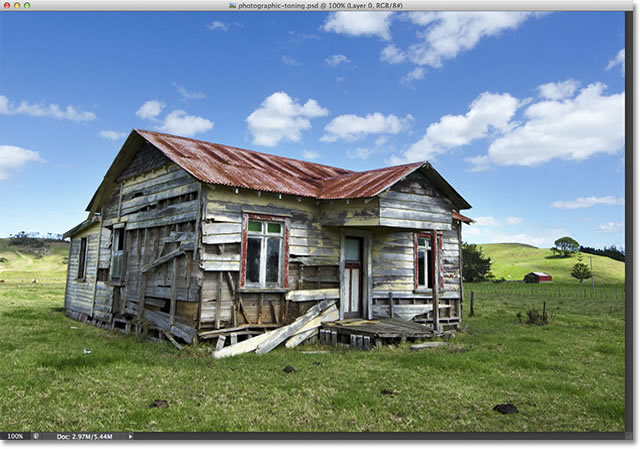
Here's the photo I have open on my screen:
Step 1: Add A Gradient Map Adjustment Layer
The new Photographic Toning presets have been added to the Gradient Map image adjustment, which means we first need to add a Gradient Map adjustment layer to our document. Click on the Gradient Map icon in the Adjustments panel (far right, bottom row):

This adds a Gradient Map adjustment layer above the photo in the Layers panel:

Step 2: Open The Gradient Picker
The options for the Gradient Map adjustment layer appear in the Properties panel (new in CS6). Click on the small, down-pointing arrow to the right of the gradient preview bar to open the Gradient Picker:

Step 3: Load The Photographic Toning Presets
When the Gradient Picker appears, click on the small gear icon in the top right corner:
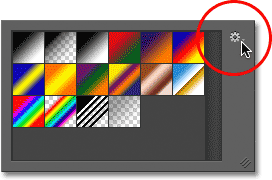
This opens a menu with various options for the Gradient Picker, and at the bottom of the menu is a list of additional gradient sets we can load into Photoshop. This is where we find the Photographic Toning presets. Click on Photographic Toning to load them in:

Photoshop will ask if you want to replace the current set of gradients with the new Photographic Toning gradients, or if you just want to add the new gradients in with the current ones. I'll click OK to replace the current gradients with the Photographic Toning set. At the end of the tutorial, I'll show you how to easily switch back to the original default gradients at any time:

With the Photographic Toning presets now loaded into Photoshop, we can see thumbnails for the various presets in the Gradient Picker:

The thumbnails may look nice, but it's tough to tell exactly which preset is which just by looking at the thumbnails. Click again on the gear icon in the top right corner of the Gradient Picker to once again open the menu:
Then, from the menu, choose either the Small List or Large List view option. I'll choose the Small List:

This lets us see not only a thumbnail for each preset but also the name of each preset to the right of the thumbnail:

You can expand the size of the Gradient Picker to view more of the presets without needing to scroll simply by clicking and (with your mouse button still held down) dragging the bottom right corner of the Gradient Picker downward:

Step 4: Click On A Preset To Apply It To The Image
Now that we've loaded the Photographic Toning presets into the Gradient Map adjustment and we can easily see both the thumbnail preview and the name of each preset, all we need to do is click on a preset from the list to have Photoshop instantly apply it to the image. The Photographic Toning presets are divided into two groups. The top half, starting with Platinum at the top of the list and ending with Copper 2, are tinting presets, meaning that they apply a single tone to the entire image. Simply click on any of them to see a live preview of the tinting effect in the document window. For example, I'll click on Platinum to select it:

Photoshop instantly applies the effect to the image. Since we're using an adjustment layer here, we're not making any permanent changes to the photo so we're free to try out as many of the presets as we like:

If I click on the Sepia 1 preset in the Gradient Picker:

The preview in the document window updates to show me what the sepia effect looks like. There's several different sepia presets to choose from:

And if I choose Cyanotype from the list as a third example:

We get a different tinting result:

The second half of the Photographic Toning presets, from Sepia-Selenium 1 down to Cobalt-Iron 3 at the bottom of the list, are split-toning gradients that apply one tone to the lighter areas of the photo and a different tone to the darker areas. As with the tinting presets, all we need to do is click on the one we want from the list and Photoshop will instantly apply it to the image. I'll choose the Sepia-Cyan preset:

And here we can see the effect, with the lighter areas toned with sepia and the darker areas with cyan:

For a stronger effect, I'll try Gold-Selenium 2:

And now we have a gold tone applied to the lighter areas and selenium to the darker areas:

And as one last example, I'll choose the Copper-Sepia preset:

And here, we get another interesting look for the image. In total, there's 38 different Photographic Toning presets to choose from in Photoshop CS6 (19 tinting presets and 19 split-toning presets) so be sure to try them all out on your own:

Restoring The Default Gradients
If, at some point, you need to switch out of the Photographic Toning presets and back to the original default gradients for the Gradient Map adjustment, just click again on the gear icon in the top right corner of the Gradient Picker:

Then, when the menu appears, simply choose Reset Gradients from the list:

Photoshop will ask if you want to completely replace the current gradients with the default set. Click OK to say yes, and the default gradients will once again become available and ready to use:

And there we have it! That's how to load and use the new Photographic Toning presets to quickly apply tinting and split-toning effects to your images with Photoshop CS6! Check out our Photo Retouching section for more Photoshop image editing tutorials!