Photoshop’s Photo Filter trick – Choose Filter Colors from your Images
Get more from Photoshop's Photo Filter by learning the trick to choosing filter colors directly from your images! For Photoshop CC and CS6.
Photoshop's Photo Filter image adjustment makes it easy to add a color tint to an image. We can choose from presets that recreate the look of traditional, real-world color filters, or we can choose our own colors using the Color Picker. In fact, a Photo Filter adjustment even lets us choose filter colors by sampling them directly from the image. Or at least, we should be able to sample colors from the image.
But if you've ever tried to sample a color to use with the Photo Filter, you most likely ran into a problem. No matter which color you clicked on in the image, the only color you selected was white. In this tutorial, you'll learn why Photoshop thinks you're choosing white, and I'll show you the easy fix so you can click on colors to select them and actually end up with the colors you expect.
Once we've applied the Photo Filter, I'll show you a quick way to enhance the colors using another simple image adjustment. I'll be using Photoshop CC but you can also follow along with Photoshop CS6.
Let's get started!
The trick to sampling Photo Filter colors from your images
We'll start by looking at the problem we run into when trying to sample a color to use with the Photo Filter, and then I'll show you the easy solution.
Step 1: Open your image
Here's a colorful image I've opened in Photoshop, and what I'd like to do is unify the colors a bit by adding a tint using the Photo Filter. And rather than choosing one of the Photo Filter's preset colors, I'd like to sample a color directly from the image. Sounds easy enough:

Step 2: Add a Photo Filter adjustment layer
In the Layers panel, I'll add a Photo Filter adjustment layer by clicking the New Fill or Adjustment Layer icon:
And choosing Photo Filter from the list:

The Photo Filter appears above the image on the Background layer:

And just by adding the Photo Filter, the image has already warmed up. On the left is the original image, and on the right is the slightly warmer result using the Photo Filter's default settings. So far, so good:

Related: How to use the Photo Filter to neutralize color casts
Step 3: Click the color swatch, and then click on a color in the image
The options for the Photo Filter adjustment layer appear in Photoshop's Properties panel. And here we see that the Photo Filter is using its default filter, "Warming Filter (85)". That's why the image is already looking warmer than before:

Now I could click on the filter's name and select a different color filter preset from the list:

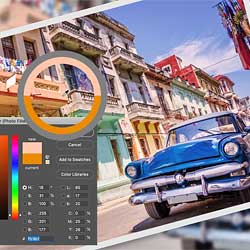
But what I really want to do is choose a color directly from the image. To do that, I'll click the color swatch to open Photoshop's Color Picker. And then, rather than choosing a color from the Color Picker, I'll click on a color in the image to sample it:

The problem: The Photo Filter always chooses white
But here's where we run into the problem. I'll try clicking on the blue sky to add a bluish tint to the image:

Yet notice that instead of selecting blue, the Color Picker shows that I somehow clicked on white:

In fact, no matter which color I click on, Photoshop refuses to let me choose it. Here I'm clicking on red from the side of the building. Or at least, I thought it was red. But according to Photoshop, I've again clicked on white:

Closing the Color Picker without selecting a color
Obviously, I don't want to use white as my filter color. So since Photoshop won't let me choose any other color, I'll click Cancel to close the Color Picker:

The solution: Deselecting the Photo Filter's layer mask
So what's going on? Is Photoshop broken? Why is it that no matter what color I try to sample for the Photo Filter, Photoshop thinks I clicked on white?
The answer can be found in the Layers panel. Notice the highlight border around the Photo Filter's layer mask thumbnail. This tells us that the layer mask is currently active:

Since the layer mask is active, it means that the whole time we thought we were clicking on the image to select a color, we were actually clicking on the layer mask. And since the layer mask is filled with white, that explains why we were always choosing white!
Viewing the layer mask in the document
By default, layer masks are hidden. Photoshop can see them, but we can't. But if you press and hold your Alt (Win) / Option (Mac) key and click on the layer mask thumbnail, you'll see the layer mask instead of the image. And notice that the mask covers the entire layer. So no matter where you click, you'll be choosing white.
To hide the mask and switch back to the image, again press and hold Alt (Win) / Option (Mac) and click on the layer mask thumbnail:

Related: Photoshop's Layer Masks Tips and Tricks
How to deselect the layer mask
So how do we solve this problem so we can choose an actual color from the image? All we need to do is click on the Photo Filter's thumbnail (the little camera filter icon). This makes the Photo Filter active and deselects the layer mask:
Clicking on the image now samples the actual color
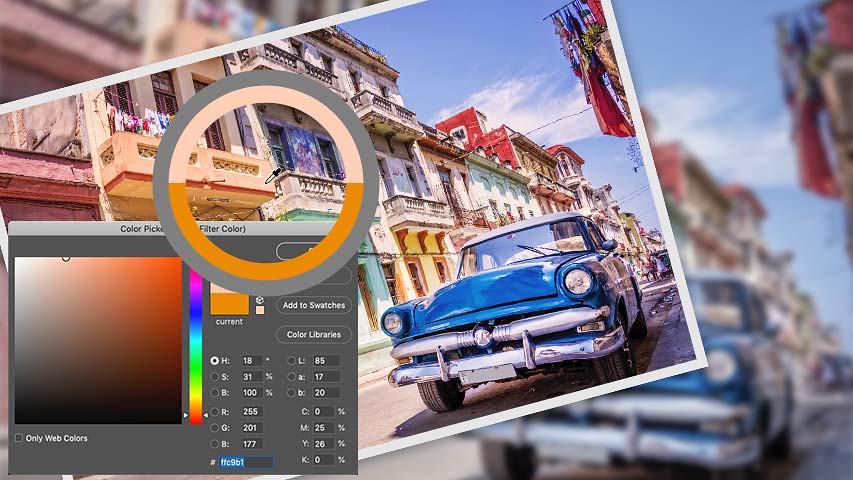
Then go back to the Properties panel and click again on the color swatch to open the Color Picker:
Click on a color in the image, and this time, Photoshop will sample the color you clicked on. I'll click on that reddish orange color from the balcony, and now we see the color I sampled showing up as expected in the Color Picker:

Related: How to choose text colors from your images
Adjusting the Density value
Once you've sampled a color, you can drag the Density slider in the Properties panel to adjust the intensity of the tint:

Viewing a "before and after" comparison
To compare the original version of your image with the Photo Filter effect, toggle the adjustment layer on and off by clicking its visibility icon:
Here's my original image once again:
And here is the Photo Filter result using the color I sampled from the image:

How to enhance the Photo Filter effect with Vibrance
Before we finish off the tutorial, here's a quick tip. After you've applied the Photo Filter, you may find that the colors still look a bit dull. You can enhance the colors by adding a Vibrance adjustment layer.
Step 1: Add a Vibrance adjustment layer above the Photo Filter
In the Layers panel, click the New Fill or Adjustment Layer icon:

And this time, choose Vibrance:

The Vibrance adjustment layer appears above the Photo Filter:

Step 2: Drag the Vibrance slider to increase color saturation
In the Properties panel, increase the saturation of the colors by dragging the Vibrance slider to the right. I'll set mine to around +50, but the amount you need will depend on your image.
Unlike the Saturation slider below it which increases saturation for all colors equally, Vibrance affects less-saturated colors the most, so it usually gives us better results:

And here, after sampling a color for the Photo Filter and then boosting the saturation with a Vibrance adjustment layer, is my final result:

And there we have it! That's how to sample Photo Filter colors directly from your image, and how to enhance the effect with a Vibrance adjustment, in Photoshop!
Visit our Photo Editing section for more editing and retouching tutorials! And don't forget, all of our tutorials are now available to download as PDFs!