
Reshape Images With Content-Aware Scale In Photoshop
In this Photo Retouch tutorial, we'll learn how the Content-Aware Scale feature, first introduced in Photoshop CS4, can help us transform and reshape images from one aspect ratio to another without distorting, or "squishing", our main subject and other important details in the image.
The usual way to change a photo's aspect ratio is to simply crop it using the Crop Tool, but that often means throwing away parts of the image we wanted to keep. With Content-Aware Scale, there's no need to crop anything away because Photoshop can move people and objects closer together (or further apart) almost like magic so everything fits within the new shape!
How does it work? With the Content-Aware Scale command selected, Photoshop will examine your photo and try to figure out, often with amazing accuracy, which areas are important (like your main subject) and which are not, and will do its best to protect the important areas as you're reshaping the image. Content-Aware Scale can be a powerful and time-saving feature when it works, but (there's always a "but") the problem is that it doesn't always work. In fact, it really depends on the image you're using.
In general, Content-Aware Scale works best with photos that contain large areas of low image detail (blue skies, open fields, calm waters, and so on). The reason is that for Photoshop to be able to move two areas of an image closer together, it needs to squish and compress the area between them. If the area between them contains too much image detail of its own, things can quickly turn into a jumbled mess. If, on the other hand, the area between them contains low amounts of detail, like a sky or open field, then it's easier for Photoshop to push those pixels together with fewer noticeable problems, giving you much better results.
As I mentioned, Adobe first introduced Content-Aware Scale in Photoshop CS4, so you'll need CS4 or higher to follow along with this tutorial. I'll be using Photoshop CS6 here, but everything we'll learn applies to CS4, CS5 and CS6. Here's the photo I'll be using:
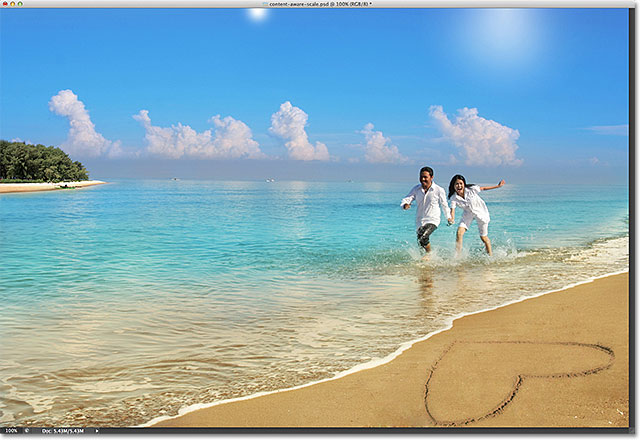
Let's say I need to reshape this photo from its original 4x6 aspect ratio into something closer to a square, but I want to keep not only the couple and the heart shape in the lower right of the image but also the small island over on the far left. If I tried to crop the photo into the new shape, I'd be forced to throw away some of the areas I want to keep, so that's not an option. Fortunately, much of the area in the center of this photo is low detail, making it a good candidate for the Content-Aware Scale command.
Before I do anything, though, I first need to take care of one minor problem. If we look at my Layers panel, we see that my photo is sitting on the Background layer, which is a special type of layer in Photoshop with its own unique rules for what we can and can't do with it:

Before we can apply Content-Aware Scale, or any of the other Transform commands, to the layer, we first need to rename the layer to something other than Background. The quickest way to do that is to hold down the Alt (Win) / Option (Mac) key on your keyboard and double-click on the Background layer in the Layers panel. This will instantly rename the layer to Layer 0, which means we're now free to do whatever we want to it:

Giving Free Transform A Try
To give us a better idea of just how powerful the Content-Aware Scale command really is, let's first see what happens if I try to reshape my photo using Photoshop's more traditional Free Transform command, which I'll select by going up to the Edit menu in the Menu Bar along the top of the screen and choosing Free Transform:

This places the standard transform handles (the little squares) around the photo. I'll click and hold my mouse button down on the left handle and drag it towards the right to reshape the image into more of a vertical, portrait orientation. As we can see though, Free Transform simply squishes the entire image together, making everyone and everything look taller and thinner (the checkerboard pattern appearing on the left is how Photoshop represents transparency). Not what we wanted:

The Power Of Content-Aware Scale
That didn't work, so I'll press the Esc key on my keyboard to cancel and exit out of the Free Transform command. This time, I'll select the Content-Aware Scale command by going back up to the Edit menu and choosing Content-Aware Scale:

At first glance, things look very similar to the Free Transform command. We get the same transform handles on the top, bottom, left, and right of the image as well as in each corner. The difference with Content-Aware Scale is that Photoshop is now analyzing the image trying to figure out which areas are important and which are not. It does this by assuming that higher detail areas are more important than lower detail areas. I'll click and hold on the left handle, just as I did a moment ago, and this time, watch what happens as I drag the handle towards the right to reshape the photo. Photoshop is doing its best to protect the areas it thinks are important (the couple running through the water and the island on the left of the image) so they keep their original shape. Most of the "squishing" is being done to the sky, clouds and water in the center of the image, since this area contains lower amounts of detail and was therefore considered less important:

The Protect Skin Tones Option
There's a couple of things we can do to help out the Content-Aware Scale command. If you're working on a photo of people, try selecting the Protect Skin Tones option up in the Options Bar (it's the icon that looks like a little person):

With Protect Skin Tones enabled, Photoshop will try to protect any warm skin tones in the photo. However, again the results will depend on the image you're working with. In my case, since the people in my photo appear pretty small, selecting this option actually made things worse, giving me one of those jumbled messes I mentioned earlier, but you may see better results with your own image so definitely give it a try:

Since the Protect Skin Tones option didn't help me at all with this image, I'll click on it again in the Options Bar to disable it, and now the couple looks much better:

Using An Alpha Channel To Specify Important Areas
The Protect Skin Tones option can be useful at times, but the real power of the Content-Aware Scale command is that we don't need to leave it up to Photoshop to figure out what's important and what's not. We can tell Photoshop ourselves which areas of the image to protect, and we do that by first selecting those areas and then saving our selection as an alpha channel.
I'm going to press the Esc key on my keyboard to cancel out of the Content-Aware Scale command for a moment. Then, to select the areas I want to protect, I'll grab the Lasso Tool from the Tools panel (you can use any selection tool you like but the Lasso Tool works fine):
With the Lasso Tool in hand, I'll first draw a selection around the island on the left of the image, since it's one of the areas I want to protect. It's okay to be somewhat loose with the selection. There's no need to be surgically precise, especially since we'll be feathering the selection edges in a moment:

I also want to protect the couple on the beach, so now that I have my initial selection around the island, I'll hold down the Shift key on my keyboard to add to my existing selection, then I'll draw a selection around the couple. I think I'll protect the heart shape in the bottom right of the image as well, so again I'll hold down my Shift key and draw a selection around the heart:

Now that we've selected all the areas we want to protect, let's add a bit of feathering to the selection to give us better results. We can quickly feather the selection using Photoshop's Refine Edge command. Click on the Refine Edge button in the Options Bar:

This opens the Refine Edge dialog box where you'll find the Feather slider near the center. We only need a slight amount of feathering, so keep an eye on your image to preview the results as you click and drag the Feather slider towards the right. I'm going to set my Feather amount to around 3.2 px. Click OK when you're done to close out of the Refine Edge dialog box:

All we need to do now is save our selection as an alpha channel, which is really just a fancy way of saying a "saved selection". Switch over to your Channels panel, which you'll find nested in beside the Layers panel. Click on the Channels name tab at the top to switch to it:

Once you're in the Channels panel, click on the Save Selection as Channel icon at the bottom of the panel (it's the icon that looks like a rectangle with a circle in the middle):

A new alpha channel named Alpha 1 will appear below the Red, Green and Blue channels in the list. Our selection is now saved, so press Ctrl+D (Win) / Command+D (Mac) on your keyboard to remove the selection outline from the document since we no longer need it:

Switch back over to your Layers panel by clicking on its name tab:

Then select the Content-Aware Scale command as we did before by going up to the Edit menu and choosing Content-Aware Scale:
If you look up in the Options Bar directly to the left of the Protect Skin Tones option, you'll see an option simply called Protect, with a selection box beside it that, by default, is set to None. Click on the word None to bring up a list of choices and choose the alpha channel we just created, which in this case was Alpha 1:

This time, as I click and hold on the left handle and begin dragging it towards the right, Photoshop uses my alpha channel to protect the areas I selected. The island, couple and heart shape on the beach all retain their original appearance while the unprotected area in the center of the photo (the area I didn't select) is being squished together:

I'll also click and hold on the top handle and drag it downward to reshape the image vertically as well. Notice here that Photoshop is compressing the low detail area in the blue sky without touching the rest of the photo:

When you're done, press Enter (Win) / Return (Mac) on your keyboard to accept the transformation and exit out of the Content-Aware Scale command. Depending on the size of your image, it may take Photoshop a few seconds to complete the task.
Trimming Away The Transparent Areas
Now that we've reshaped our image, we need to clean things up by trimming away the transparent areas (the checkerboard pattern) around it, and we can do that using Photoshop's Trim command. Go up to the Image menu at the top of the screen and choose Trim:

When the Trim dialog box appears, select the Transparent Pixels option at the top if it's not selected already. Also, make sure all four options (Top, Bottom, Left and Right) are checked at the bottom:
Click OK to close out of the dialog box, at which point Photoshop trims away all the transparent areas from around the photo, leaving us with our final result:

Tips For Getting Better Results With Content-Aware Scale
Here's a few quick tips for getting better results out of Photoshop's Content-Aware Scale command.
Keep Expectations In Check
First, keep your expectations realistic. No matter what we do to protect the important areas in a photo, we can only squish and compress an image so far before things start to get ugly. Exactly how much reshaping you can do with an image will depend entirely on the image itself. Photos with large areas of low detail will give you more room to work than will images with lots of detail throughout.
Reshape In Smaller Steps
Also, rather than reshaping the image all at once, try breaking it down into smaller steps. Select the Content-Aware Scale command and drag the transform handle only part of the way, then press Enter (Win) / Return (Mac) to accept it. Choose Content-Aware Scale again, drag the transform handle further, then again press Enter (Win) / Return (Mac). Keep repeating this process until you've reshaped the image as much as you need to. This way, by breaking it down into smaller steps, Photoshop doesn't have quite so much work to do each time.
Blending Content-Aware Scale With Free Transform
Finally, if you look up in the Options Bar (when the Content-Aware Scale command is active), you'll find an Amount slider which, by default, is set to 100%. We can use this slider to actually switch the behavior between Content-Aware Scale and the standard Free Transform command. With Amount set to 100%, we get the full power of Content-Aware Scale, but if we lower the Amount value down to 0%, the command behaves like Free Transform. By setting the Amount value to something between 0 and 100%, we get a blend of the two commands. That may sound a bit confusing, but if you find that certain areas of your image are starting to look jagged or broken, try lowering the Amount value which will reduce the strength of the Content-Aware Scale features and may help fix those problem areas:

And there we have it! That's how to reshape and transform images using the Content-Aware Scale command in Photoshop! Check out our Photo Retouching section for more Photoshop image editing tutorials!