
Photoshop Black and White Conversions – Channel Mixer
In the previous tutorial in this series on the many ways of converting color photos to black and white in Photoshop, we learned that every RGB image contains three color channels (Red, Green and Blue), and that each channel gives us a different black and white version of the image.
We saw how to view each channel separately from within the Channels palette and how to create a brand new document from the channel that gave us the best overall results.
In this tutorial, we'll look at one of the ways the professionals do it. Rather than selecting an individual channel, we'll see how Photoshop's Channel Mixer makes it easy to mix and combine the best of what each color channel has to offer to create highly customized black and white images!
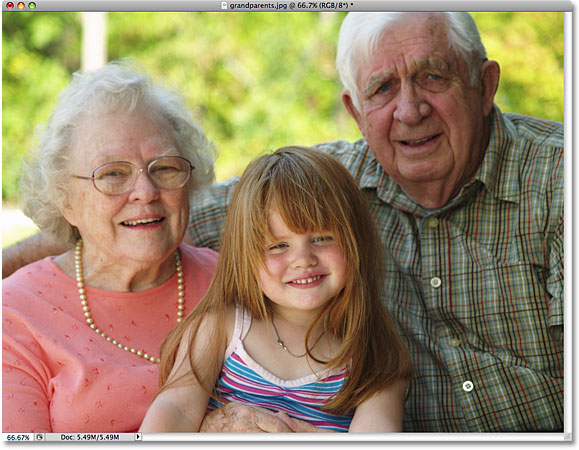
Here's the photo I'm using throughout this series so we can compare the results of the different black and white conversion methods:
Step 1: Preview Each Color Channel In The Channels Palette
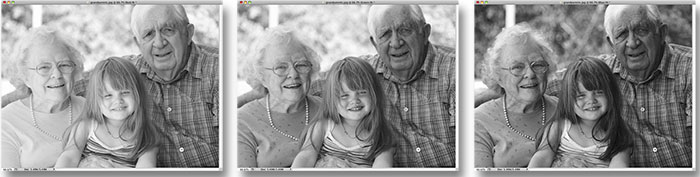
Before we start mixing the three RGB color channels together, it helps to first see what each channel looks like so we have some idea of what we're working with. We covered how to view each channel separately in the document window in the previous tutorial so I won't bother repeating it here, but as a quick reminder, here's what each of my three channels look like, with the Red channel on the left, the Green channel in the middle and the Blue channel on the right. As we can see, the Red channel gives us the lightest image since skin tone always contains lots of red, while the Blue channel gives us a very dark image because there's very little blue in the photo:
Step 2: Add A Channel Mixer Adjustment Layer
Now that we've seen what it is we'll be mixing together, let's add our Channel Mixer. Click on the New Adjustment Layer icon at the bottom of the Layers palette and select Channel Mixer from the list:

Step 3: Select The Monochrome Option
If you're using Photoshop CS4 as I am here, the options and controls for the Channel Mixer adjustment layer will appear in the Adjustments Panel, new in CS4. For users of Photoshop CS3 and earlier, the Channel Mixer dialog box will appear on your screen.
In a moment, we'll use the Channel Mixer to mix our three color channels together, but before we do, since we're using the Channel Mixer to create a black and white version of the image, select the Monochrome option. This will convert the image to black and white in the document window, and if you look at the Output Channel option in the Channel Mixer dialog box, you'll see that we're now creating a custom Gray channel (depending on which version of Photoshop you're using, the Monochrome option may be located near the bottom of the Channel Mixer dialog box rather than at the top as it appears in the screenshot):

Step 4: Adjust The Percentages For The Red, Green And Blue Channels
In the center of the Channel Mixer are the controls that allow us to adjust how much of each channel is being used to create the black and white version we see in the document window. By default, Photoshop combines 40% of the Red channel, 40% of the Green channel and 20% of the Blue channel to create the initial black and white version of the image:

The reason why the Red and Green channels are given preference over the Blue channel is because of how our eyes work, with reds and greens being easier for us to see than blues. Here's what my image looks like with the default values:

To increase or decrease the percentage amount for a specific channel, simply click on the channel's slider and drag it left or right. Dragging the slider towards the right will increase the amount while dragging it towards the left will decrease it. For example, if I want to brighten the skin tone of the three people in my photo, I know from having first examined my three channels that the people appeared lighter in the Red channel, so I'll add more of the Red channel to my black and white version by dragging its slider towards the right:

You can also adjust the channels by clicking directly inside their input boxes and increasing or decreasing the values with the Up and Down arrow keys on your keyboard, which will increase or decrease the value in 1% increments. Holding down your Shift key while pressing the Up or Down arrow keys will increase or decrease the value in 10% increments. This gives us a more accurate way of adjusting the percentages since dragging the sliders can be a little clumsy.
The 100% Rule
The general rule when adjusting the amounts for each channel is that you want to keep the total amount of all three channels equaling 100% so that the overall brightness level of the image is the same in the final result as it was when you started. If you go beyond 100%, it means there's a good chance you're losing some of your highlight detail by forcing the lightest areas of the image to pure white. Anything less than 100% means your image is now darker than it was originally. In Photoshop CS3, Adobe added a great new feature to the Channel Mixer so that it keeps track of the total amount for us as we adjust the channels. Since the default values of 40%, 40% and 20% add up to 100%, we can see that by increasing the percentage of the Red channel, I've now increased the total amount of all three channels beyond 100%. Photoshop even displays a small warning icon letting me know that I've gone too far:

If I look at my image in the document window, I can see that sure enough, even though the people now appear brighter, there's quite a few areas where the highlights have been completely blown out, leaving nothing but patches of pure white in their place: 
It's a good idea to keep your Histogram palette open on your screen as you're adjusting the individual channel values. You'll find the Histogram palette grouped in between the Navigator and Info palettes. If you notice a spike appearing on the right edge of the histogram, it means you're losing highlight detail in the image. To correct the problem, either lower the percentage of the channel you just increased or lower one of the other channels to compensate for it:

Don't be afraid to make drastic changes to the sliders at first just to see what sort of effect each channel has on the black and white result. Since we're using an adjustment layer, nothing we do to the image is permanent. The original photo remains safe and unharmed on the Background layer in the Layers palette. Once you have a good idea how each channel is affecting the brightness and detail levels in the image, fine-tune the percentage amounts of each channel until you have the results you want while keeping the total amount of all three channels as close to 100% as possible.
After experimenting with the sliders and judging the results in the document window, I've decided to knock my Red channel down to 45%. The Red channel is definitely the lightest of the three but it also offers the least amount of image detail, which was causing my black and white version to appear washed out. To darken the background which is made up mostly of trees, I've lowered the Green channel down to 10%. The Blue channel may be the darkest of the three but it contains quite a bit of image detail (our eyes are much more sensitive to detail in the shadows than in the highlights), so I've raised the Blue channel to 45%, which brings my total amount of all three channels to 100%. Keep in mind of course that the values you choose for your image may be completely different from mine:

Here's my final black and white result after mixing all three channels together with the Channel Mixer:

The Channel Mixer is more than capable of giving us professional-level, custom black and white conversions, but it does have its drawbacks. It can be confusing if you don't fully understand how color channels work, and it forces us to think like Photoshop. Wouldn't it be great if there was a way to create custom black and white versions of our photos that was still as easy as dragging sliders back and forth but without having to understand all this "primary colors of light" stuff?
Good news, there is! In fact, there's not one but two ways to do it! We'll look at the first way as we take our second and more advanced look at the Hue/Saturation adjustment next!