
Seeing The Difference With JPEG Compression In Photoshop
It's a fact of life when it comes to working with digital photos and images. Sometimes, we need to compress them to make our file sizes smaller, especially if we're emailing them to a client or to family members, or posting them on a website.
Since the jpeg file format is still the format of choice for digital photos, even though it's been around for more than 15 years, compressing images usually means using jpeg compression, which does a great job of reducing the file size. Unfortunately, it also reduces image quality, although it's not always easy to see what sort of negative impact the compression is having on the image, especially when viewing it on a computer monitor. But thanks to Photoshop and one of its rarely-used blending modes, the horrors of jpeg compression become strikingly clear.
To see exactly what's happening to our images, we'll use Photoshop's Difference layer blend mode. The Difference blend mode gets its name from the fact that it looks for differences between two layers. Any areas in both layers that are exactly the same appear as pure black, while areas that are different in some way appear as strange colors. The Difference blend mode isn't used very often outside of the special effects world, but it does a great job of showing us how much garbage (yes, I said garbage) we're adding to our jpeg images when we compress them. Now, this isn't to say that we all need to stop compressing our photos. In a perfect world, sure, but that's just not realistic. It does help, though, for us to see and understand what's happening to our images, especially for those of us who, up until now, have been convinced there's no difference in image quality between a compressed and uncompressed digital photo.
Here, I have two document windows open in Photoshop, each one containing what appears to be the same image:
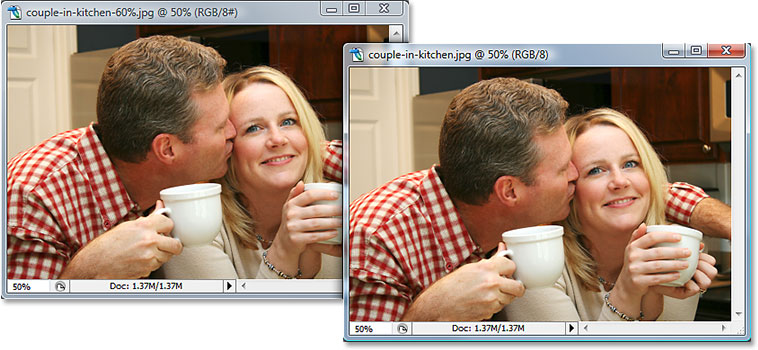
But are they really the same image? Appearances can be deceiving, especially on a computer screen. The truth is, they're not the same. The one on the right is the original, uncompressed photo, as if it was downloaded directly from a digital camera. The one on the left is a copy of the photo saved in Photoshop at 60% image quality, which is a fairly typical setting. This means that the image on the left has been compressed.
I realize it's a little difficult to tell in the screenshot above, but if you were to look at both of these images on my screen in Photoshop, you'd have trouble telling which one is compressed and which one isn't. If we were to print them, the differences would become clear, but on a computer screen, which has a much lower resolution than a printed image would have, the differences are not so easy to spot. At least, not without using Photoshop's Difference blend mode to help us out.
I said a moment ago that the Difference blend mode looks for differences between two layers, and that any areas between the two layers that are exactly the same appear as pure black. Let's put this to the test. I'm going to select my original, uncompressed photo, and I'm going to duplicate its Background layer in the Layers palette by pressing Ctrl+J (Win) / Command+J (Mac). I now have two layers in the Layers palette - the original Background layer on the bottom and a copy of the Background layer, which Photoshop has named "Layer 1", above it:

Since "Layer 1" is a copy of the Background layer, both layers should be identical. We can use the Difference blend mode to prove that they are. I'm going to go up to the blend mode option at the top of the Layers palette and change the blend mode for "Layer 1" from "Normal" to Difference:

With "Layer 1" set to the Difference blend mode, if I look at the image in the document window, I see that the entire image is now filled with solid black, which is the Difference blend mode's way of telling me that both layers are in fact identical:

Let's take things even further to be absolutely certain that all we're seeing now in the image is nothing but pure black. To do that, we'll use a Levels adjustment layer. I'm going to click on the New Adjustment Layer icon at the bottom of the Layers palette:
Then I'll choose Levels from the list of adjustment layers that appears:

This brings up the Levels dialog box. I can use the Histogram in the center of the dialog box to see exactly what tonal information is being displayed in my image. If every single pixel in the image is displaying pure black, which should be the case if both of my layers are identical, then all I should see in my Histogram is a single vertical bar on the far left, which just happens to be exactly what I'm seeing:

The Histogram confirms that there are currently no other colors being displayed in my image except pure black, which means that "Layer 1" and the Background layer are 100% identical. So far, so good. We've now proven what most of us already knew, that when we make a copy of a layer, the copy is identical in every way to the original. Exciting stuff, right? Let's move on.
I'm going to click the Cancel button in the top right corner of the Levels dialog box to exit out of it for now, and I'm going to delete "Layer 1" from my Layers palette by clicking on it and dragging it down on to the trash bin icon:

I'm now left with just my original Background layer once again:

Now let's see what happens when we use the exact same method to compare the uncompressed version of the photo with the compressed version of it. As I mentioned, it's not easy to see any differences between them simply by looking at them on the computer screen, but let's find out what the Difference blend mode has to say about it. With each version of my photo open in its own document window, I'm going to click inside the compressed version's document window (the one on the left) with my Move Tool and drag the image into the uncompressed version's document window (the one on the right):

Since both images have exactly the same pixel dimensions (width and height), I'm going to hold down my Shift key and then release my mouse button, which will align the two images perfectly inside the document window:

If I look in my Layers palette, I can see that I now have two layers once again. The uncompressed version of the image is on the Background layer, and the version that was saved at 60% image quality is now above it on "Layer 1":

I'm going to once again change the blend mode of "Layer 1" from "Normal" to "Difference":
And now, with the blend mode of "Layer 1" set to "Difference", if there truly is no difference between the compressed and uncompressed versions of the photo, I should be seeing nothing but pure black when I look at my image in the document window:

Hmm. Can you see all that faint noise in the image above? It will depend on how you have your monitor set up. You may just be seeing black, but I can see on my screen that it's definitely not pure black like it was before when we were comparing the Background layer with an identical copy of it. There's something else there, and that "something else" is telling us that the compressed and uncompressed versions of the photo are not the same. But just how different are they? Does jpeg compression really make that much of a difference?
Let's use a Levels adjustment layer once again and let the Histogram answer that question for us. I'll click on the New Adjustment Layer icon at the bottom of the Layers palette and choose Levels from the list:

This again opens the Levels dialog box. Recall from last time that the Histogram displayed a single vertical bar on the far left, which told us that there was absolutely nothing else in our image except pure black. This time, we're seeing something a bit different:

There seems to be a lot more going on this time on the far left of the Histogram, which confirms that my eyes weren't playing tricks on me. There's definitely something else there in the image. The single vertical bar has been replaced by a larger area of black, which means the image itself now contains more than just pure black, and that means there's areas in the two versions of the photo that are no longer identical.
So what's different about them? Simple - garbage. By compressing one version of the image, we've taken the pure, untouched image information and added a whole lot of garbage to it. Noise, junk, call it what you like. The bottom line is, we've damaged the photo. How much garbage did the jpeg compression add? It may not look like much just yet, and it's still hard to see in the image itself, so I'm going to click on the small, white slider on the bottom right of the Histogram and drag it all the way over to the left until it's under the spot where the black slope begins:

Without getting into a lengthy discussion of how the Levels dialog box works, what I've just done is taken all that faint noise in the image and made it much brighter so we can see it more easily. Remember, any strange colors you see represent areas that are different between the original, uncompressed version of the photo and the version that was saved with jpeg compression:

Not a pretty sight, is it? Now that we can see things more easily, all of those weird colors represent all the damage we've done to the image by compressing it. The image is now filled with what are commonly referred to as "compression artifacts", which is just a fancy way of saying "we took your perfectly good image information and messed it all up". Compressing a jpeg image can greatly reduce your file size, but as the Difference blend mode is showing us, it can also greatly reduce image quality. Again, it's not always easy to see how much damage your image has suffered by looking at it on your computer screen, but you'll definitely notice the difference when printing in high resolution.
So now that we've seen how much damage we can do to a digital photo by compressing it, what can we do about it? Unfortunately, not much. The jpeg format is still your best bet for saving digital photos, and when file size is an issue, we really have no choice but to compress them. If you're working on a project for the web, you can usually get away with quite a bit of compression before image quality becomes an issue, but if your project is going to print, you'll want to use the original, uncompressed images whenever possible. And there we have it!