
Inverted Colors Photo Effect With Photoshop
In this Photoshop Effects tutorial, we're going to look at how to invert the colors in an image to create interesting photo effects.
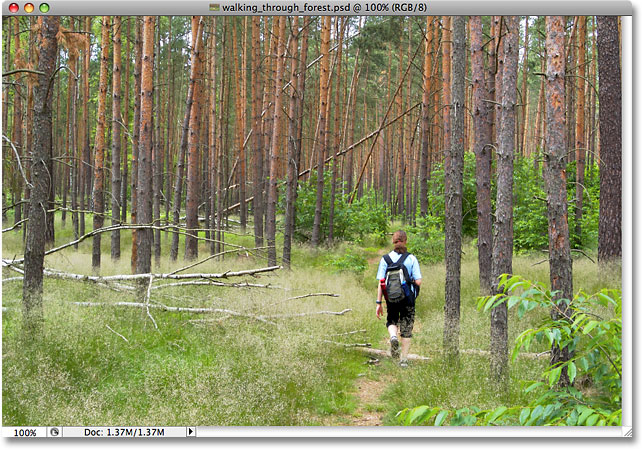
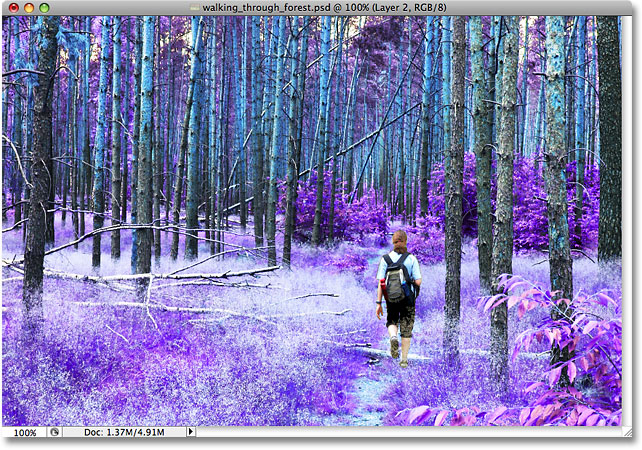
Most people would agree that taking a stroll through the forest can be very calming and peaceful, with all of its natural green and brown colors. But who says forests have to be green and brown? Certainly no one with a copy of Photoshop. We can have any colors we want in our images, and in this tutorial, we'll see how easy it is to flip nature upside down and invert its colors, creating a strange, even mystical appearance.
Here's the photo I'll be starting with:
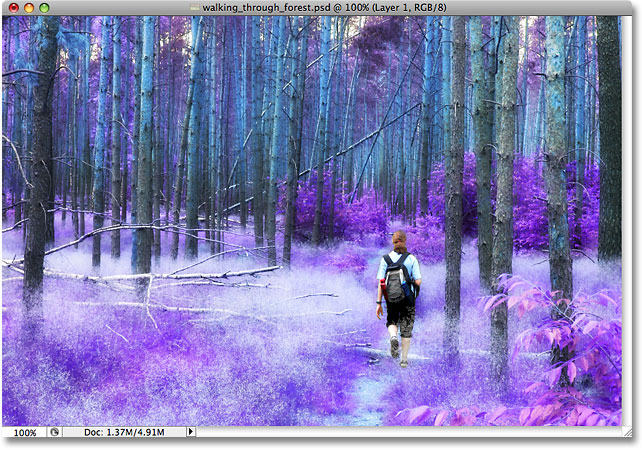
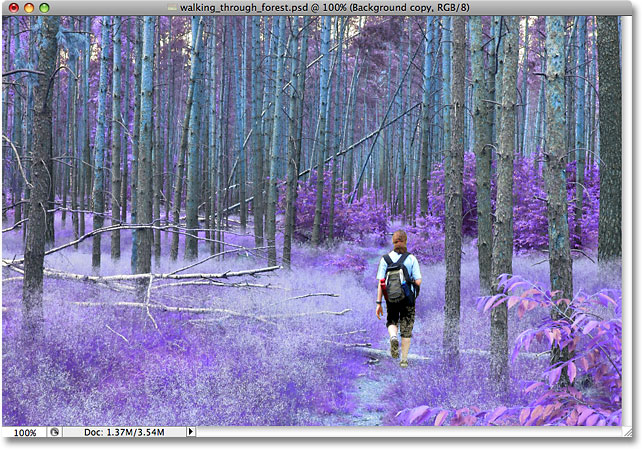
And here's the finished "inverted colors" effect:
This tutorial is from our Photo Effects series. Let's get started!
Step 1: Select Any People In The Image And Place Them On A Separate Layer
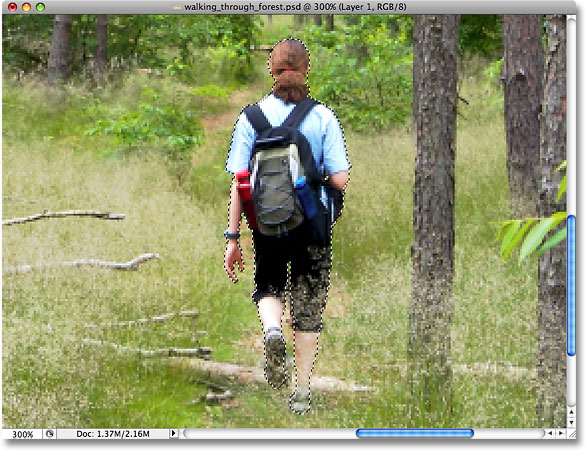
In my image, there's a young guy strolling along through the forest. I'm going to be inverting the colors in the forest, but I want him to keep his original colors, which means I'll need to select him and place him on his own layer. To do that, I'll grab the Lasso Tool from the Tools palette:
Then, with the Lasso Tool selected, I'll draw a selection outline around him:
Once I have him selected, I'll go up to the Layer menu at the top of the screen, choose New, and then choose Layer via Copy, or I could simply use the keyboard shortcut Ctrl+J (Win) / Command+J (Mac):
Either way tells Photoshop to copy my selected area of the photo on to its own layer, and we can see in the Layers palette that the guy now appears on his own layer directly above the Background layer. Photoshop has automatically named the new layer "Layer 1":
Step 2: Duplicate The Background Layer
Next, we need to duplicate our Background layer. Since we currently have "Layer 1" selected, we'll need to select the Background layer by clicking on it in the Layers palette. You can tell which layer is selected because the currently selected layer is always highlighted in blue:
Then, to duplicate the Background layer, I'll use the same method we used a moment ago to copy the selection to a new layer. But this time, rather than going up to the Layer menu, choosing New and then choosing Layer via Copy, I'll simply use the faster keyboard shortcut Ctrl+J (Win) / Command+J (Mac). When you have something on a layer selected as we did earlier, Photoshop copies only the selected area to a new layer. When nothing on the layer is selected, Photoshop considers everything on the layer to be selected and copies the entire layer to a new layer directly above the original. We can see in the Layers palette that a copy of the Background layer now sits between the original Background layer and "Layer 1":
Step 3: Invert The Background Copy Layer
To invert the colors in the image, with the copy of the Background layer selected, I'll go up to the Image menu at the top of the screen, choose Adjustments, and then choose Invert:
This inverts all of the colors on the layer, making each color its exact opposite color, replacing the greens and browns with magentas and blues. Notice that the person in the image has kept his original colors, and that's because he's sitting on his own layer above the layer that we just inverted:

Step 4: Change The Blend Mode Of The Inverted Layer To "Color"
Unfortunately, inverting the image not only inverts the colors, it also inverts the luminosity (lightness) values, making light areas dark and dark areas light. All I want to do is change the colors while leaving the brightness values alone, so to do that, with the inverted layer still selected, I'll go up to the Blend Mode options at the top of the Layers palette and change the blend mode from "Normal" to Color:
The Color blend mode restores the original brightness values in the image, leaving only the colors inverted:
The basic effect is now complete, but I'm going to add a bit more of a mystical look to the image to finish it off.
Step 5: Merge All Three Layers Onto A New Layer Above The Inverted Layer
I need to merge all four layers on to a new layer, but I want to keep the existing layers intact. Photoshop offers us a command called Merge Visible, which we would normally access by going up to the Layer menu at the top of the screen and choosing Merge Visible from the list of options. The problem is, by default, the Merge Visible command essentially flattens the image, combining the separate layers into a single layer, and that's not what I want to do. I want to merge the layers on to a new layer while keeping all of my separate layers in place. To do that, all I need to do is press my Alt (Win) / Option (Mac) key, then, while still holding the key down, I'll go up to the Layer menu and choose Merge Visible:
Adding the Alt (Win) / Option (Mac) key while selecting the Merge Visible command is what tells Photoshop to keep the separate layers in place, and we can see in the Layers palette that all three layers have been merged on to a new layer, which Photoshop has named "Layer 2". By default, Photoshop places new layers directly above whichever layer was selected. Since I had the copy of the Background layer selected, the new merged layer appears directly above it:
Step 6: Change The Blend Mode Of The Merged Layer To Overlay
I'm going to use the merged layer to add a soft, mystical glow to the forest. Creating the glow is easy and requires nothing more than the Gaussian Blur filter and a layer blend mode. First, I'll select the blend mode, which will make it easier to see how much blurring I need to apply in the next step. With the merged layer selected, I'll go up to the Blend Mode option once again at the top of the Layers palette and I'll change the blend mode from "Normal" to Overlay:

More detailed information about the Overlay blend mode can be found in our Five Essential Blend Modes For Photo Editing tutorial in the Photo Editing section of the website, but essentially, the Overlay blend mode boosts contrast in the image by making light areas even lighter and dark areas even darker, and we can see by looking at the image that the forest now has much more contrast to it:
Step 7: Apply The Gaussian Blur Filter
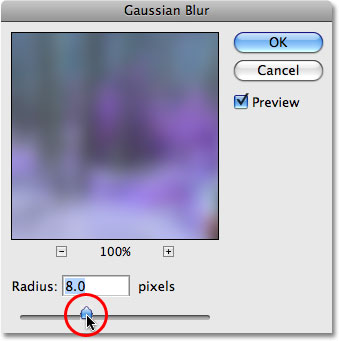
With the blend mode set to Overlay, we're ready to apply some blurring to the layer. I'll go up to the Filter menu at the top of the screen, choose Blur, and then choose Gaussian Blur:
This brings up the Gaussian Blur dialog box. To adjust the amount of blurring, simply click on the slider at the bottom of the dialog box and drag it towards the right for more blurring or towards the left for less blurring. You'll want to keep an eye on your image as you drag the slider and adjust the effect until you're happy with the results. I'm using a fairly low resolution image for this tutorial, so for me, a Radius value of around 8 pixels seems to work well. You may want to use a higher setting for higher resolution images:
I'll click OK to exit out of the Gaussian Blur dialog box, and we're done! If you find that the blurring effect is too intense, an easy way to reduce it is to simply go up to the Opacity setting at the top of the Layers palette (directly across from the Blend Mode option) and lower the opacity to fine-tune the effect. In my case, since I'm going for more of a mystical look, I'm happy with the results so I'll leave my opacity setting at it's default 100%.
Here is my final "inverted colors" photo effect:
And there we have it! That's how to create an inverted colors photo effect with Photoshop! Visit our Photo Effects section for more Photoshop effects tutorials!