
Cropping Images In Adobe Camera Raw 8
In this tutorial, we'll learn how to crop photos non-destructively using Adobe Camera Raw. We'll be looking specifically at Camera Raw 8, part of the newly released Photoshop CC (Creative Cloud). Camera Raw 8 is also available as a free update for Photoshop CS6 users, and while the CS6 version is missing some newer features exclusive to Photoshop CC, the steps for cropping images in Camera Raw are the same regardless of which of these two versions of Photoshop you're using.
As we've learned in previous tutorials, one of Camera Raw's main advantages over Photoshop is that it's a parametric-based image editor, as opposed to Photoshop which is a pixel-based editor. Photoshop makes permanent changes to the pixels in an image, while Camera Raw uses nothing but a series of instructions to display a live preview on your screen of what the image currently looks like based on those instructions.
When we make changes to the image using any of Camera Raw's tools or panels, Camera Raw updates the instructions as well as the live preview. This makes working in Camera Raw both flexible and non-destructive because it gives us the freedom to go back and make any changes we want as often as we want without ever harming a single pixel in the original image. As we're about to see, this freedom and flexibility even extends to Camera Raw's Crop Tool so we never have to worry about losing any areas of the image we've cropped away.
Where does cropping the image fit within a good editing workflow? Technically, you can crop your image at any time, especially in Camera Raw where everything we do is non-destructive. However, many people prefer to crop the photo as the first step, before worrying about setting the white balance, exposure, and so on. This way, as you're processing the image, you can focus on the area you plan on keeping without any of the surrounding, unwanted area getting in the way.
Let's start by opening an image. Here, I've used Adobe Bridge to navigate to a folder on my desktop containing a few photos. Each of these images was saved as a JPEG file, one of three file types that Camera Raw supports (Raw, JPEG and TIFF). I'll open the first one on the left in Camera Raw. To do that, I'll click on its image thumbnail once (in Bridge) to select and highlight it:
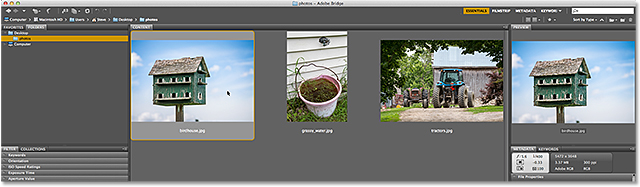
Then, with the image selected, I'll click the Open in Camera Raw icon at the top of the Bridge interface:

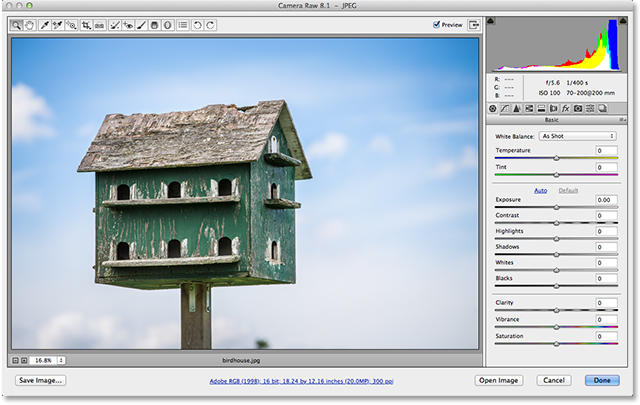
This opens the image inside the Camera Raw dialog box:
Related Reading: How To Open Raw, JPEG and TIFF Files In Camera Raw
Selecting The Crop Tool
To crop photos in Camera Raw, we use the Crop Tool which works in a similar way to Photoshop's own Crop Tool. There's a few ways to select the Crop Tool in Camera Raw. The quickest way is to simply press the letter C on your keyboard to select it with the shortcut. Another is to click on the Crop Tool icon in the toolbar along the top left of the Camera Raw dialog box. However, I don't recommend either of these ways for selecting the Crop Tool, at least not initially, because you're missing out on some useful and important options.
If you look in the bottom right corner of the Crop Tool icon, you'll see a small down-pointing arrow. This tells us that there are additional options available for the tool:
Rather than simply clicking on the icon, click on it and continue holding your mouse button down for a second or so. This will open a menu displaying various options for the Crop Tool, including some handy preset aspect ratios at the top that we can choose from. At the very top of the menu is an option called Normal which is the default mode for the Crop Tool. I'll select it from the list:

In Normal mode, we can freely crop the image any way we want. All we need to do is drag out an initial crop box, then resize and reshape it as needed. Click somewhere in the image to set a starting point for the crop box, then with your mouse button still held down, drag diagonally outward from that point. As you drag, you'll see your crop box appearing as a selection outline. When you release your mouse button, the actual crop box appears. The area outside the box (the grayed out area) is what will be cropped away. The area on the inside is what you'll keep:

Some Quick Tips
If you want to force your initial crop box into a perfect square, press and hold the Shift key on your keyboard as you're dragging. Make sure you release your mouse button first when you're done, then release the Shift key. Also, you can draw the crop box out from its center, rather than from a corner, by pressing and holding the Alt (Win) / Option (Mac) key on your keyboard as you drag. Again, make sure you release your mouse button first when you're done, then release the Alt / Option key. To draw a perfect square from its center, press and hold Shift+Alt (Win) / Shift+Option (Mac) as you drag. Finally, you can reposition the crop box inside the image as you're drawing it by pressing and holding your Spacebar. Drag the crop box into position, then release your Spacebar and continue dragging:

Resizing The Crop Box
Once you've drawn your initial crop box, you can easily resize it by clicking and dragging any of the handles (the little squares) located around it. Since we're working in Normal mode, you'll find a handle in the top center, bottom center, left center and right center, as well as one in each of the four corners. Any or all of these handles can be used to resize and reshape it as needed:

Moving The Crop Box
As I mentioned, you can reposition the crop box as you're drawing it by pressing and holding your Spacebar as you drag, then releasing your Spacebar to continue drawing. You can also move the crop box around inside the image after you've drawn it. Just position your mouse cursor anywhere inside the crop box, then click and, with your mouse button held down, drag the crop box around with your mouse:

Turning On The Overlay
If you need a little help with your composition, click and hold once again on the Crop Tool icon at the top of the Camera Raw dialog box. When the menu appears, choose Show Overlay from the list:

Camera Raw will display a 3x3 grid inside the crop box, with the idea being that if you place your main subject at or near one of the spots where the grid lines intersect (as opposed to placing it in the dead center of the image), you'll add more interest to the photo. This common design trick is known as the Rule of Thirds, although it's definitely more of a general guideline than an actual rule and may or may not be useful with your specific image:

Rotating The Crop Box
We can also rotate the crop box, either to straighten a crooked image or again simply to add more visual interest. To rotate it, position your mouse cursor anywhere outside the crop box. When you see your cursor change into a curved, double-sided arrow, click and with your mouse button still held down, drag your mouse to rotate it. If you have the Show Overlay option turned on in the Crop Tool's menu, Camera Raw will display a different grid as you're rotating, this one designed to help straighten a crooked image. Simply align the grid lines with something that should be straight, either vertically or horizontally. If you find the grid too distracting, you can turn it off by unchecking the Show Overlay option:

Cropping To A Specific Aspect Ratio
What if you need to crop the image to a specific aspect ratio? The Crop Tool in Camera Raw gives us several aspect ratio presets to choose from. Just click and hold on the Crop Tool icon, then choose a preset from the menu. Some of the more popular ones, like 4x6 and 8x10, may not be immediately obvious. The 4x6 aspect ratio is listed as 2 to 3, while the 8x10 ratio shows up as 4 to 5:

If you've already drawn your crop box, it will instantly snap to the newly chosen aspect ratio, and you can change aspect ratios at any time. Here I've chosen the 2 to 3 ratio. You'll notice, though, that when working with specific aspect ratios, the resizing handles on the top, bottom, left and right of the crop box disappear. Only the corner handles remain, and as you drag one of the corner handles to resize the box, the aspect ratio will remain locked in place:

Setting A Custom Aspect Ratio
If none of the preset aspect ratios are what you need, you can set your own by choosing Custom from the Crop Tool menu:

This will pop open the Custom Crop dialog box where you can enter in your own custom aspect ratio. I'll enter something random like 3 to 5, just as an example. Click OK when you're done to accept it:

Again, if you've already drawn your crop box, it will instantly snap to the new ratio. One nice feature is that Camera Raw will remember your custom aspect ratio and add it to the Crop Tool's menu, so if you need to choose it on a regular basis, you'll be able to easily select it just like any of the other presets:

Accepting The Crop
To accept the crop, you can either press the Enter (Win) / Return (Mac) key on your keyboard, or you can double-click anywhere inside the crop box with your mouse:

Bringing Back The Crop Box
As I mentioned at the beginning of the tutorial, everything we do in Camera Raw is non-destructive, and that includes cropping the image. Even though we've accepted the crop and the unwanted area has disappeared from view in Camera Raw's preview area, nothing has actually been deleted. The entire original image, including the part that was cropped away, is still there, which means we can go back and change our crop at any time. To quickly bring back the crop box, as well as the area that was cropped away, simply select the Crop Tool once again, either by clicking the Crop Tool icon at the top of the dialog box or by pressing the letter C on your keyboard. The crop box, as well as the entire image, re-appears in the preview area so you can make whatever changes you need:

Cancel The Crop
If you need to cancel the crop, you can either choose Clear Crop from the Crop Tool menu, or press the Esc key on your keyboard. This will clear the crop box and restore the entire original image:

Closing Out Of Camera Raw
If you're done cropping the image and don't need to do any more work on it for now, click the Done button in the bottom right corner of the dialog box to accept your settings and close out of Camera Raw:

One last thing before we finish up this tutorial. I'm going to switch back over to Adobe Bridge for a moment so we can take another quick look at my image thumbnail. If we look in the top right corner, we can now see a small crop icon. This icon lets us know that the image has been cropped in Camera Raw (Bridge even updates the image thumbnail to show the cropped version of the photo). You can re-open the image in Camera Raw at any time and choose the Crop Tool to re-edit the crop, or even to cancel the crop entirely and restore the original photo:
And there we have it! That's the essentials of cropping images non-destructively in Adobe Camera Raw 8, part of Photoshop CC and available as a free update for Photoshop CS6! Check out our Photo Retouching section for more Photoshop image editing tutorials!