
Adding A Brightness/Contrast Adjustment Layer In Photoshop
In the previous tutorial in this series on tone and color correction in Photoshop, we learned all about the Brightness/Contrast image adjustment and how it can quickly and easily improve the overall brightness and contrast of an image.
Unlike the fully automatic Auto Tone, Auto Contrast and Auto Color commands that we looked at in the beginning of this series which offer no way to adjust or fine-tune the results after applying them, the Brightness/Contrast command gives us manual control over our settings with easy to use, independent Brightness and Contrast sliders.
There's two ways that we can apply Photoshop's Brightness/Contrast command; one is as a static adjustment, the other is as an adjustment layer. We covered how to apply it as a static adjustment in the previous tutorial. The problem with static adjustments, though, is that they make permanent changes to the pixels in our image which makes it tough to go back and re-edit things later. This type of workflow is known as destructive editing and is something we should always try to avoid. A better way to work is by using non-destructive methods to accomplish the same things, and one of the best ways to do that is by taking advantage of adjustment layers. So in this tutorial, we'll learn how to easily apply the Brightness/Contrast command not as a static adjustment but as a flexible and fully-editable adjustment layer!
Since I covered everything about how the Brightness/Contrast command works in the previous tutorial, I'll be moving a bit more quickly here so we can focus more on how to apply it as an adjustment layer. If you're not familiar with the Brightness/Contrast command, I highly recommend reading through our Applying A Brightness/Contrast Image Adjustment In Photoshop tutorial first before you continue. As with all tutorials in this series, I'm using Photoshop CC (Creative Cloud) but everything is fully compatible with Photoshop CS6 as well.
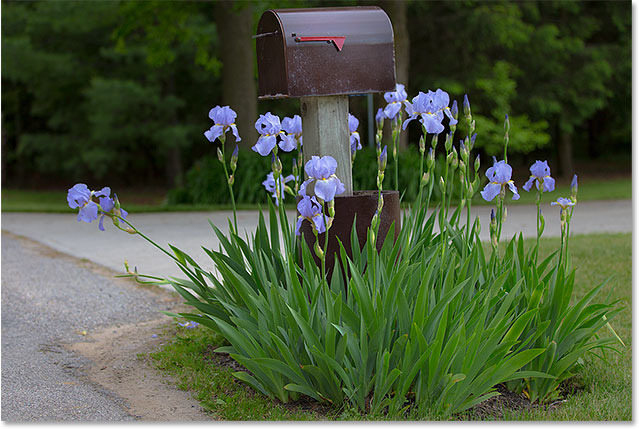
Here's an image I currently have open in Photoshop. It's not bad, but it definitely needs a boost in brightness and contrast. Let's see how a Brightness/Contrast adjustment layer can improve it, and how it can do so without permanently changing a single pixel in the image:
Step 1: Add A Brightness/Contrast Adjustment Layer
Back when we were learning how to apply Brightness/Contrast as a static adjustment, the first thing we needed to do was make a copy of our image and place it on a new layer. That way, we could apply the adjustment without harming the original image. With adjustment layers, there's no need to do that because they're completely non-destructive. All we need to do is add one, and there's a few ways to do it. One is by going up to the Layer menu in the Menu Bar along the top of the screen, choosing New Adjustment Layer, then choosing Brightness/Contrast:

Another way is by clicking on the Brightness/Contrast icon in Photoshop's Adjustments panel. It's the first icon on the left, top row (the name of each adjustment layer will appear as you hover your mouse cursor over the icons):

If you're not seeing the Adjustments panel on your screen, go up to the Window menu where you'll find a list of all the panels available in Photoshop, then choose Adjustments. A checkmark next to the name means the panel is currently open, so you may just need to look for it (by default, it's nested in with the Styles panel, or as of CC 2014, with the Styles and Libraries panels). If you don't see a checkmark, select the Adjustments panel to open it:

The third way of adding a Brightness/Contrast adjustment layer, and the one I tend to use the most, is by clicking on the New Fill or Adjustment Layer icon at the bottom of the Layers panel:
Then choosing Brightness/Contrast from the list:

Nothing will happen to the image just yet, but a new Brightness/Contrast adjustment layer appears above the image in the Layers panel:

Step 2: Click The Auto Button
When we applied Brightness/Contrast as a static adjustment, the options and controls for it opened in a separate dialog box. With adjustment layers, they appear in the Properties panel which was added to Photoshop in CS6. Here, we see the same Brightness and Contrast sliders, the Auto button and the Use Legacy option, all of which we covered in detail in the previous tutorial:
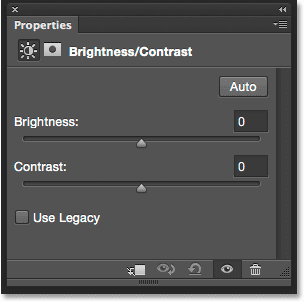
Just as before, the first thing we'll usually want to do is click the Auto button, which lets Photoshop compare your image with similar images from other professional photographers as it tries to figure out the ideal brightness and contrast settings:

In my case, Photoshop decided to set the Brightness to 54 and the Contrast to 66. Of course, each image is unique so if you're following along with your own photo, chances are these values will be different:

Here's my image with the Auto settings applied:

Step 3: Adjust The Brightness And Contrast Sliders
If you think your image could still look better after trying the Auto button, you can make further adjustments using the Brightness and Contrast sliders. Dragging a slider to the right increases brightness or contrast. Drag to the left to decrease brightness or contrast.
I like what Photoshop came up with for the most part, but I think I'll lower the Brightness value a bit, down to maybe 45 or so, and I'll increase the Contrast to 75. Again, this is just my own personal preference with this specific image. You'll want to keep an eye on your photo in the document as you drag the sliders to come up with the settings that work best for you:

Here's my photo after making my own manual adjustments. For comparison, the original, untouched version is on the left. The adjusted version is on the right:

The "Use Legacy" Option
Just as with the static version of the Brightness/Contrast command, the adjustment layer version includes a Use Legacy option which tells the Brightness/Contrast command to behave the way it did prior to Photoshop CS3. I won't spend a lot of time on it here because I covered it in detail in the previous tutorial, but just as a quick refresher (and for anyone who hasn't yet read the previous tutorial), I'll click inside its checkbox to select it (it's turned off by default):

Use Legacy tells the Brightness/Contrast command to behave the way it did prior to Photoshop CS3, when Adobe made major improvements to it. Back then (in CS2 and earlier), the only thing Brightness/Contrast did really well was destroy your image. As a quick example, with Use Legacy turned on, I'll drag both the Brightness and Contrast sliders all the way to the right, increasing both to their maximum value. This results in a completely blown out image (with strange color artifacts). That's because all Photoshop did was push the pixels in the image to extremes, sending the lighter tones to pure white and the darker tones to pure black:

By comparison, the same increase in Brightness and Contrast results in an image that, while definitely too bright, still retains most of its detail when the Use Legacy option is left off:

Likewise, if I turn Use Legacy back on and drag the Brightness and Contrast sliders all the way to the left, decreasing them to their minimum values, I get an image that's not simply too dark; it has no detail remaining at all:

With Use Legacy off, the same decrease in Brightness and Contrast still keeps most of the image detail intact. There's no reason to enable the Use Legacy option these days (except in cases like this where you just want to compare the old version of Brightness/Contrast with how much better it works today). It's turned off by default, and it's best to just leave it off:

Comparing The Original And Adjusted Versions Of Your Image
Something you may have noticed is that the Properties panel does not have the same Preview option that we saw with the static version of Brightness/Contrast. The Preview option allowed us to temporarily hide our adjustments in the document so we could view our original image. Does that mean we can't do that with an adjustment layer? Nope! It just means there's no actual Preview option, but there's still an easy way to do it. Simply click the layer visibility icon at the bottom of the Properties panel to toggle the Brightness/Contrast adjustment layer on and off:
With it off, you'll see your original image once again in the document:
Click the same visibility icon again to turn the adjustment layer back on and view the image with your Brightness and Contrast settings applied. This makes it easy to compare the two versions to make sure you're on the right track:

If that little eyeball icon in the Properties panel looks familiar, that's because it's the same visibility icon that's found in the Layers panel, and they both do the same thing. Clicking either one toggles the adjustment layer on and off:
Resetting The Brightness/Contrast Settings
At any time, you can reset both the Brightness and Contrast sliders back to their default value of 0 by clicking the Reset icon at the bottom of the Properties panel:
Re-Editing The Brightness And Contrast Settings
If we were applying Brightness/Contrast as a static adjustment, we would need to click OK in the dialog box to accept our settings and commit them to the image, at which point the pixels on the layer would be permanently changed. With adjustment layers, there's never a need to do that because they remain forever editable, with no loss in image quality. To show you what I mean, I'll add a second adjustment layer to my document, this time choosing a Vibrance adjustment to boost the colors. To add it, I'll click on its thumbnail in the Adjustments panel:

Notice that by adding this new adjustment layer, my Brightness/Contrast settings in the Properties panel (upper right corner of the screenshot below) have been replaced by the Vibrance settings. Since this isn't a tutorial on how Vibrance works, I'll just quickly increase my Vibrance value to around 30 and the Saturation value to 10:

If I want to go back at this point and re-edit my Brightness/Contrast settings, all I need to do is click on the little thumbnail icon on the Brightness/Contrast layer in the Layers panel:

This selects the Brightness/Contrast adjustment layer and changes the Properties panel back to the Brightness/Contrast settings so I can make whatever changes I need:

And there we have it! That's how to easily improve the overall brightness and contrast of an image, and keep your settings both fully editable and non-destructive, by applying Brightness/Contrast as an adjustment layer in Photoshop! In the next tutorial, we'll learn how to restore hidden detail in the shadows and highlights of an image with Photoshop's powerful Shadows/Highlights image adjustment!